
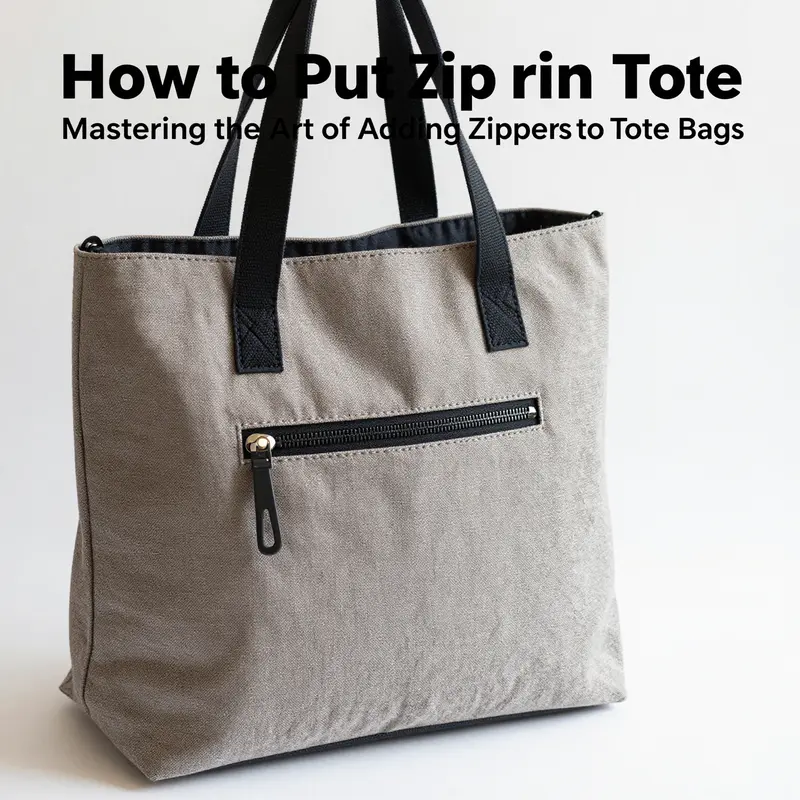
Zippers enhance both functionality and style in tote bags, making them a popular choice among consumers. For business owners in the tote bag industry, mastering the technique of installing zippers can elevate product quality and customer satisfaction. This guide delves into the necessary materials and preparation, details the step-by-step attachment process, and culminates in the final assembly and finishing touches. By understanding these components, manufacturers can ensure that their tote bags not only meet aesthetic standards but also perform well in everyday use.
From Groundwork to Glide: Preparing for a Professional Tote Bag Zipper

The zipper is more than a functional edge on a tote bag; it is the hinge that arms the bag with security, shape, and daily reliability. When you begin with the right materials and a thoughtful plan, what can feel like a daunting, fiddly task becomes a fluid, almost meditative process. The preparation phase is where confidence is built. It is the quiet, exacting work that makes the difference between a tote that simply opens and closes and a tote that endures a season of daily use. In this chapter, we move from the broader idea of a functional opening to the concrete, preparatory steps that lay the groundwork for a smooth zipper installation. We’ll keep the focus on the essentials—selecting the right zipper and fabrics, preparing them with care, and laying out a precise plan that keeps the work tidy and predictable.
To begin, the choice of materials sets the tone for the entire project. For a tote bag that feels sturdy enough to hold everyday items while remaining easy to carry, you want two main fabric pieces for the bag body. These are your front and back panels, typically cut from sturdy cloth such as canvas, denim, or another robust weave. The lining deserves the same careful attention but can be a lighter, smoother fabric, since it serves as the interior surface where your hand will travel and where the zipper access is created. The length of the zipper is not arbitrary; it should match the width of the bag opening you envision. A common range for a standard tote is a 12- to 18-inch zipper, but the exact measurement should be dictated by your pattern and the final opening you want to achieve. The zipper’s material matters, too. Metal zippers are known for durability and a certain weight that can complement heavier bags, while nylon zippers offer a lighter, gentler glide and are often favored for casual totes. Regardless of the choice, the zipper should be reliable, with smooth teeth and durable tape so that the installation lasts.
Interfacing, while optional, is worth considering. A light-to-medium fusible interfacing applied to the outer pieces adds structure and helps the bag hold its shape, which is especially important when a zipper is installed. Without sufficient structure, the fabric can flop and the zipper glide may feel uneven or catch against a soft edge. If you choose to use interfacing, you should plan for it in advance—iron it onto the wrong side of the outer pieces before you cut or as soon as you have the pieces ready, following the interfacing manufacturer’s directions. The interfacing becomes the backbone of the bag’s frame, allowing the zipper to sit neatly along the opening without warping the fabric during use.
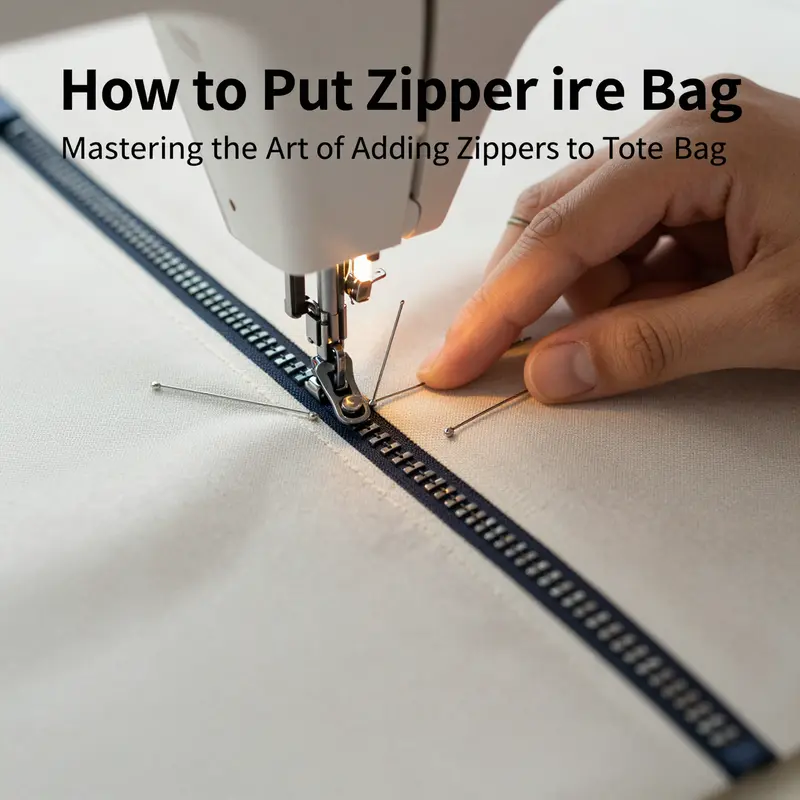
Thread is the faithful thread of the story. A strong, matching thread—often a polyester or all-purpose option—will resist abrasion and maintain a clean topstitch across the zipper tape. The thread’s strength matters more than color mismatches in this stage, since you will need the seam to behave reliably as you sew near the fastener. The sewing machine itself is a partner in this work. A standard machine with a dedicated zipper foot is essential; the foot lets you sew close to the zipper teeth without the fabric garbling or the stitches skipping. If your machine has a walking foot or an edge-stitch setting, those can be a help, but the core tool is always the zipper foot, positioned just beside the teeth for an even, controlled seam.
Pins or clips keep layers aligned during assembly. They prevent shifting as you move from one phase to the next. Scissors for cutting and a rotary cutter for precise trimming are the second pair of hands you’ll rely on, especially when you are adjusting length or trimming the zipper tape. An iron and ironing board are indispensable for smoothing seam lines, pressing fabric to set the interfacing, and pressing the zipper area cleanly before you begin sewing. Precision here pays off later when you turn the bag right-side-out and see a crisp, professional finish around the opening.
With the materials in mind, the preparation steps become a choreography rather than a series of isolated tasks. First, you cut the fabric for the outer shell and the lining to pattern size, making sure to include the seam allowances your pattern prescribes—typically about a half inch (12 millimeters) in many tote patterns. The outer fabric pieces form the visible sides of the bag, while the lining pieces are tucked inside, creating the interior finish. It is a good habit to press all pieces thoroughly before assembly. This removes wrinkles, flattens fibers, and helps the pieces lie flat during construction. A smooth start reduces the likelihood of misalignment once you begin sewing the zipper.
Next comes the careful application of the zipper to the outer fabric and to the lining. The approach described here emphasizes a secure, durable finish: you will first attach the zipper tape to the two lining pieces, creating a dedicated “zipper pocket” within the lining, and then attach the same zipper to the main fabric pieces. The two-layer approach—lining and outer fabric—helps ensure that the zipper is anchored in two planes, reducing the chance of shifting or wear over time. To begin, place the two lining pieces right sides together—the side that will face outward on the inside of the bag. Align the top edge of the zipper with the top edge of the lining. With the teeth facing down and the wrong side of the fabric against the back of the zipper, pin the zipper tape to one lining piece. Using your zipper foot, sew along the edge of the zipper tape to secure it. Repeat this step for the other lining piece. When finished, you have created a “zipper pocket” inside the lining, a discreet and sturdy feature that also helps with the bag’s overall construction integrity.
This stepwise patience continues as you prepare the main fabric pieces. Place the two outer pieces right sides together and align the top edges with the zipper. The zipper teeth should be facing outward, toward the bag’s exterior, while the wrong side of the outer fabric sits against the back of the zipper. Sew along the edge of the zipper tape, securing it to the outer fabric as well. The result is a zipper that is now attached to both main fabric pieces, a key anchor for the bag’s opening. The sequence—first attach to lining, then attach to outer fabric—establishes a robust structure that supports a clean final seam when you assemble the bag.
At this juncture, the bag’s top edges—the outer fabric and the lining—are prepared and connected by the zipper. The next stage involves assembling the bag as a whole, which is where many sewists shift from a technique-driven mindset to a spatial, three-dimensional planning approach. With the main fabric and lining still pinned at the top, you will nest them so that the right sides of the main fabric and the lining face each other, with the zipper sandwiched between the two layers. Sew around the entire perimeter, leaving a small turning gap in the lining, typically around four to five inches, so you can turn the bag right-side-out later. The seam allowance here runs at the standard width—about a half inch in most patterns—and the turning gap gives you enough room to manipulate the corners and edges without tearing fabric.
The turning process is where preparation pays off in tangible form. When you turn the bag right-side-out, you want sharp, square corners that reflect careful pressing. Pushing the corners out with a tool or a blunt implement helps achieve this effect. A thorough press around the entire top edge, including the area around the zipper, gives the bag a crisp, professional look. A final topstitch along the top edge not only reinforces the seam but also gives a polished finish that conceals the inner workings. The last interior seam—the opening in the lining—should be closed by hand-stitching, a small but important detail that keeps the bag’s interior neat and secure.
As you proceed, you will undoubtedly test the zipper’s glide. It should open and close smoothly, without catching or sticking. If the zipper does not perform cleanly, recheck that the zipper teeth are aligned properly with the fabric and that the zipper foot was positioned correctly. The alignment of the top edges is crucial; a misaligned zipper can pull fabric as you zip, which undermines the whole purpose of a clean, functional opening. One of the benefits of the method described here is its durability. By attaching the zipper to both the lining and the outer fabric before assembling the bag, you create anchors that resist distortion as the bag fills and empties with use. If you want to add a final flourish for visual appeal or added security, you can attach a decorative tab or a small button to the end of the zipper pull. This is optional, but it can help with grip and aesthetics, especially if you intend the tote to be carried in environments where the zipper gets a lot of handling.
The preparation stage also invites you to think ahead about the bag’s overall design and function. How will the weight of the items inside influence the zipper area? Will the bag be used for daily commutes, or for weekend trips where it will carry heavier objects like a laptop or textbooks? If you anticipate heavier loads, you might choose a zipper that has a bit more robustness or a tape that can anchor more securely to both fabric layers. If the bag is meant for light carry, a smooth nylon zipper might feel perfectly adequate, providing a gentle glide and a lighter overall feel. Regardless of choice, the critical insight at this stage is to ensure the zipper is sized to the bag’s opening, installed with precision, and supported by fabric structure through interfacing or sturdy interlining where applicable.
As you consider the path from groundwork to glide, it is helpful to remember that this preparation work is not merely a set of mechanical steps. It is an exercise in alignment, balance, and anticipation. You are not only sewing a zipper to fabric; you are shaping the experience of opening, closing, and using a bag day in and day out. The quality of your preparation becomes evident in the bag’s behavior in real life: in how neatly the zipper sits when the bag is filled, how smoothly it runs after months of use, and whether the bag retains its shape once the zipper is in place. A well-prepared tote is a testament to patience and precision, qualities that transform a simple sewing project into a durable, beloved accessory.
In this journey, one resource can offer further context on the broader category of zipper-equipped totes and the variety of approaches you might encounter. For readers who want to explore how other makers approach tote construction with zippers, a dedicated guide on totes with zippers provides a complementary perspective and a sense of how this technique sits within the larger family of bag-building. It can be a useful reference as you refine your own method and decide which details to include in your pattern or practice piece. You can learn more about totes with zippers here: totes bags with zippers.
With materials chosen and the plan in place, you stand at the threshold of a successful zipper installation. The preparation work you’ve completed is the quiet foundation of a robust construction. It ensures that when you proceed to the sewing stage—attaching the zipper, assembling the bag, and finishing the edges—the outcome will not be a rushed improvisation but a coherent, durable design. Your pattern may call for variations—perhaps a different zipper length, or a slightly different method for attaching the zipper to the lining—but the core principle remains: prepare thoroughly, measure precisely, and sew with intent. When you treat the zipper as a central feature rather than a finishing detail, you give the entire bag a professional presence that endures beyond a single season of use.
If you’re revisiting this chapter after reading the preceding sections, you’ll notice how the focus on materials and preparation aligns with the broader aim of the article: to demystify the process of installing a zipper in a tote bag and to give readers a practical, repeatable method. The preparation phase is not a mere preamble; it is the core of craftsmanship that informs every subsequent stitch. As you prepare your own project, keep in mind the practicalities of your fabric choice, your zipper selection, and the pattern’s demands. A thoughtful preparation not only saves time during sewing but also reduces the frustration of adjustments after you have invested your effort. The result is a tote that opens and closes with ease, maintains its shape, and holds up to daily use with a quiet confidence born of careful planning.
In closing, the chain from fabric to zipper to finished bag begins with a deliberate, well-considered preparation. The materials you select—the main fabrics, the lining, the zipper, the interfacing (if used), the thread, and the tools—set the tone for how smoothly the project will proceed. The steps you take to cut, press, interface, and align create a path that reduces ambiguity and builds skill. And the mindset with which you approach the work—patience, attention to detail, and a sense of how this component fits into the bag’s overall design—translates into a final product that looks and functions like a shop-bought piece, yet carries the personal touch of a handmade creation.
Threads of Closure: A Seamless, Durable Zipper Inset for a Tote Bag
A zipper can be the quiet hero of a tote bag, turning a simple carryall into a functional, reliable everyday companion. When you learn to install a zipper with care, the bag not only closes securely but gains a clean silhouette and a sense of craftsmanship that speaks to the maker as well as to the wearer. This chapter follows a single, cohesive journey through the process, weaving together the practical steps with the why behind each choice. You will see how the pieces of fabric, the zipper, and the machine become a coordinated system, each part reinforcing the others so the finished bag feels sturdy in hand and graceful on the shelf.
Begin with a mindset that emphasizes alignment, precision, and patience. The goal is not merely to attach a zipper but to bake in durability from the first stitch. The zipper is a structural element, and the way you attach it will influence everything that follows—the bag’s opening, its ability to withstand daily use, and how the top edge sits when you carry items inside. The process is linear, but it unfolds like a dialogue between fabric and metal, between fiber and slider. It rewards the careful person who takes time to prepare, measure, and test before calling a project complete.
First, choose your materials with intention. The length of the zipper should match the intended opening of the tote. A longer zipper can be trimmed, but the option to shorten is preferable when you want a precise, clean finish. The zipper foot attachment on your sewing machine is essential; it lets you sew as close as possible to the zipper teeth without catching the slider or the fabric. For a tote that will travel in and out of cars, on buses, or through crowded hallways, consider a zipper with a smooth travel and sturdy teeth that won’t snag constantly. The outer fabric deserves equal attention. A sturdy cotton canvas or a sturdy synthetic can handle the tug and the daily flexing, while the lining fabric—often a lighter, softer material—gives the bag its interior drape and a pleasant feel against the hands and pockets.
The project begins with the panels themselves. You cut two main fabric pieces for the bag’s outer shell and two lining pieces for the interior. They must be identical in size, and the pattern you follow will gate how the zipper sits and how the bag assembles. Before stitching, press every piece to remove wrinkles; a flat, smooth surface makes it easier to align edges correctly. Pressing also sets any interfacing or stabilizer you might be using, helping the bag hold its shape after the zipper is installed. If you are incorporating fusible interfacing on the outer fabric, you get extra stiffness where the zipper lies, reducing the risk of fabric puckering or the zipper catching on a loose thread during use. This is not merely a decorative step. It is structural courtesy to the eventual user of the bag and a habit you will appreciate when you look back on the project.
The next stage is the interior zip, which many learners find surprising in its utility. You place the two lining pieces right sides together, so the wrong sides face out as the interior of the bag will be the visible world once the project is turned. Aligning the zipper tape with the top edge of one lining piece creates the inner zip pocket, a feature that is both practical and elegant. Sew along the edge of the zipper tape with the zipper foot, letting the teeth face down and the fabric’s wrong side against the back of the zipper. Repeat this for the other lining piece. The result is a concealed zip that sits snugly within the lining, offering a secure stash pocket for small items like keys, coins, or transit passes. This interior zipper setup is central to the method described here; it ensures that the interior edge of the bag remains crisp and that the outer shell’s top edge can be finished cleanly and securely, without the inner stitching showing through.
With the lining prepared, turn your attention to the outer fabric. Place the two main fabric pieces right sides together, then align the zipper’s top edge with the top edge of the outer fabric. At this moment the zipper teeth should face outward, toward the outside world, while the wrong side of the main fabric sits against the zipper’s back side. The zipper foot helps you sew a precise line, securing the zipper to both outer panels. This step is a little bit of a turning point: the zipper now belongs to the exterior shell, and you can feel the bag taking shape around this edge. The aim is to fix the zipper firmly so it resists shifting, pulling, and small distortions that can happen if the fabric moves during sewing. It’s not a difficult step, but it requires attention to the way the zipper aligns with the fabric’s edge, and the stitching should be even and close to the teeth—about a sweat-free, precise distance that you can maintain across the entire length without wavering.
Now you have the zipper attached to both the lining and the outer shell separately. The bag is still flat and unassembled, yet you can sense that a stable spine is forming where the zipper sits. The layers can be maneuvered with care, and this separation—zipper-fixed-to-lining and zipper-fixed-to-outer—yields a cleaner, more professional finish when you bring the two halves together. As you prepare to join the outer and lining layers, you should align the panels with their right sides facing each other once again. The zipper lies between them, a buffer and anchor that will keep everything aligned during the final seam. Pin or clip the edges around the zipper so that nothing shifts when you sew around the perimeter. You should not sew through the zipper itself in this stage; rather, you sew along the outer fabric’s edges and the lining’s edges, leaving a small turning opening in the lining. This turning opening—often around 6 to 8 centimeters—acts as your gateway to turning the bag right-side-out after the final seam is sewn. The exact measurement may vary depending on your pattern, but the principle remains the same: a turning port that is large enough to extract corners and shape through, yet small enough to be easily closed later by hand stitching or a fine machine topstitch.
As the final seam is stitched, you are not merely hiding a seam line; you are reinforcing a point of contact where fabric, thread, and metal meet. The top edge around the zipper, and the joining seam at the bag’s sides, must be robust. A good practice is to use a standard seam allowance—typically half an inch—so the finished top edge sits cleanly and does not creep inward as you load the bag loosely or with heavier items. The act of sewing around the perimeter with the zipper sandwiched between the two layers creates a compact, durable wall that resists snagging and ensures the interior corners stay true. When you reach the turning port, you stop short, leaving the port open to allow the bag to pass through during the turning stage. This is the moment when the design transitions from a two-layer construction into a three-dimensional shape with a defined opening and a stable top line.
Turning the bag right-side-out is the moment of transformation. Use a blunt tool to help guide the corners into their final shape, pushing from the inside so you do not crush the fabric or stretch the zipper tape. Once the bag is fully right-side-out, give it a thorough press. Focusing heat around the zipper area ensures the fabric lies flat and any minor puckers vanish. The pressing is more than cosmetic; it sets the seam allowances for a crisp finish and helps maintain the top edge’s alignment when you topstitch. Topstitching around the top edge seals the edge and adds a clean, professional finish that keeps the outer layer and the lining from shifting. It creates a subtle but sufficient barrier against wear at the seam, particularly at the points where the bag opens and closes each day. The final closing of the lining’s turning opening is a delicate but essential step. You can close it by hand with a ladder stitch, which remains nearly invisible from the outside, preserving the continuity of the top edge, or you can sew a final line along the inside edge for a stronger wrap-around finish. Either method is valid; the important thing is that the lining remains securely joined and the top edge looks tidy from the outside.
With the structural work complete, attention turns to the finishing touches that transform a good zipper installation into a bag you are proud to carry. The zipper must glide smoothly through multiple operations, not bind or catch on fabric folds. Test the zipper operation by pulling it up and down several times, listening for any resistance or irregular movement. If you notice a catch, recheck the stitching line along the zipper, ensure the lining is not caught by the zipper teeth, and confirm that the top edges are flat and evenly aligned. Small adjustments at this stage can prevent larger issues after daily use. A decorative or functional tab at the end of the zipper pull can be added for convenience and a touch of personality. These little details contribute to the overall finished look without compromising durability or function.
If you want to explore variations or expand this method to different bag designs, keep in mind that the core principle remains: secure attachment of the zipper to both the outer shell and the lining, followed by careful alignment and a clean top edge. The logic of repairing and reinvigorating fabric work guides you toward better outcomes each time you sew. A zipper that is correctly installed distributes stress across the fabric rather than concentrating it at a single point. This reduces wear at the seam and helps the bag maintain its shape after repeated use. A well-executed zipper installation also improves the bag’s appearance. When the top edge sits evenly and the zipper lies flat, the bag looks tailored rather than home-made. The difference may be subtle, but to many wearers, it is the distinction between a bag that lasts and a bag that fades under daily demands.
To support your growth as a maker, you can view additional examples of tote designs that incorporate zippers by exploring related projects and galleries. For instance, you may come across resources titled tote-bags-with-zippers, which can provide a broader sense of how different fabrics and weights respond to this technique. This reference page offers a curated view of possibilities, from minimalist lines to more complex bag shapes, all sharing the same underlying zipper attachment logic. It is not a substitute for practice, but it is a valuable repository of ideas that can inspire you to adapt the technique to your own designs. You may find it helpful to study the way the zipper sits in relation to the bag’s opening and the way the top edge finishes, then apply those insights to your own work. If you are working with patterned fabric, consider how the zipper placement interacts with the pattern so that the seam becomes a feature rather than a distraction. A consistent seam line and careful placement reinforce the sense of design-conscious sewing that elevates a simple tote into a personal, well-made accessory.
As you move through the learning curve, it helps to recall the practical benefits of proper zipper installation. You gain a functional closure that keeps belongings secure and an interior that remains organized, with pockets that stay in place. The bag’s opening becomes accessible enough for daily tasks, yet controlled enough to prevent items from tumbling out when you’re navigating busy spaces. The zipper tooth line can function as a guide for where the top edge will lie when the bag is filled. In the end, the precision you bring to the zipper stage will echo throughout the bag’s life. It is a small seam in a larger piece of work, but it anchors the bag’s integrity and its visual appeal.
If this approach resonates with your practice, you can carry the same logic into future projects. You may choose longer or shorter zippers depending on the intended use, or you may experiment with different fabrics and interfacing to balance weight, durability, and texture. The process you followed here—preparing both the lining and outer fabric, attaching the zipper to both layers separately, then joining the layers with the zipper sandwiched in between—provides a reliable framework for producing bags that feel crafted rather than assembled. It is a method that grows with you, offering the satisfaction of a finished piece that performs as well as it looks.
For readers who want a direct, classroom-style reference, this approach aligns with practical, step-by-step guides that emphasize the importance of ensuring symmetry and structural reinforcement at each stage. The core lesson is that a zipper is not an afterthought but a hinge around which the bag turns—literally and figuratively. By treating the zipper as a primary element and building the construction around it, you create a tote that responds well to daily use, travels nicely in a bag, and presents a polished, professional finish that reflects careful workmanship. The quiet rhythm of stitching near the zipper teeth becomes a metronome for the entire project, guiding you toward consistent seam allowances, clean top edges, and a durable final product that you will reach for again and again.
If you would like to see a concrete, visual demonstration of the technique described, you can explore examples of tote designs that include zippers with detailed photographs and commentary. The path I described mirrors the step-by-step approach you would find in described guides and video tutorials, with the same sequence of lining attachment, outer fabric attachment, and final assembly. These resources can augment your understanding and offer dynamic insights into how different fabrics respond to zipper installation. Remember that sewing is as much about maintaining tension and control as it is about following a sequence of steps. A steady hand, a calm plan, and a willingness to pause and adjust when the fabric refuse to cooperate will consistently yield better results than rushing through.
If you are integrating this chapter into a broader article on making tote bags, you may want to consider how to thread this technique into additional sections about fabric selection, pattern drafting, or finishing details. A tie-in section might discuss zipper length options for small, medium, and large totes, how to choose a zipper type for a given weight of fabric, or how to choose interfacings that preserve the shape around heavy openings. This is a natural extension of the core method and a way to present a cohesive, comprehensive guide for readers who are sewing their first zipper tote and those who are refining a more advanced project. The essence is that a zipper, properly installed, does not dominate the bag; instead, it serves as a clean, reliable anchor that allows the fabric to speak for itself. The result is a tote that feels balanced, well made, and ready for daily life.
In the spirit of sharing knowledge and supporting curious makers, I invite you to explore additional examples and variations. For those seeking broader context, you can find related content at the tote-bags-with-zippers resource, which showcases a range of configurations and design choices. Such exploration can inform your planning and help you tailor the technique to your preferred aesthetics and practical needs. Practicing with a scrap and testing your process on a small, reversible sample can build confidence before you commit to your final bag. The more you practice, the more you will understand the delicate balance between tension, alignment, and finish—three factors that together determine how the zipper behaves over time, even after weeks of use.
As you close this chapter and carry your newly crafted tote bag through the world, you will notice how the zipper’s gentle resistance becomes second nature. You may discover subtle improvements for future projects, such as adjusting topstitch length, refining edge alignment at the zipper, or selecting subtly contrasting thread that highlights the stitching without overpowering the design. Each bag becomes a testament to patience, careful planning, and the quiet confidence that comes from sewing with purpose. The technique described here—securing the zipper to both lining and outer fabric before assembling the bag—offers a reliable, repeatable method that yields professional results without sacrificing accessibility for beginners. It is a practical path toward mastery, and like many sewing endeavors, it rewards you with a sense of accomplishment that grows with each completed project.
Internal resource for broader context: tote-bags-with-zippers
External resource: https://www.thesprucecrafts.com/how-to-attach-a-zipper-to-a-tote-bag-4159342
The Last Seam: Final Assembly and Finishing Touches for a Durable, Polished Zippered Tote
The moment you reach the final seam of a zipper tote is the moment when intention meets craft. After all the careful cutting, lining up, and stitching, the bag begins to reveal its future: a sturdy everyday companion that carries more than items, it carries hours of patient work and a touch of personal design. The final assembly and finishing touches are not afterthoughts; they are the keeper of shape, function, and a clean, professional look. In this phase, you breathe life into the tote by securing the pre-sewn zipper unit to the main body with precision, then reinforce the structure so the bag remains resilient under daily use. You learn to harmonize the fabric, the zipper, and the lining into a single, balanced shell that moves as one. For many makers, this is where confidence blossoms. You no longer see a collection of pieces; you see a bag that will hold its shape, glide its zipper without snagging, and present a quiet, confident finish.
The core action in this stage is to attach the zipper unit to the main body with care. Start by taking the pre-sewn zipper unit—the outer fabric, the inner lining, and the zipper itself—and align it with the bag’s opening on the main fabric. The goal is to center the zipper so that it sits evenly along the top edge and lies flat against the surface of the bag. Work slowly as you pin or clip the assembly in place. A straight, unrumpled top edge is not a luxury here; it is a necessity for a smooth unzip and a tidy finish. With the zipper foot on your machine, stitch along the edge of the zipper tape, following the original seam line. The needle should glide just beside the zipper teeth, not through them, so the tape remains secure and the zipper runs true once the bag is finished. As you sew, periodically lift the presser foot and check that the fabric lies flat. If you catch any puckering, stop and re-seat the fabric before continuing. A single wrinkle can throw the entire top edge off-center and compromise the bag’s shape when it’s loaded with weight.
This step is mirrored on the opposite side of the bag, creating a clean, symmetrical attachment that anchors the zipper to the bag’s exterior. The result is a durable bond between the zipper and the shell, one that will resist stress from opening and closing as well as the daily tug of the bag’s contents. Once the zipper is attached to both sides of the main fabric, take a moment to check the alignment from several angles. Look down the top edge to confirm that the zipper sits evenly across the opening; if it sags or shifts even slightly, adjust with a fresh pin or clip and resew a short distance to correct it. The goal is not only a straight line but a line that remains straight under light tension when the bag is full. A well-centered zipper contributes to a professional finish and prevents curious snagging when you reach for the bag in a crowded space.
Reinforcement is the quiet work that underpins long-lasting performance. The zipper seam is the most stressed point in the bag’s opening, especially when you fill the tote with heavier items. To counter this, consider two actionable refinements. First, add a second row of stitching parallel to the original line. This topstitching reinforces the seam and creates a deliberate, clean look that’s often associated with durable, ready-to-wear bags. The second refinement is more interior and structural: insert a stiffener along the top edge inside the bag. A narrow strip of interfacing or fusible webbing acts as a backbone, keeping the opening flat and resisting sag as the bag is used. This reinforcement prevents the seam from stretching and extends the life of the zipper, even when the tote carries a heavy load or when items press against the opening over time.
With the zipper securely attached and the interior reinforced, the next phase is to refine the edges and ensure a precise, crisp finish. Perform a thorough inspection as you would for a garment seam. Test the zipper by opening and closing it several times, listening for any roughness or resistance. A stiff feel might indicate slight fabric tension or a puckered seam somewhere along the tape. If needed, adjust the thread tension and re-sew a short segment rather than attempting to fix the entire length. Check alignment from multiple perspectives—eye level, a lower angle, and a view from the side. A bag that looks crooked from one angle will feel unbalanced in the hand, even if it performs well. Trim any stray threads with small sharp scissors to prevent snagging and to keep the finish tidy.
Pressing is the invisible artist in this stage. A cool iron, a press cloth, and deliberate, measured pressure can transform a rough seam line into a crisp, professional edge. Press the seam allowances away from the zipper, avoiding direct contact with the teeth. The heat from the iron can soften the fabric and help the edges fall neatly into place, but the teeth should be pampered rather than pressed. Use the cloth to protect the zipper and to prevent shine on delicate fabrics. Gently press the main top edge to settle the fabric and help the zipper sit in its resting position. The same care applies to the lining around the opening. A well-set seam line not only looks high-end; it also acts as a shield against wear, helping the bag hold its shape as it fills and empties over time.
The finishing touches reveal the bag’s character. The opening line, the point where fabric meets zipper, receives a final, readable finish. A light topstitch just above the first line can add both durability and a subtle decorative touch. This additional stitching anchors the fabric and the zipper more securely and gives the top edge a refined, polished look. If the design allows, you might also add a slim stiffener along the very edge of the bag’s opening on the exterior. The extra layer can help the top edge resist curling or warping and can contribute to a crisp silhouette when the bag is empty or lightly loaded. The decision to feature decorative hardware at the zipper end—such as a small tab, pull, or bead—can also be made at this stage. A tiny flourish can elevate the bag from a practical carrier to a personal accessory, but it should remain subtle enough not to interfere with zipper operation.
As you finalize the exterior, turn your attention to the lining. The lining’s top edge should align with the bag’s opening, and any turning gaps should be stitched closed with care. The lining should lay smoothly, without bunching or stiff spots, so that when you turn the bag right-side-out through the lining opening, the interior feels comfortable and uncluttered. The hand stitching that closes the lining opening—typically a ladder or slip stitch—deserves patience. It’s not a visible seam, but it’s essential for a clean, professional appearance. When you finish the lining, a light press along the entire interior can help the fabric settle, making the bag feel more substantial in hand and more resilient in use.
One practical tip arises from years of making and testing tote bags: keep the interior calm around the zipper. If you foresee a scenario where the bag will carry many small items that could slip into the zipper area, consider a small interior pocket or a shallow slip pocket sewn into the lining above the zipper. This is not a requirement, but it can reduce the chance of items catching on the zipper and can contribute to a more organized interior. The pocket can be as simple as a single patch pocket formed from the lining fabric. It adds structure without complicating the assembly, and it gives you a place to tuck keys, a phone, or small cosmetics so they don’t drift into the zipper’s closed track.
Finally, test the completed bag with a couple of real-world tasks. Pack a few items with varying shapes and textures and practice zipping and unzipping while the bag is resting on a table. Then lift the tote and carry it for a short walk, paying attention to how the opening behaves under movement. If the opening remains flat and the zipper glides without catching, you’ve achieved a durable, functional finish. If you notice any resistance, revisit the possible causes: misaligned zipper, puckered fabric, or tension imbalance in the stitch. A small re-sewing in a localized area or a quick layout adjustment is often enough to restore smooth operation.
For readers seeking broader inspiration on how zippers influence tote design, this is a good moment to explore more examples of zippered totes. See this collection for additional design ideas and variations: tote bags with zippers.
As a final note on professional finish, consider documenting your process with a few photos. A calm, well-lit shot of the top edge, the zipper, and the interior from several angles can serve as a reference for future projects. It also helps you notice subtle improvements you might want to implement next time—from thread color choices to the exact distance from the edge for the topstitch line. The goal is to build a toolkit of small, repeatable steps that yield predictable results. A zipper tote completed with care is more than a bag; it becomes a dependable everyday tool that supports and protects what you carry.
If you crave deeper insights into the physics of fabric, the psychology of finishing touches, or more intricate methods for attaching hardware without sacrificing fabric integrity, there are many resources that walk through these ideas with similar rigor. For a broader exploration of zipper-focused tote construction, you can consult sewing guidance like that found in dedicated sewing communities and reference guides. External guidelines emphasize testing, precise alignment, and thoughtful reinforcement as standard best practices for durable zipper projects. For further reading on deepening your understanding of zipper installation and finishing techniques, see the following external resource: Sewing.org.uk zipper tote guide.
Final thoughts
Understanding how to install a zipper in tote bags is essential for business owners looking to enhance their product offerings. By preparing with the right materials, following a detailed attachment guide, and focusing on the final assembly, businesses can create high-quality bags that resonate with customers. A functional zipper not only adds practicality but also elevates the overall aesthetic appeal of the tote bag, resulting in a versatile product that meets market demands. Elevate your bag-making skills today for a competitive edge.