
Sewing a zippered tote bag embodies more than a mere crafting endeavor; it offers a unique opportunity for business owners to tap into a niche market. In this guide, you will discover the essential materials required to create a durable bag that caters to your customers’ needs. Each chapter aims to provide structured insights into the entire sewing process, from preparation to finishing touches. By following these detailed instructions, you can elevate your brand’s offering by creating exclusive tote bags that resonate with your clients, ensuring both practicality and style.
Essential Elements: Mastering the Materials for Crafting Your Ideal Zippered Tote Bag
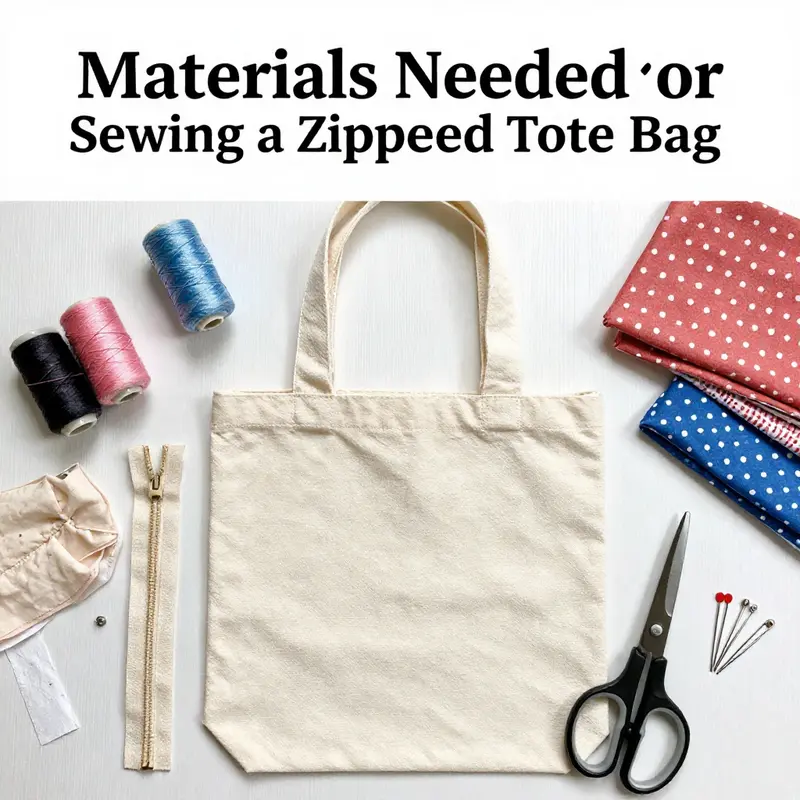
When embarking on the creative journey of sewing a zippered tote bag, the foundation of success lies in selecting the right materials. The very materials you choose not only dictate the bag’s structural integrity and functionality but also influence its overall aesthetic appeal and durability. In this chapter, we explore the array of components you will need, explain their importance in the construction process, and offer expert tips on choosing the best options that align with your vision and sewing skill level.
At the heart of your project is the fabric itself. For a tote bag that will withstand everyday use, opting for robust materials such as sturdy cotton canvas, denim, or heavy cotton is advisable. These fabrics are prized for their durability, resilience, and attractive texture. Outer fabric choices like canvas provide a classic look and are particularly well-suited for tote bags that must conform to both practical and stylish demands. The outer layer acts as a protective shield, and its thickness is essential in ensuring the bag retains its form even when filled with items. Moreover, quality outer fabric can be further enhanced by treatment such as waterproofing or a light wash for a vintage appeal. Equally important is the selection of lining fabric. While the exterior bears the brunt of handling, the lining safeguards the contents and provides a smoother finish for the bag’s interior. A matching fabric or a complementary patterned textile that not only offsets the look of the outer fabric but also offers a softer, more pliable finish is ideal. When paired thoughtfully, the outer fabric and lining work in harmony, ensuring the bag is both functional and visually appealing.
Another essential component is, of course, the zipper. A medium to full-length zipper, usually around eight to twelve inches, is chosen to offer an effective closing mechanism for your tote bag. It is critical that the zipper be both durable and visually fitting with your overall design. The practicality of a zipper lies in its ability to secure the bag’s contents, yet its installation requires precise alignment and careful sewing. When attaching the zipper, using a dedicated zipper foot on your sewing machine ensures clean, parallel stitches that enhance the bag’s longevity and finished appearance. This small detail underlines the role that each element plays in combining form with function.
In addition to the visible fabrics and zipper, reinforcing materials like fusible interfacing add an extra dimension to the structure of your tote. Interfacing, selected to match the outer fabric, is fused to the backside of your fabric pieces. This simple yet transformative step bolsters the material, reducing sagging and improving overall stability. For first-timers or seasoned sewers alike, understanding the importance of interfacing can elevate the look of your bag from homemade to heirloom quality. The interfacing is particularly useful when working with thinner fabrics that might otherwise appear flimsy or lose shape over time.
Thread selection is often an underestimated aspect of bag construction. To ensure that every seam is secure and that your bag stands up to repeated use, make sure to choose high-quality polyester or all-purpose thread that closely matches your fabric’s color. The thread not only binds your project together but also contributes subtly to the overall design. Matching thread can enhance a uniform look, while a contrasting thread might be deliberately chosen to add a decorative touch. The consistent use of durable thread provided by modern sewing machines guarantees that each stitch supports your tote bag reliably.
A reliable sewing machine is the backbone of the project. Whether you are a beginner or an experienced seamstress, a standard home sewing machine will suffice, provided it is equipped with the proper accessories such as a zipper foot. Take time to test stitch tension and adjust settings before working on the final assembly. A well-calibrated machine ensures effortless stitching through thick layers of fabric and interfacing. Beyond the machine, other indispensable tools include scissors or a rotary cutter to provide precise fabric cuts, as well as a robust ironing board and quality iron for pressing seams. Pressing is not merely a finishing touch; it facilitates a crisper edge, prevents puckering, and sets the interfacing in place. The accuracy in cutting and the discipline in pressing combine to create a professional look that belies the homemade nature of the tote.
In addition to the basic materials, it is often advantageous to gather a collection of pins or clips. These simple devices are invaluable during the assembly process, holding fabric layers securely in place until they are permanently stitched together by your machine. While pins have been used traditionally, many modern sewers prefer clips for their ease of use and the reduced risk of puncturing delicate fabrics. Investing in quality tools not only makes the project smoother but also minimizes potential frustrations during the sewing process.
For those who wish to imbue their tote with personal style, decorative embellishments may also be part of the material list. Optional adornments such as embroidery floss, patches, or decorative trims allow you to elevate a functional item into a statement accessory. Adding details through hand-stitched embroidery or fabric painting can transform your tote bag into a one-of-a-kind design that reflects your individual aesthetic. The selection and placement of these embellishments depend on your creative flair, and while optional, they provide the perfect finishing touch to an already meticulously constructed bag.
Each material you choose for your tote bag project has a unique role. The sturdy outer fabric provides the necessary resilience for everyday use, while the well-chosen lining fabric enhances the interior’s appearance and offers smooth functionality. The zipper not only adds practicality but also serves as a central design element when properly aligned and stitched. Fusible interfacing enables the bag to retain its structure over time, and high-quality thread locks every seam firmly in place. Essential tools like a reliable sewing machine, sharp scissors or rotary cutters, and a thorough pressing routine ensure that the finished product meets both aesthetic and practical goals.
Before you begin your project, it is important to consider the overall design and functionality of your tote bag. Every decision, from the choice of fabric to the selection of adhesive interfacing, contributes to the final product’s success. For instance, if you prefer a more sustainable approach, consider opting for eco-friendly fabrics like organic cotton or upcycled denim. Not only will these options boast durability, but they also reflect a kind of environmental mindfulness that is increasingly valued in today’s creative communities. Additionally, if your design plan involves frequent travel or heavy usage, you might opt for double layers of fabric in both the outer shell and the lining. This method reinforces the bag and extends its life, ensuring that your creation remains a reliable accessory for years to come.
In the process of gathering these materials, preparation is key. Organizing your workspace and laying out every component before beginning ensures that you have everything at hand. It minimizes interruptions and allows you to focus entirely on creating a seamless, functional design. Such meticulous preparation offers the psychological satisfaction of working in a well-ordered space, giving you the confidence to tackle more complicated projects in the future. Additionally, a well-prepared environment reduces the risk of mistakes or material waste, which can sometimes occur when one is rushed or distracted.
The importance of planning extends to sourcing your materials. Trusted suppliers often provide fabrics specifically designed for crafting projects. By choosing the right source, you reduce the chance of running into unexpected problems like shrinking or color bleeding later in the sewing process. Online resources can offer guidance on the best places to purchase specific fabrics and accessories that have been vetted by experienced creators. For example, detailed instructions and sourcing tips found at guides on making specialized tote bags can offer creative ideas on where to secure materials that perfectly match your vision. An internal resource available for further inspiration is the guide on tote bags with zippers, which provides useful insights on modern trends and traditional techniques alike.
Even with a detailed list and careful planning, technical execution during material preparation is crucial. After cutting your fabric pieces, take the time to inspect each cut for evenness and consistency. A slight deviation can cause misalignment during the construction process. This is where tools like bevelled scissors or a rotary cutter excel – they ensure that every edge of your fabric is clean and uniform. Pressing the fabric after cutting is not simply an aesthetic choice; it also relaxes the fibers, making them easier to work with as you sew. By devoting time to these initial steps, you lay down a solid framework that paves the way for a smooth assembly later.
Incorporating interfacing into your project deserves its own careful attention. Fusing interfacing to the back of your outer fabric pieces not only adds firmness but provides extra support around stress points such as the bag’s handles and zipper area. It is essential to match the interfacing weight with the outer fabric; a mismatch can lead to uneven texture or stiffness in areas where flexibility is needed. This component is the unsung hero of your bag’s structure, ensuring that every time you open and close the zipper, the fabric retains a crisp, clean line without sagging.
While the emphasis on functionality is paramount, aesthetics should not be neglected. Coordinating fabric prints, colors, and textures can dramatically enhance the final product’s appeal. Some sewers enjoy mixing neutral tones with bold accents to reflect their personality, while others opt for a consistent monochrome palette that exudes understated elegance. Think about how the textures and patterns of the materials interact under different lighting conditions. The subtle glint of a well-stitched zipper against a backdrop of textured canvas can become a focal point of the design, inviting both admiration and practical use. Such considerations transform a mere bag into a curated accessory that can complement various wardrobes.
Finally, as you consolidate all the chosen components into a cohesive material kit, remember that every element has its place and function. A well-organized set of materials not only streamlines the sewing process but also provides peace of mind. This balance of functionality and creativity is at the core of crafting an envelope that is as stylish as it is enduring. The materials you gather serve as building blocks that, when assembled with care and precision, yield a zippered tote bag that is uniquely yours. The mastery over material selection is reflected in every carefully stitched seam and every pressed edge, inviting you to embrace the craft with both precision and passion.
For those seeking additional inspiration or more eco-friendly approaches, consider exploring alternative ideas such as upcycling worn denim into a chic tote bag. Detailed instructions and practical insights can be found in the comprehensive guide available at Upcycling Old Jeans Into Tote Bags. This external resource provides further context on turning everyday materials into extraordinary, sustainable fashion statements, reinforcing that the right materials can truly transform your creative vision into an everyday accessory that lasts.
Mastering the Art of Crafting Your Own Zippered Tote Bag: A Comprehensive Journey

Sewing your very own zippered tote bag is an exercise in creativity and precision that transforms everyday materials into a functional, personalized accessory. This chapter offers an in-depth, continuous narrative that takes you from gathering the required materials to the final polished touches on your bag. Every step is explained in detail, demonstrating that with focused planning, even complex projects become manageable. The journey begins with the careful selection and preparation of fabrics and tools, and it flows seamlessly into methods for attaching zippers, constructing sturdy seams, and finishing edges with finesse. Whether you are a beginner or someone with intermediate sewing skills, this guide aims to enhance your craftsmanship while inspiring you to take pride in every stitch you make.
The first essential step involves gathering all necessary materials and tools, laying a solid foundation for your project. You will need durable outer fabric—such as canvas, denim, or sturdy cotton—that will give your tote bag structure and resilience. Complement this with a lining fabric of similar size to ensure that the interior boasts a neat and professional look. A zipper, preferably at least 12 inches long, serves as the centerpiece of your design by providing secure closure and a stylish accent. Additionally, for a more structured look, consider an optional fusible interfacing that is fused to the wrong side of your outer fabric. Other indispensable tools include a reliable sewing machine equipped with a zipper foot, sharp scissors or a rotary cutter, pins or clips, matching thread, and of course, an iron and ironing board to press seams and fabrics for a crisp finish. When you have assembled these materials, you set the stage for a rewarding project that marries effective design with personal style.
Once your supplies are in place, meticulous preparation of your fabric is next. Start by cutting two pieces each for the outer layer and lining, ensuring consistency in dimensions—a necessity for a perfectly aligned finished product. For instance, cutting the outer fabric and lining to about 14 inches by 16 inches (or your desired dimensions) will provide ample space for a functional tote bag. If using fusible interfacing, cut it to match the outer fabric pieces and fuse it accurately to the wrong side. This extra step not only reinforces the fabric but also maintains a smooth and even appearance throughout the finished bag. Taking time at this stage to prepare each piece carefully means that later assembly will be far simpler and yield a neater result.
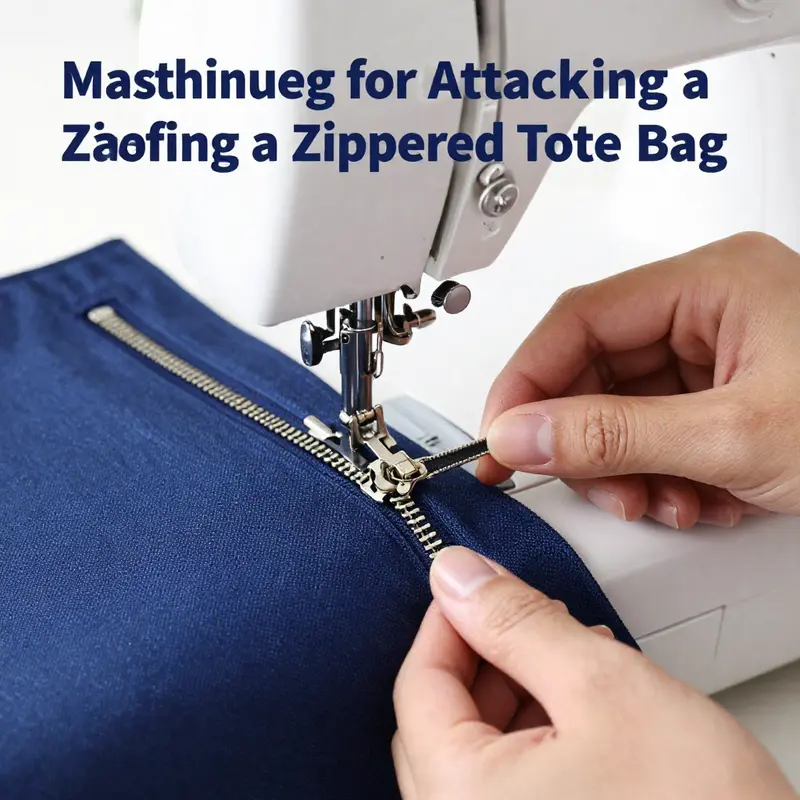
A pivotal moment in the process is attaching the zipper to the outer fabric. Lay one piece of your outer fabric flat, right side up, and open the zipper so that you can align it perfectly along the top edge. Place the zipper face down, ensuring the teeth are parallel to the raw edge of your fabric. It is imperative to use a zipper foot when sewing along the zipper tape, as this specialized foot allows the needle to sew as close to the zipper teeth as possible, creating a sleek, secure finish. Begin stitching from the top, gradually working your way down, and employ backstitching techniques at both the beginning and end to secure your work. Once this is done on one side, mirror the process on the second outer fabric piece. The aim is to have the zipper function as the cohesive element that binds these two sections together while serving as a reliable closure. The details in this stage are what define the overall quality of your tote bag, and careful execution ensures long-term durability and an aesthetically pleasing look.
With the zipper securely in place on both outer fabric pieces, you now advance to constructing the body of the bag. Place the two outer pieces together with the right sides facing each other, so the zipper is enclosed neatly between them. Secure the layers with pins or clips, taking care to align all edges precisely. When sewing, maintain a consistent seam allowance—typically around ½ inch—to form a uniform edge. It is crucial to leave a gap in the center of the bottom, approximately 4 to 5 inches wide, as this opening is used later for turning the fabric inside out. Clipping the corners diagonally helps reduce bulky layers and preserves the smooth, clean shape of your tote. Once you have sewn around the perimeter, the turning process requires patience and care: gently push the fabric through the opening, using a blunt tool such as a chopstick to ensure sharp corners emerge free of creases. After turning, press all seams flat with an iron, and finally, close the opening by hand-stitching or using a machine, ensuring that the internal construction of your bag remains neat and resilient.
Parallel to the outer assembly is the creation of the lining. The lining is sewn with the same precision as the outer fabric, but the focus here is on smoothness and internal aesthetics rather than structural reinforcement. Cut the lining fabric into two pieces matching the dimensions of the outer fabric, and sew these pieces together with the same seam allowance, deliberately leaving a gap for turning. Once constructed, turn the lining right side out and press it thoroughly. This lining will later be inserted into the already completed outer bag, creating a dual-layered effect that hides the raw edges and adds an extra layer of sophistication. This step is critical because the lining not only contributes to the bag’s durability but also offers a refined look that belies the amount of work that went into its creation.
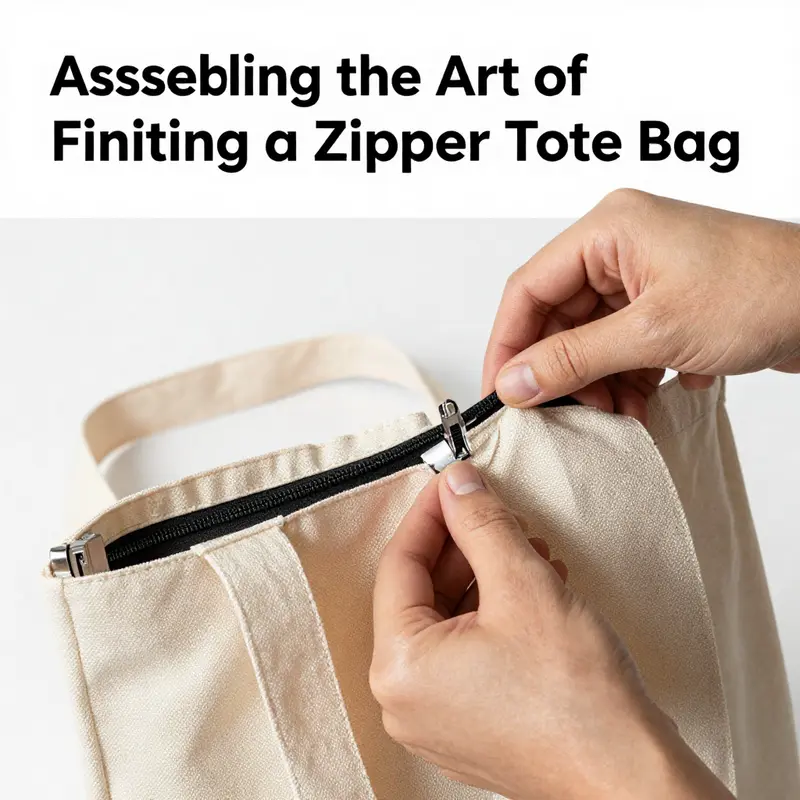
Now comes the step where the two halves—outer shell and lining—are brought together into one cohesive unit. With both the zipper-attached outer bag and the prepped lining ready, place the outer bag inside the lining, ensuring that both have their right sides face-to-face. Carefully align the top edges and pin the perimeters to secure the layers uniformly. Sew around the top with a consistent seam allowance to firmly connect the lining to the outer bag. This method encapsulates the inner construction within the outer shell, lending a professional finish that not only looks pleasing but also enhances the overall structural integrity of the bag. After sewing, turn the accorded assembly right side out through the turning gap, pushing the lining carefully until it fits perfectly within the outer fabric. A topstitch along the top edge, typically around ¼ inch from the outer edge, adds an extra layer of security while neatly concealing any raw edges. The end result is a beautifully assembled tote bag that blends functionality with a handcrafted, bespoke quality.
Optional, yet highly recommended for those seeking added resilience, is the reinforcement of bag handles. Reinforced handles demand additional fabric strips—often around 2 inches by 18 inches in dimension—that, once folded, provide enough width for comfortable carrying. After sewing along the open edge of these strips, turn them right side out and press well to form a clean, durable handle. Insert these into the top corners of the bag’s interior, aligning them centrally so that the weight is evenly distributed. Secure the handles with either hand-stitching or machine stitching, ensuring they are robust enough to support heavy loads. Though optional, reinforced handles add a professional touch that elevates your tote from a simple accessory to a standout piece of craftsmanship.
Every part of this process relies on a meticulous attention to detail. From aligning fabric edges to determining the precise length of seam allowances, each decision contributes to the final quality of the bag. Testing your machine’s stitch tension on scrap fabric before beginning the final project can prevent future issues, such as uneven stitching or thread breakage. When working with heavier fabrics like denim or canvas, a walking foot attachment can be invaluable as it assists in feeding the fabric evenly, reducing the possibility of skipped stitches or fabric bunching. Consistent pressing after each stage of sewing sets the stitches firmly in place and provides a polished finish. Each small action—whether clipping a seam or ensuring that each pin is properly placed—works in harmony to produce a bag that is as strong as it is beautiful.
For those who are new to sewing, integrating the various techniques involved can initially seem overwhelming. However, as you progress through each step, the process gradually unfolds like a well-rehearsed routine. Learning to attach a zipper accurately or understand how to maintain fabric alignment underlies many other sewing projects. There is a pleasure inherent in overcoming challenges and watching the bag slowly come together, each step solidifying your confidence and skills. Embracing mistakes as part of the learning process not only accelerates professional growth but also makes the journey far more enjoyable. Each completed tote bag stands as a tangible testament to creativity and perseverance, a unique accessory that embodies both function and self-expression.
In today’s digital age, countless resources are available to supplement your learning experience. For example, if you’d like to explore innovative design ideas or view diverse techniques from other enthusiasts, consider browsing through a comprehensive guide on tote bag designs. One such resource that provides a wealth of inspiration while focusing on the structural elements of bag construction is the handy article on tote bags with zippers available online. By integrating insights from experienced sewists, you can adapt these creative ideas to your own projects and continue to evolve your personal style.
The value of crafting your own bag stretches beyond the immediate satisfaction of a completed project. With every measured cut, every meticulous attachment of the zipper, and every carefully sewn seam, you develop a set of skills that extend to all areas of creative work. The process teaches patience, precision, and the importance of planning—lessons that are applicable not only in sewing but also in other life pursuits. As you practice these techniques, you learn that every single stitch builds a foundation for future projects, ultimately enriching your creative journey with confidence and skill.
Moreover, working through this project allows you to create an accessory that is uniquely your own. Unlike mass-produced items, a handmade bag reflects personal tastes and preferences, from the choice of fabric to the style of the zipper and even the color of the thread used. Such personalization offers an authentic sense of accomplishment and ensures that the bag remains a one-of-a-kind creation. Each time you pick up the completed tote, you are reminded of the care and effort invested into its making—a rewarding feeling that rarely accompanies store-bought items.
Beyond the functional benefits, the experience of sewing a zippered tote bag immerses you in the creative process. The blend of technical skill and artistic expression opens a gateway to new ways of thinking about design and craftsmanship. The tactile pleasure of handling fabrics, the rhythmic sound of the sewing machine, and the visual satisfaction of watching loose pieces come together into a coherent whole all contribute to an enriching experience. With every project, you refine your techniques and discover nuances that transform sleeping patterns into a living canvas of art and practicality.
For further depth in your learning experience, you might find additional, detailed guidance on pressing and topstitching techniques particularly valuable. Many experts recommend reviewing external tutorials to solidify these foundational practices. One such external resource that offers a comprehensive overview of these critical steps is available through this guide on sewing basics, which offers comprehensive insights on how to press seams and perfect topstitch. Integrating these techniques into your workflow ensures that each project not only meets functional standards but also boasts a professional level of finish.
The process of crafting a zippered tote bag, therefore, becomes far more than a single sewing project. It is a journey enriched by the pursuit of precision, creativity, and personal expression. Each step is a lesson in itself—from the initial selection of materials, through the skillful attaching of the zipper, to the final topstitch that secures the bag’s interior. As you work through these stages, you appreciate that even the smallest detail plays a significant part in the overall aesthetic and durability of your final creation. In this way, the bag evolves from a simple accessory into a lasting piece of art, one that reflects the hands-on effort and artistic vision behind it.
Ultimately, every stitch you make reinforces your skills and marks a milestone in your ongoing creative journey. The finished bag stands as evidence of what can be achieved through careful planning, persistence, and an eye for detail. It is both a practical accessory and a personal statement—a piece that holds the potential to accompany you on daily errands and special outings alike. Embrace the learning curve with enthusiasm, and know that every project, regardless of its challenges, adds to your repertoire of techniques and creative ideas. Enjoy the process as much as the final product, and let this project be the stepping stone to many more masterpieces in your sewing adventures.
Mastering the Art of Zipper Attachment: Techniques to Sew a Seamless Zipper in Your Tote Bag
When you set out to create a zippered tote bag, the careful attachment of the zipper is a crucial step that defines both the bag’s functionality and its aesthetic appeal. In this chapter, we explore the detailed techniques that ensure the zipper is securely and neatly integrated into your tote bag, setting you up for success regardless of your experience in sewing. Every small detail matters, and the methods described here are designed to guide you through the process with clarity and precision.
The first stage in any sewing project is preparation. Carefully selecting your materials is essential. You must have two main fabric panels – one for the outer shell of your bag and another for the lining – along with a suitable zipper that matches the bag’s dimensions. It is wise to use sturdy fabrics like canvas or denim for the outer material. Such fabrics provide durability and structure. The lining fabric should complement the outer fabric while offering a softer hand. In some cases, a piece of fusible interfacing is added to the outer fabric to create a stiffer finish, reminiscent of a professionally made bag. All components, including matching thread and the right tools such as a zipper foot for your sewing machine, play a significant role in achieving a polished result.
Begin by preparing your fabric pieces. Cut two pieces for the outer fabric and two pieces for the lining. Accuracy during the cutting phase prevents misalignment later in the project. When you choose to apply interfacing, ensure you adhere it to the wrong side of your outer fabric. This step is important because it increases the bag’s strength and gives the fabric a smoother surface. Working on a clean, flat surface while using sharp tools will simplify each subsequent step. The quality of your initial cuts directly influences the final appearance of your tote bag.
Before attaching the zipper, it is important to become familiar with the role of the zipper foot on your sewing machine. A zipper foot is specially designed for close stitching along curved edges and is a tool every sewer should master. With the zipper foot in place, you can bring the edge of the zipper tape close to the fabric edge. Slow, careful stitching along the zipper ensures that the fabric does not shift or pucker. A pair of fine pins or clips will help secure the zipper in place before you begin sewing. By slowly running your machine along the edge, you secure the zipper with a neat, continuous line of stitching that reinforces the overall structure of the bag.
When securing the zipper to the inner lining, be meticulous about fabric orientation. Place the zipper face down on the wrong side of the lining fabric piece, making sure that the zipper teeth align perfectly with the top edge of the fabric. Maintaining a firm grip on the fabric using clips prevents any slip while stitching. Use a steady, guiding hand, as precision here will determine the functional smoothness of the zipper. Once you staple the zipper in the right position, stitch along both sides of the tape. Using a short stitch length initially helps lock the zipper in place and minimizes the chance of shifting. Always remember to backstitch at the beginning and end of your seams to add extra security to the attachment.
Attaching the zipper to the outer fabric follows a similar process, but with slight modifications to account for the differences in fabric texture and thickness. Position the zipper with the face down on the wrong side of one outer fabric panel. Secure it carefully with pins or clips, ensuring alignment with the edge. The zipper foot now guides your sewing machine along the edge, closely hugging the zipper tape as it moves along. The process demands consistent speed and pressure to maintain alignment and uniformity. As you trace the edge, the zipper becomes an integrated design element, adding a professional finish to your tote bag.
An important nuance in these techniques is that the zipper is sewn to both fabric layers separately before the two layers are joined together. This dual attachment approach allows the finished bag to retain a crisp edge around the zipper, ensuring that the bag opens and closes smoothly. When attaching the zipper to both the inner and outer fabric panels, keep a consistent seam allowance of about half an inch. This uniform seam width is vital for both durability and aesthetics, as uneven seams can produce unwanted bulk and detract from the refined look of the tote bag.
The process of aligning the zipper tapes on the outer surface continues with careful attention to detail. Once you have stitched the zipper onto the outer fabric panel, it is important to verify that the fabric pieces are correctly oriented. Correctly aligning both sides of the zipper means that when the bag is assembled, the tapes will meet perfectly at the insertion point. This step requires patience and precision. Sometimes a slight misalignment at this stage can result in a finale that feels off balance. To avoid such issues, check the alignment frequently as you secure the zipper to the fabric. In doing so, the process ensures that every edge is smooth and every stitch contributes to a consistent design flow.
After both the inner lining and the outer fabric have their zippers attached, the next stage involves the integration of the two layers. This is achieved by placing the outer fabric and inner lining together with their right sides facing each other. The zipper should now be sandwiched between them. It is essential during this assembly to ensure that the edges line up exactly. During this phase, smooth, stable handling of the fabric is crucial. Any misalignment might lead to gaps or puckers that are difficult to correct later.
The sewing process continues by running a stitch along the top edge where the bag meets the zipper. By securing the zipper between the two fabrics, you create a unified structure where the zipper feels like a natural part of the design. The stitching along this edge is not only functional; it creates a clean visual transition between the fabric and the zipper. Many seasoned sewers recommend clipping any extra fabric from the corners to reduce bulk, which in turn gives the bag a sleek and deliberate appearance. Ironing as you go ensures that the seams remain flat and that the fabric retains its intended shape.
When considering enhancements, applying fusible interfacing can make a significant difference. Interfacing adds rigidity to the fabric and helps maintain the bag’s shape over time. For those who desire a bag with a crisp, structured finish, interfacing is a welcome addition. However, if you prefer a softer and more flexible tote, you might skip this step. The key is to match the interfacing properties to your chosen fabrics so that the final product reflects your stylistic preference and practical requirements. This decision is one of many that allow you to personalize your sewing project and create a tote bag that is uniquely yours.
The techniques for attaching the zipper highlight an important balance between precision and creativity. While the instructions may seem methodical, they offer ample room for personal adjustments based on fabric behavior and design preferences. For instance, when aligning and pinning the zipper tape, you must constantly check that the zipper teeth align perfectly with the fabric edge. This extra step might take more time initially, but it saves you from having to troubleshoot the bag later. Ensuring that each segment of the zipper is properly attached contributes immensely to the durability of your tote bag.
Attaching the zipper to the inner lining demands a focused approach. With the zipper face down, you begin sewing from the top and steadily guide the fabric to secure it along the zipper tape. This method demands not only mechanical skill but also a keen visual discipline. The zipper should run continuously, with no gaps and minimal chances of snagging. Advanced sewers sometimes employ a technique where the second half of the zipper is inserted between the lining and the outer fabric in a single step. However, keeping the process segmented until the final assembly allows better control over each detail. These steps demonstrate that every careful stitch builds toward a bag that feels professional both in appearance and function.
Similarly, the outer fabric presents its own set of challenges and rewards. When the zipper is attached to the outer fabric, you must take extra care to maintain the integrity of the fabric’s design. Working with thicker materials can be more demanding because the fabric tends to shift and bulk up along the seams. A walking foot can be an invaluable tool in such cases, helping to feed the fabric evenly through your machine. The goal is to achieve a seamless integration of the zipper with the outer panel, creating a look that reflects both simplicity and competence. Every stitch here is a step closer to forming a robust and attractive tote bag.
After the zipper is secured on both the inner and outer fabrics, the final assembly phase begins. The two layers are sewn together along the sides and bottom, leaving an opening at the bottom to turn the bag right side out. This opening is essential for flipping the bag and creating crisp, neat corners. As you complete this final assembly, you must handle each fabric edge with care. Clipping the seam allowance at corners reduces excess bulk, and additional ironing at each step flattens the curves and edges. This stage marks the convergence of all the previous techniques into one finalized, high-quality product.
There is an art to topstitching, which fixes the lining to the outer fabric at the top of the bag. This step reinforces the attachment of the zipper and provides a finished look that elevates the overall design. Topstitching should follow the contour of the bag smoothly, with the stitches placed approximately a quarter-inch from the edge. It is a delicate process that requires steady hands and an eye for symmetry. Consistency in your stitches is crucial to avoid any irregularities that might catch the eye. Every precise stitch confirms that you have mastered the art of zipper attachment, combining visual appeal with practical durability.
While the main focus is often on the zipper attachment, the finishing touches deserve special mention. Finished handles, for instance, add both style and enhanced functionality to your tote bag. Handles are typically made from strips of fabric that are folded and sewn to reinforce their strength. When you attach these handles inside the bag, close to the top corners, you ensure that they center perfectly and share the overall design language of your tote. The secure fastening of handles not only adds to the bag’s strength but also provides an element of style that completes its look. This added detail can be compared to the finesse of well-finished stitching along the zipper.
Every successful tote bag project depends on the interplay of precise measurements, consistent stitching, and thoughtful assembly. The methods discussed emphasize a balance between the inner lining and the outer fabric, ensuring that the zipper is perfectly integrated. Your bag’s utility and aesthetic are both enhanced when each component is carefully aligned. The techniques described here are not only practical instructions but also an invitation to embrace creativity within the structure of the project. You can experiment with different fabrics, interfacing types, and even handle designs to create a tote bag that is both uniquely yours and functionally sound.
Attention to detail is evident throughout the entire process. Whether you use fine pins or sturdy clips to hold your zipper in place, every tool you select contributes to a seamless construction. It is beneficial to test your stitch tension on scrap fabric before sewing on the final pieces. Such preliminary tests help you make adjustments to avoid any surprises during the main project. Consistent tension in your stitches is as important as precision in your fabric cuts. This attention to technical detail guarantees that the final product will have a clean finish with a professional look.
For those new to sewing, the act of aligning a zipper might seem daunting. However, with practice and patience, you will learn how subtle modifications in your technique can prevent issues such as misaligned edges or uneven seams. Dedicated practice encourages confidence and skill, allowing you to tackle more complex projects over time. Many sewing enthusiasts share their personal tips based on trial and error, which often serve as an inspiration. They advise taking the time to align fabric layers correctly and to work slowly for the best results. These insights transform routine tasks into satisfying moments of creative achievement.
Incorporating these zipper attachment techniques into your tote bag project not only results in a functional accessory but also provides an opportunity to refine your sewing expertise. The journey from preparing your materials to final topstitching is filled with learning moments and creative decisions that enhance your overall craftsmanship. As you stitch, pin, and press, you build confidence and skill. The little adjustments you make along the way—like using the correct seam allowance or clipping the corners diagonally—contribute to a product that is both visually appealing and built to last.
If you are interested in further exploring the nuances of zipper attachment and other sewing techniques, you may find additional resources worthwhile. One particularly useful guide on tote bags with integrated zipper designs is available through an internal article on detailed tote bag construction techniques. You can learn more by reading the article on the importance of zippers in contemporary designs in this piece from an expert collection on tote bags with zippers (https://alltotebags.com/tote-bags-with-zippers/). This resource complements the hands-on techniques described here and offers further inspiration for your creative journey.
For those looking to refine their skills further, a well-regarded external tutorial from The Spruce Crafts offers clear, step-by-step guidance on sewing a zippered tote bag. You can view this comprehensive resource at https://www.thesprucecrafts.com/sewing-a-zippered-tote-bag-4129749. By studying various approaches and techniques, you will become more adept at troubleshooting and perfecting your own work. Embracing multiple perspectives enriches your ability to adapt techniques to suit your personal style and project specifications.
Every stitch you sew and every method you master contributes to your growing expertise in DIY bag projects. Successfully attaching a zipper is more than just a mechanical process; it is an art form that blends precision, patience, and creativity. By following this guide, you are well on your way to creating a tote bag that not only meets practical needs but also stands as a testament to your skill and dedication. The reward is a beautifully assembled accessory that you can proudly say is entirely your own creation.
Refined Craftsmanship: Seamlessly Assembling and Finishing Your Zippered Tote Bag
The art of assembling and finishing your zippered tote bag is one that combines practical sewing skills with creative flair; it is a process that transforms raw fabric pieces into a refined accessory that exudes durability and style. In this chapter, we explore the journey from first aligning your materials to the final topstitch that secures a neatly pressed finish. Every step is a chance to display precision, attention to detail, and personal artistry.
Begin by preparing your workspace: a well-lit table, neatly arranged materials, and all necessary tools within reach contribute to a steady pace of work. The process starts with the careful selection of fabrics; popular outer choices include canvas, denim, or robust cotton that promises longevity, while the lining fabric offers a smooth contrast to the exterior texture. When considering the overall structure and shape of the bag, many sewists find that pressing the seams as they progress is crucial to achieving the professional look that will eventually shine through each getup.
With your fabric in hand and pre-cut to the desired dimensions, it is time to focus on attaching the zipper. Placing the zipper face down along the top edge of the outer fabric pieces ensures that the zipper will sit perfectly flush with the bag’s opening, providing both a neat edge and a functional closure. The zipper serves as a central design element, and its proper installation is fundamental. Begin by aligning the zipper teeth with the fabric’s edge and pin it securely. Using a sewing machine fitted with a zipper foot, carefully stitch along both sides of the zipper tape. The steady rhythm of the machine, when paired with backstitching at both the beginning and the end of your seam, ensures that the zipper stays in place throughout all subsequent manipulations. This delicate phase requires the coordination of guiding the fabric and allowing the machine’s feed dogs to achieve uniform pressure along the seam.
Once the zipper is firmly in position on both exterior fabric panels, you move on to the construction of the outer shell of the bag. Pair the two pieces with right sides together, ensuring the zipper is sandwiched between them in a way that leaves no misalignment. The idea here is to sew around the perimeter of the panels with a consistent ½-inch seam allowance; however, leaving a gap of 4 to 5 inches at one segment of the bottom is essential for later turning the bag right side out. Such an opening not only facilitates an easier internal finish but also allows for adjustments in the fabric alignment later on. The process of clipping the corners diagonally is employed to reduce the bulk rendered by the overlapping seam allowances; this creates smoother, cleaner corners that elegantly signal the bag’s sophistication.
After constructing the outer shell, attention shifts to preparing the lining—the layer that will form the interior of your tote bag. Unlike the outer fabric, the lining does not require the integration of a zipper before joining it with the exterior. Instead, the two lining fabric pieces are stitched together with the same ½-inch seam allowance, and a similar gap is left to allow the lining to be turned right side out. As with the outer bag, careful clipping along the corners of the lining reduces the material thickness at the joints, ensuring a sleek inner finish. When the lining is turned correctly, pressing each seam reinforces the structural foundation necessary for the bag’s longevity.
At this stage, the assembly process offers a moment to appreciate the intersection of technical precision with creative expression. Once both the outer shell and lining are completed, they must be joined meticulously. Placing the outer bag inside the lining with right sides facing each other is critical for forming a durable bond between the two layers. By aligning the top edges of the outer fabric with those of the lining, you create a canvas upon which the final topstitch is applied. The stitching along the top edge not only secures the layers but also gives the bag a tidy, professionally finished look. Clipping the corners at this juncture to minimize bulk ensures that the assembled bag maintains an even profile from every angle.
The real finesse is shown in the moment you turn the assembled bag right side out. This final transformation, achieved through the previously created gap on the lining, requires a gentle but firm prodding to ensure that the lining fits perfectly within the confines of the outer fabric. As the bag takes its final shape, the smooth motion of the zipper, now integrated securely into both layers, confirms that every stitch was placed with care. For added security and a robust finish, a final round of topstitching is performed along the top edge of the bag, typically about a quarter inch from the edge. This not only reinforces the seam but also provides a visual treat with the neat, uniform line of stitching that speaks to the maker’s attention to detail.
Beyond the basic assembly and refinement of the tote, some sewists choose to incorporate optional finishing touches that further elevate the bag’s utility and aesthetic appeal. For example, reinforcing the handles is a common consideration. Many choose to create handles from fabric strips, which are folded, stitched, and turned to reveal a clean edge. This extra detail ensures that the straps can support the weight of everyday items, and adding them inside the lining offers an additional level of durability. The creative freedom in handle design also presents opportunities for experimenting with contrasting fabrics or different stitch styles that add yet another layer of personality to the finished piece.
Moreover, while the step-by-step process described thus far focuses on the traditional construction of a zippered tote bag, creative alternatives abound for those with a penchant for innovation. By repurposing fabric from an old shoulder duffle bag or using mismatched materials that tell a unique story, you can craft a tote bag that is as individual as its creator. A sustainable approach to sewing not only revitalizes discarded items but also introduces textures and stories into your projects that mass-produced accessories simply cannot emulate. Reinforcing the base of the bag with interfacing or a semi-rigid insert can provide structure particularly when working with softer fabrics, ensuring that the final product stands firm under daily use.
While the basic principles of zipper installation and seamless assembly form the core of this tutorial, variation in closures can offer both style and function enhancements. Some designers opt to replace the standard zipper with alternative closures such as magnetic snaps or even a drawstring mechanism. These alternatives require a nuanced understanding of both the mechanics of the bag and the aesthetic implications of each closure type. It’s worth noting that while alternative closures add a modern edge to the classic design, the meticulous care taken to align and sew the individual fabric pieces remains paramount. Each decision, from the arrangement of fabric pieces to the choice of closure, culminates in a bag that is not only practical but also a statement piece.
Achieving a professional finish requires patience and persistence. The process of assembling and finishing the tote bag is as much about honing your craft as it is about creating an accessory that serves you in everyday life. Once the outer shell, lining, and handle reinforcements are complete, a final inspection ensures that every seam is secure, every corner pressed, and every edge trimmed for a polished look. Paying special attention to the functionality of the zipper can make or break the usability of the bag. The zipper should operate smoothly, gliding along the tape with minimal resistance; if it does not, consider revisiting the initial attachment process or rechecking the alignment of the fabric edges.
In working on this project, it’s helpful to occasionally step back and admire the progress made from the simple stack of fabric pieces to the nearly finished tote bag. This is an art that marries technical proficiency with creative inspiration. For those who seek additional ideas or wish to compare their results with other projects, there is a wealth of inspiration available online. For instance, a great resource to explore designs and tips is the guide on tote bags with zippers, which provides a range of insights and visual examples that encourage further experimentation in your own work.
The detailed work on assembling the bag is not only a practice in sewing but also a meditative process that instills confidence in one’s abilities. It reinforces the importance of precision in every stitch and the value of each small adjustment made along the way. Mastery of these skills is built over time, with each completed project adding both to the portfolio and to the repertoire of techniques that contribute to more advanced and refined creations in the future.
Additionally, the integration of sustainability into your design philosophy is an evolving conversation in the realm of craft and sewing. Many enthusiasts are now embracing eco-friendly methods and materials, repurposing what might otherwise be discarded into beautiful, functional art. Employing repurposed fabrics not only reduces waste but also imbues the final product with a story that is unique and environmentally conscious. Whether you’re transforming an old shoulder bag or using fabric remnants from previous projects, sustainability enhances the narrative of your crafted tote and aligns with the broader movement towards ethical consumption.
The culmination of your efforts is not merely the creation of a bag but the realization of a project that is a testament to your skills and creativity. The process demands focus—every alignment of the fabric, every backstitch at the zipper margins, and every press of the iron contributes cumulatively to the professional outcome. As you run your fingers along the newly finished edges and test the smooth operation of the zipper, a sense of accomplishment emerges, reminding you that every challenge encountered along the way was a stepping stone to mastery.
The journey of assembling and finishing a zippered tote bag is rewarding not only because it results in a practical accessory but also because it encapsulates the spirit of craft that turns ordinary materials into extraordinary objects. Each decision made and every method applied—from the practical integration of a stable base to the creative freedom of alternative closures—contributes to an end product that resonates with both functionality and personal style.
For further visual guidance and additional ideas on how to refine your design, consider exploring the detailed illustration and tutorial available at an external resource on Pinterest: DIY Zipper Tote Bag Tutorial. Here you can find step-by-step images and videos that visually echo the concepts described, providing a complementary perspective to the narrative instructions laid out in this chapter. Embrace the satisfaction of transforming fabric and thread into a lasting personal accessory, and let each project spur you towards even greater creative endeavors in the world of sewing.
Streamlining Your Sewing Process: Expert Techniques for Crafting a Perfect Zippered Tote Bag

Sewing a zippered tote bag is as much about skillful craftsmanship as it is about leveraging efficient methods that make the process smoother and more enjoyable. Whether you are a beginner or a seasoned tailor, incorporating practical hacks and precise techniques can transform your project from a challenging task into a rewarding experience. By focusing on the right tools, understanding proper alignment, managing seam allowances, and mastering pressing techniques, you can create a beautifully finished tote bag that shows off both durability and style.
One of the most important aspects of creating an impeccably sewn zippered tote bag lies in setting a solid foundation. The journey begins with selecting the appropriate presser foot. Many sewers overlook the benefits of using a specialized presser foot, such as the zipper foot or walking foot, which is designed to accommodate the intricacies of attaching a zipper. This particular tool not only safeguards against uneven stitching but also provides better control when maneuvering around the zipper teeth. The universal zipper foot ensures that as you sew along the fabric’s edge, your stitches remain consistent, straight, and secure. For instance, when aligning the zipper tape with your outer fabric panel, using the right presser foot minimizes the risk of misalignment and uneven allowance, resulting in cleaner lines right from the start.
Proper alignment is key when attaching the zipper to your tote bag. You should begin by carefully matching the center mark on the zipper tape with the midpoint of your fabric panel. Doing this guarantees that your finished bag will have a balanced and symmetrical appearance. While it may seem like a minor detail, neglecting precise alignment can cause the bag’s closure to appear crooked, disrupting the overall aesthetic. One effective trick is to pin the zipper carefully in place along the bag’s opening, making sure that the marks on the zipper tape and those on the fabric are in perfect agreement. Once the alignment is confirmed, proceed with sewing along each side, being mindful to backstitch at both the beginning and the end of your seam. This extra step reinforces the attachment and ensures longevity. The time invested in meticulous zipper installation pays off extensively when you see your finished product exhibiting a pristine, professional finish.
Managing seam allowances may appear to be a straightforward task, yet many sewers find themselves wrestling with excess bulk and irregular edges. To avoid these common pitfalls, trimming the seam allowances soon after sewing is recommended. For example, after you have stitched the side seams and attached your zipper, take a moment to trim away any surplus fabric from the seam allowance. This reduces bunched fabric at the corners and helps prevent unsightly bulk when you turn your bag right side out. Not only does this technique give a cleaner finish to your tote bag, but it also makes subsequent pressing much simpler. A neatly trimmed seam is easier to press, and the finished seam once pressed is both flatter and more manageable when it comes to assembling the lining and outer shell.
While trimming helps manage bulk, a well-planned pressing technique works hand in hand with these steps to produce a finished bag that appears crafted by a professional. Pressing isn’t anything that you can leave until the end of your project; rather, it should be an ongoing practice throughout your sewing process. As soon as a seam is stitched, use an iron to press it flat. This is crucial not only for achieving a clean finish but also for facilitating the assembly of multiple layers later on. For curved areas like the bag’s corners, consider using the help of a tailor’s ham or a small firm cushion. These tools allow you to carefully mold the fabric into the desired rounded shape, eliminating the risk of a blocky, uneven corner. The improved appearance and functionality of a well-pressed tote bag can make a dramatic difference in how the final product is perceived, turning a mere accessory into a statement piece of craftsmanship.
Integrating the outer bag with the lining is another important step that calls for both patience and precision. Once both the outer shell and the lining are prepared—with the zipper securely attached to the outer fabric and the smooth seams of the lining neatly pressed—the two components come together in a delicate dance of alignment and adhesion. Lay the outer bag and its lining together with the right sides facing one another, ensuring that the top edges are perfectly aligned. Pin these layers together firmly. In this stage, some experts suggest that it might be easier to attach any additional elements, such as a top handle, before fully assembling the bag. By attaching the handle while the tote remains flat, you avoid the difficulties that may arise from trying to secure it after the bag has been constructed into its final shape.
Throughout the entire process, taking a few extra moments to test stitch tension can save considerable rework later. This is particularly true when working with thicker fabrics or multiple layers. The tension of your stitch impacts not only the durability of the seams but also the overall appearance of your bag. Running a short test stitch on a scrap piece of fabric matching your outer material ensures that you have the correct adjustment. Following this, consider using shorter, more controlled stitches when attaching the zipper pull. A satin stitch or a short straight stitch can secure the zipper efficiently without compromising the bag’s strength, making it a subtle yet effective finishing touch.
In the spirit of efficiency, many seasoned sewers use a two-pronged approach. First, they rely on the practice of the “tuck and press” method immediately after completing a seam. This technique involves tucking in the seam allowance and then pressing it flat with the iron before moving forward. This approach ensures that each seam is crisp, thereby reducing the time needed for reworking any misaligned parts later in the project. Second, using tools like an overlock machine or a zigzag stitch to finish raw edges keeps fraying at bay and gives the tote bag a neat and polished look. Not only does this method secure the edges effectively, it also provides the bag with an extra layer of durability against wear and tear.
It is also essential to maintain an orderly workspace throughout your sewing session. Everything from your fabric pieces to your specialized tools like the zipper foot, walking foot, and pins or clips should be readily accessible. An organized working environment minimizes the frustration of searching for tools when you are in the middle of a detailed step, and this translates into a faster workflow. The smoother your process, the more time you can spend focusing on the finer details, such as ensuring that your seam allowances are even and that no stray threads remain to mar the final presentation.
For those who might find themselves occasionally bogged down by the intricacies of attaching tiny handles or ensuring impeccable symmetry, it is worthwhile to explore additional methods to simplify these final steps. When planning on adding handles to your tote bag, it is advisable to pre-cut fabric strips and fold them before incorporating them into your design. This not only reinforces the handle but also ensures that they are precisely aligned at each attachment point. In some tutorials, experienced sewers recommend sewing the handles to the bag top with a few extra passes of stitching, thereby providing extra reinforcement and durability.
The beauty of sewing your own tote bag is in the ability to customize every element to your personal style. The process that may seem complex at first simply transforms into a series of logical steps once you have become confident with the foundational techniques. In your journey from selecting the right fabric and interfacing to finishing the final topstitch, each step adds a layer of sophistication to your work. The key lies in not rushing through any phase. Whether it is the careful placement of pins while aligning a zipper or the deliberate technique of trimming seam allowances, each moment provides an opportunity to perfect your craft.
Even though each phase requires attention to detail, the assembled process flows naturally when you allow each step to build on the last. For instance, after securely attaching the zipper and aligning the fabric pieces, you are immediately ready to sew the outer bag with confidence. The fact that the initial steps have been executed with such precision paves the way for effortless assembly. Once you combine the outer and inner components of the tote bag, the previously practiced techniques of pressing and trimming become invaluable. The end product is not only visually appealing but also functional—a bag that promises to be both durable and stylish.
In some ways, the process of sewing a zippered tote bag is analogous to arranging the elements of a well-composed musical piece. Each instrument, from the specialized presser foot to the perfectly aligned zipper, plays its role harmoniously. With each measured step, the final composition becomes increasingly clear—a bag that is as much a testament to efficiency as it is to creative expression. A detailed attention to the fundamentals not only minimizes mistakes but also builds the confidence required to experiment with more advanced designs in the future.
To further streamline your process, consider viewing additional insights and visual guidance on advanced techniques for working with zippers. For example, exploring practical tips on managing seam allowances and pressing techniques can be extremely rewarding. For more detailed guidance on these techniques and further inspiration, check out this informative guide on zippered tote bag construction. This resource serves as another excellent example of blending careful planning with expert execution to achieve outstanding results.
Moreover, while every seam and stitch contributes to the overall integrity of the bag, the final aesthetic touches are equally vital. The careful topstitching around the top edge of the tote bag not only secures the lining neatly inside the outer fabric but also adds a professional decorative element that enhances the bag’s appearance. In essence, this final step is like adding the signature flourish at the end of a masterpiece—one that speaks volumes about the level of care and expertise invested in your work.
Every stitch, pin, and press brings you one step closer to a finished product that stands as a reflection of your commitment to quality and efficiency. With each subsequent tote bag you sew, these efficiency hacks become second nature. They seamlessly integrate into your workflow and empower you to tackle more complex projects with confidence. The journey from a simple fabric piece to a refined product is not just about assembling pieces together; it is about transforming raw materials into a functional and stylish accessory that you can be proud of.
It is these precise techniques and careful steps that elevate your sewing from a mere hobby to a refined skill. The blend of practical knowledge and the commitment to executing even the smallest details distinguishes a good project from an exceptional one. In the end, crafting a zippered tote bag is an exercise in meticulousness and dedication—a challenge that, when met with efficient techniques and a calm, methodical approach, results in a creation that is both practical and aesthetically pleasing.
For those looking to further refine their skills, exploring comprehensive resources and tutorials can provide additional insight into the art of efficient sewing. One highly regarded external resource that offers a wealth of knowledge in this area is the tutorial provided by The Spruce Crafts. Their detailed video guidance and clear photographic instructions serve as a useful complement to the techniques discussed here. For more advanced tips and step-by-step visual instructions, consider visiting The Spruce Crafts’ guide on sewing a zippered tote bag to further enhance your sewing repertoire.
By now, the array of tips and techniques shared provides a comprehensive overview of how to sew a zippered tote bag efficiently. Focusing on the fundamental steps such as using the right presser foot, precise zipper alignment, managing seam allowances through careful trimming and pressing, and simplifying the final assembly all work towards a streamlined process. Embracing these practices not only improves the quality of the finished product but also transforms the sewing process from one marked by frustration into a gratifying creative pursuit. Armed with these expert techniques, every sewist is well-equipped to produce a tote bag that is not only functional and durable but also a showcase of refined craftsmanship.
Final thoughts
Creating a zippered tote bag not only enhances your product line but also reflects your brand’s commitment to quality craftsmanship. By mastering the materials, techniques, and efficient sewing practices outlined in this guide, business owners can create stylish and functional bags that appeal to diverse customer needs. As you incorporate these insights into your operations, you’ll likely see increased customer satisfaction and potential for greater sales within the artisan market.