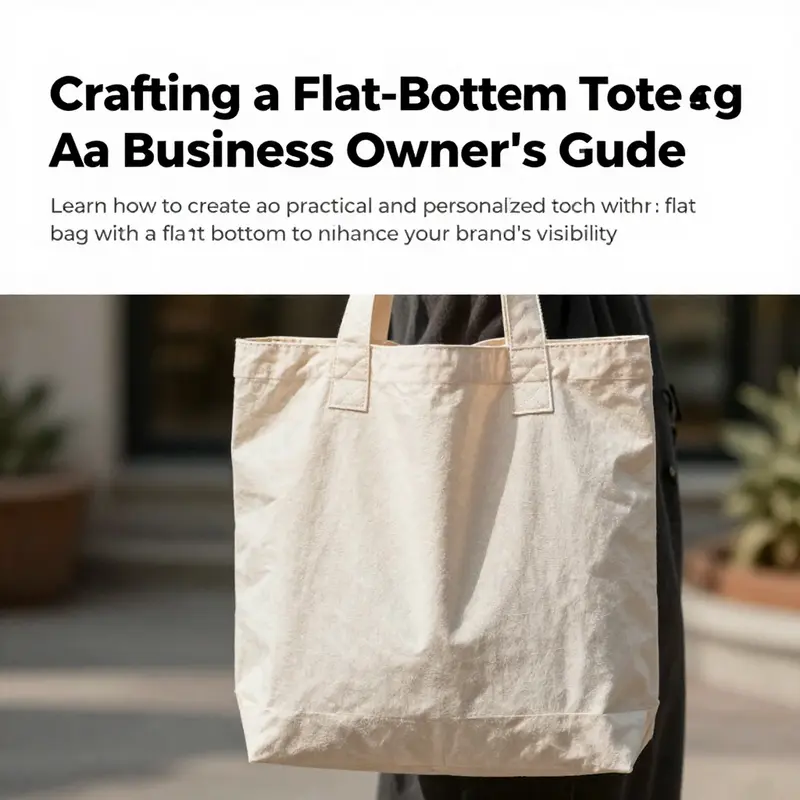
Tote bags are more than just practical items; they present a unique opportunity for businesses to showcase their brand while offering utility to customers. With increasing demand for stylish yet functional products, a tote bag with a flat bottom stands out as a favorite—ideal for carrying groceries, books, and everyday essentials. This guide provides a detailed exploration of making such a bag, ensuring that business owners not only understand the value of craftsmanship in their merchandise but can also offer customers personalized, high-quality products. Each chapter delves into essential steps: from gathering materials to assembling the bag, and finally, adding personal touches, ensuring that your tote bag creation will resonate with target audiences.
Stand Tall and Carry Well: A Seamless Guide to Sewing a Flat-Bottom Tote
A tote bag with a flat bottom is more than a simple carrier; it is a portable work surface, a stable grocery companion, and a canvas for personal style. When a bag stands on its own, it changes how you interact with it. Books stay upright, even when the bag is half-full, groceries don’t tip, and a small display of items—like a notebook, a plant, or a lunch container—remains organized and easy to reach. The flat bottom is the design feature that makes all of this possible, providing a sturdy base that resists bulging and helps the bag maintain its shape as weight shifts inside. Between the stability offered by a reinforced base and the durability of sturdy fabrics, a flat-bottom tote becomes a reliable everyday workhorse. This chapter threads together a practical, beginner-friendly approach with the quiet joy of a handmade object that is both functional and personal. The method below honors the logic of a simple, durable construction while leaving space for customization, so you can tailor the bag to your own daily rituals and values.
To begin, you’ll want materials that perform well under pressure and age gracefully with use. Heavyweight cotton canvas is a classic choice for both outer fabric and lining due to its strength, structure, and natural texture. The canvas provides a robust frame that won’t sag when loaded with books, groceries, or a laptop charger and a lunchbox. Choose a fabric that feels substantial to the touch, one that resists puckering when you stitch and holds a crease for a clean, crisp silhouette. If you want a touch of luxury or a different texture, you might opt for a durable faux leather, a sturdy woven, or even a denim option. The principle remains the same: the outer fabric and the lining should be of similar weight and construct to ensure balanced performance. Matching thread completes the squared-off look and helps create seams that endure repeated opening and closing, bottom loading and unloading, and the occasional mishap that comes with everyday carry. A simple machine stitch will do, but you can always reinforce corners, edges, and attachment points by adding extra passes or using a backstitch to anchor the thread more firmly. Irons and pressing play a crucial role here too, as pressing seams flat reduces bulk and helps you achieve cleaner lines when the time comes to assemble the pieces.
The design process itself is a form of problem solving. If you trace a rectangle template onto your fabric and cut carefully, you set yourself up for symmetry and balance in the final product. The flat-bottom insert, a separate rectangular piece, becomes the core of the structure that defines the tote’s base. When you baste or stitch the three-dimensional box into the bottom, you create a foundation that resists tipping and caving under load. The more precise your cuts and the more consistent your seam allowances, the more orderly your bag will look and the longer it will last. A well-executed bottom insert works in tandem with the side panels to keep the bag stable, even when filled. It is this partnership between the base and the sides that gives the flat-bottom tote its distinct personality: upright stance, predictable shape, and an internal space that feels disciplined rather than wasted. As you work, you might reflect on the relationship between form and function—how a tiny adjustment in seam allowance or corner alignment can translate into a bag that stands firm rather than collapses at the slightest provocation. In the spirit of continual improvement, you can peruse broader tote designs to gather ideas about proportions and finishing details. For instance, many creators explore a range of tote styles, such as those found in broader canvas tote collections, which can be a source of inspiration for experimenting with pocket placements, handle shapes, and top-edge finishes. See how different configurations influence the bag’s balance and usability by looking at various examples in the broader library of styles such as womens canvas tote bags. women’s canvas tote bags.
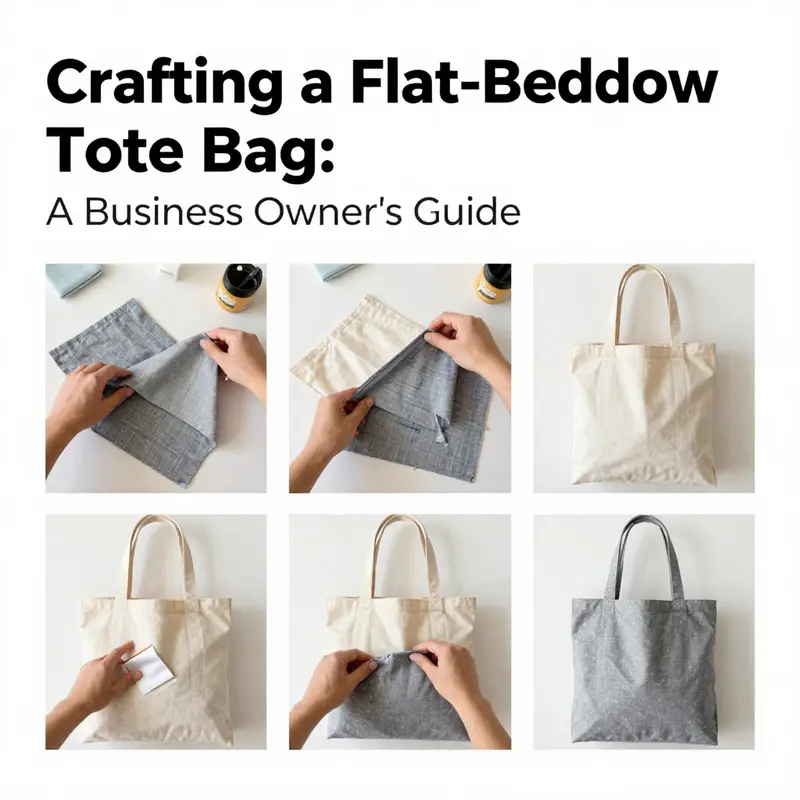
The process begins with cutting the fabric into the components that will shape your tote. A standard flat-bottom tote might measure about 14 inches wide and 12 inches tall, a generous enough footprint to accommodate daily essentials without becoming cumbersome. In this plan, you’ll prepare two main body pieces—outer and lining—and two flat-bottom inserts that will form the base. Each bottom insert matches the width of the bag, typically 14 inches, and measures about 5 inches in height to create a stable, box-like bottom when sewn. Keeping the lines square and the edges clean ensures that the bag sits evenly on its base rather than warping toward one corner. Pattern templates or a simple cardboard box can act as reliable guides. If you rely on a template, trace the shapes carefully, cutting with sharp scissors or a rotary cutter to avoid fraying and to maintain crisp edges. Precision here matters because the best-looking tote begins with accurate pieces that align without forcing seams to gather or stretch.
Once the pieces are cut, the construction takes a rhythmic turn. The bottom insert is first formed by placing the two bottom pieces right sides together and stitching along the long edges with a comfortable seam allowance, typically ½ inch. After sewing, you turn the insert right side out, using a turning tool or a blunt object to coax the fabric through the opening. A quick press with the iron yields a neat, flat seam that sits flush against the fabric. This simple step creates a reinforced, box-like form that will anchor the base of the tote. You then attach this bottom insert to the outer main body piece by aligning raw edges and sewing around the perimeter with the same seam allowance. Repeating this with the lining creates two distinct base structures: an outer box and an inner box, each designed to protect the bag’s contents from impact while maintaining a clean silhouette. The act of sewing around the insert anchors the base securely, forming a foundation that will support heavier loads as you fill the tote. The result is a bag that feels solid at the touch and behaves predictably when weight is introduced.
After the base is secured, you move to assembling the outer shell and the lining. These two components will form the sides and top of the bag, and they are connected right-sides-together so that the interior becomes the exterior’s mirrored surface. You align the top edges and the side seams, pin or clip the pieces in place, and stitch along the side seams with a ½-inch allowance. It’s essential to leave the bottom seam open where the bottom inserts attach; this creates a corridor for the base to nestle into the outer shell and for the inner lining to follow the same path. When the outer and lining pieces are sewn and the bottom opening is left, you turn the bag right side out through that bottom opening. At this moment you can press the seams flat or leave them slightly softened for a more relaxed look, depending on the fabric’s stiffness and your preferred handle feel. Pressing is a reliable way to minimize bulk at the corners and to create crisp vertical lines that trace the bag’s side profile. The top edge remains unfinished for now, ready to welcome a reinforced finish that will secure the opening and improve durability.
Handles are the final structural element that completes the tote’s function. You’ll want two strap pieces, typically 18 to 20 inches long and about 2 inches wide, so they sit comfortably on the shoulder or in the hand without slipping. The straps are folded with the wrong sides together and pressed, then stitched along the long edge to form a sturdy tube. After turning the straps right side out, you’ll topstitch along the edges to ensure the straps keep their shape and resist stretching over time. Attaching the handles requires careful placement: position each end about 2 to 3 inches from the bag’s side edges, and anchor the straps through both the outer fabric and the lining. A strong backstitch or zigzag stitch at the junctions increases resilience where the strap meets the bag. If you want to add an extra safety buffer, you can sew a small fabric patch under each handle anchor point; this distributes stress across a broader area and helps prevent ripping under heavy loads.
Finishing the top edge brings the whole piece together. A clean, professional look benefits from folding the top edge inward by about ½ inch and pressing. You can then secure this fold with a narrow topstitch along the folded edge, which doubles as reinforcement and a subtle decorative detail. This step helps to prevent the fabric from curling and provides a crisp transition from body to opening, which is especially appealing when you use heavier fabrics or bolder prints. If you’re feeling creative, you can pepper in minor embellishments here—perhaps a row of tiny stitches in a contrasting thread, or a decorative cross-stitch line near the opening for a hint of personality. The goal is to strike a balance between sturdy construction and an aesthetically pleasing finish.
With the basic construction in place, you can introduce personalization to truly make the tote your own. Fabric paints offer a quick way to introduce color and motifs, while embroidery—whether machine-assisted or hand-done—lets you weave initials, symbols, or nature-inspired designs into the fabric. Patches, appliqués, or felt shapes can also be added for a playful or sophisticated touch, depending on your chosen theme. Personalization is more than decoration; it’s a chance to reflect how you’ll use the bag and how it should feel in your hands. A tote that matches your wardrobe, or one that carries a particular sentiment, becomes a more enduring companion because it carries your intention as much as your belongings. If you’re considering sustainable crafting, repurposing fabric from existing garments or other textile pieces is a powerful strategy. For instance, transforming an old canvas bag, a worn-out pair of jeans, or even fabric remnants from previous projects can yield a durable, stylish tote with a story. The advantage of reusing materials is not only environmental but practical: you often have access to textures and colors you wouldn’t find in new fabric, and the act of repurposing can spur creative decisions about how to balance weight, architecture, and finish.
As a final flourish, consider a gentle, reflective closing to your project. Turn the bag inside out to check for loose threads, uneven seams, and any fabric pucker along the edges. Lightly shape the bottom so it sits flat and evenly distributes any weight placed inside. If you’ve included a bottom insert, test the bag with a light load to verify stability and strength. A well-made flat-bottom tote should stand by itself when empty and should maintain its shape as you fill it. If a particular area feels soft or lax, you can reinforce it with an extra stitching line or by pressing more firmly along the problematic seam. The beauty of this method lies in its adaptability: you can simplify for a quick, sturdy project or expand the complexity with pockets, a zipper closure, or exterior panels that reveal personal taste while preserving the flat-bottom magic.
Finally, the reasons to embrace a flat-bottom tote extend beyond aesthetics. The base is the workhorse element that helps keep items organized and accessible. It supports heavier loads, reducing the risk of the bag tipping over or losing its shape under weight. The ability to stand upright makes it easier to loading and unloading groceries, books, or craft supplies, and it contributes to a more orderly carry experience. By choosing durable fabrics and implementing reinforcing stitches at stress points, you deliver a long-lived bag that can accompany you through daily routines, from commute to classroom to market. The process itself—designing around a stable base, shaping a clean exterior, and adding personalized touches—becomes a small daily practice of intentional creation. It is a tangible demonstration that even a humble tote can be engineered with care to serve both function and form, with the potential to spark joy in everyday life. This chapter has walked you through the core sequence: measuring and cutting, building the reinforced bottom, joining the outer and lining, creating and attaching sturdy handles, finishing the top edge, and adding personal touches that transform a practical project into a cherished item.
To maintain continuity with related craft explorations, it often helps to reference broader tote-building ideas as you reflect on your finished piece. While the steps here concentrate on a flat-bottom construction, you may find it useful to compare how other tote configurations address weight distribution, edge finishing, and user comfort. The discussion above should leave you with a clear sense of how each decision—whether in seam allowance, handle length, or bottom height—contributes to stability and usability. If you’d like to explore related content that expands on the theme of everyday carry and fabric manipulation, you can navigate to a broader collection of tote styles that includes a range of canvas options and design variations. The journey from a basic rectangle to a stand-ready bag is a reminder that even modest materials, when treated with care, can yield something durable, practical, and expressive. In that sense, a flat-bottom tote is not merely a craft project; it is a statement about how we carry our lives—steadily, with intention, and in a way that invites touch, use, and shared stories.
External resource for deeper techniques and inspiration: https://www.crafty-bag.com/diy-gift-wrap-tote.
Sturdy Foundations: Materials and Tools for a Flat-Bottom Tote That Stands Proud
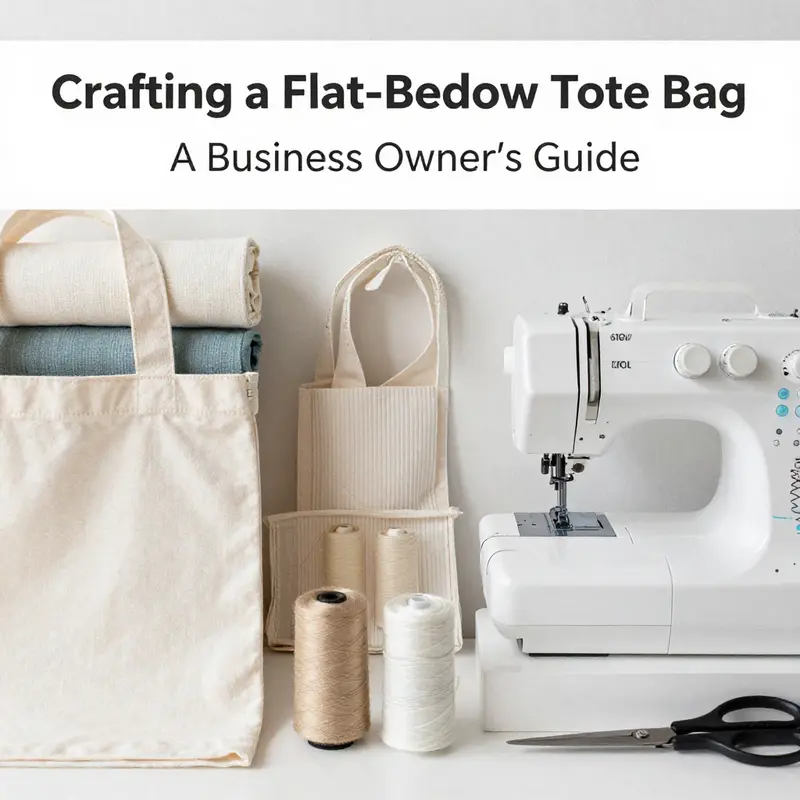
Choosing the right materials and the right tools is less about a shopping list and more about shaping a bag that earns its keep. A tote with a flat bottom needs a careful balance of strength, structure, and flexibility. The fabric must hold its form when loaded, the lining should tame the interior, and the bottom insert must resist crushing under weight. When you walk through the logic of these choices, the tote stops feeling like a simple carrier and becomes a crafted object that can stand upright, bear books and groceries, and still look neat on a crowded shelf. In this chapter, we’ll trace that logic from the ground up, exploring why certain fabrics work better than others, how to reinforce seams and bottoms, what tools make the process smoother, and how to think about durability as a design choice rather than a last-minute fix. This is the foundation upon which every flat-bottom tote is built, and it sets the tone for every stitch that follows.\n\nThe fabric you choose is the first and most influential decision. Practicality and appearance walk hand in hand here. Heavyweight options like canvas and denim have long been favorites for tote construction because they resist sag and pucker, even when a bag is loaded. They carry weight without deforming, they grip themselves when you handle the bag, and they age gracefully with a touch of patina. Heavy-duty polyester can also be a viable option when stitched with a strong thread and reinforced at the seams. Each of these fabrics has its own character: canvas carries a tactile sturdiness; denim adds a casual, rugged feel; polyester offers a sleek, modern look with substantial resistance to wear. What matters most is choosing a fabric that has little to no stretch; stretch invites distortion at the seams and at the bottom, where the load concentrates. When stretch is present, even the best stitching can begin to give, and the bottom can begin to sag, defeating the purpose of a flat, stable base. The guidance about avoiding stretchy or puckering fabrics isn’t merely an old wives’ tale; it’s a practical rule born from experience. The fabric’s behavior under pressure and its memory when you manipulate the bag matters as much as color and texture. It is always possible to add a decorative layer later, but the initial performance rests with the fabric’s core structure.\n\nInterfacing and stabilizing layers play a critical supporting role that deserves careful attention. Interfacing can be a quiet hero, turning a flimsy cloth into something that behaves more like leather than fabric. A stabilizing layer on the inside helps the bag maintain its boxy form and prevents the outer panels from flaring. For a flat-bottom tote, a sturdy interfacing brings the body panels into a coherent, square silhouette. The choice of interfacing—ranging from lightweight fusible types to heavier woven options—depends on the fabric you pick and how rigid you want the finished bag to feel. The bottom, in particular, benefits from a bit of extra reinforcement. If you opt for a pre-cut bottom insert, you may still want to apply a light stabilizer around the edges to keep the seam allowances from tunneling or puckering when you sew around the perimeter. The stabilizer helps the bag stand firm when placed on a table or shelf, turning a once bulky interior into a tidy, usable space. It’s a quiet difference, but a meaningful one; the tote’s personality—whether it exudes a soft drape or a confident, architectural presence—depends in part on how aggressively you stabilize the panels.\n\nThread and stitching are the engine of any durable bag. Strong, heavy-duty thread is essential for seams that carry weight and endure repeated use. The thread must be compatible with the fabric’s fibers and the needle you choose. For most heavyweight fabrics, a robust polyester or cotton-poly thread behaves well under stress, resisting breakage while maintaining a clean, nearly invisible line of stitching. The sewing machine you use matters, too; a machine capable of handling heavier fabrics, paired with a needle sized 16/100 or larger, keeps the stitch length stable and reduces the risk of skipped stitches. If you’re hand sewing, which some beginners prefer for control, a strong backstitch at stress points becomes even more important. Consistency wins here: even, evenly spaced stitches produce a stronger seam and a more professional appearance. It’s not glamorous, but it is effective. When the fabric is thick and the panel edges align, a drip of careful thread tension and measured stitching makes the difference between a tote that holds its shape and one that looks used before it’s even finished.\n\nHandling and attaching the handles is where the bag starts to feel personal. Handles need to be strong enough to bear a heavy load, yet comfortable to carry. Cut a strap that reflects the bag’s size and intended use, typically around 18 to 20 inches long and about 2 inches wide for a balanced shoulder tote. Fold the strap in half lengthwise with wrong sides together, press the crease with a steady hand, and sew along the long edge with a narrow seam allowance. Turn the strap right side out, using a turning tool or a chopstick to coax the fabric through the opening. Topstitch along both edges for durability and a tidy finish. The way you attach these straps—how far from the sides they sit, and how you anchor them through both the outer and inner layers—can transform the bag’s behavior under load. A common-sense rule of thumb is to position the handles about 2 to 3 inches from each side seam, distributing the load toward the center of the bag. When you’re ready to attach, sew through all layers with a robust backstitch or zigzag stitch. If you want to take it a step further, reinforce the attachment with a small fabric patch tucked beneath the seam. The patch doesn’t take away from the aesthetic; it acts as a quiet guarantor that the handles won’t pull free when the bag is stuffed with groceries or books. A simple, well-executed reinforcement makes the entire tote more reliable in daily life.\n\nThe top edge and finishing details bring the whole thing into one cohesive unit. A neat, clean top edge not only looks professional but also helps the bag resist casual wear at the points where it’s most stressed. Turning the top edge inward and securing it with a gentle topstitch should be enough for a tidy finish, but you can also forge a slightly more substantial collar by folding and stitching a small amount of fabric to the interior. This reinforcement protects the opening from fraying and keeps the interior clean, particularly when you’re slipping items in and out. It’s the kind of detail that’s noticed in use but hardly noticed in the moment of creation, which is precisely the mark of good craft. As you near the end of assembly, you’ll want to check that the bottom lies flat and that the sides meet at right angles, especially where the flat-bottom insert is incorporated. The bottom’s flatness is not a mere aesthetic; it’s a functional statement about stability. A little extra effort here that ensures the base stays square will pay off whenever the bag stands on a shelf or a kitchen counter as you set groceries or a stack of notebooks inside.\n\nOne of the practical joys of making a tote from sturdy materials is the opportunity for personalization without sacrificing structure. If you’ve chosen canvas or denim, you’re already on a durable path, but you can still infuse character with careful, respectful embellishment. Fabric painting can be a straightforward way to mark a personal message or design, while embroidery—done by hand if you don’t own a machine—lets you lace in initials, botanical motifs, or simple symbols that echo your style. Patches and appliqués invite a playful, colorful touch that also serves a pragmatic purpose: patches can cover minor imperfections or wear spots on older or repurposed fabrics. The notable thing about personalization is that it becomes part of the tote’s story. Each stitched line, each patch, or each painted motif transforms a functional object into a personal companion for daily life. If you want to explore fabric choices and how they influence the look and feel of a tote for different settings, you can consult resources such as Fabric tote bags for women which discusses fabrics typically used in women’s tote designs and why they work well for durable, everyday uses. This link serves as a practical reference for weaving aesthetic decisions together with material performance.\n\nThe practical toolkit for this project matters as much as the choices you make about fabric. For a reliable build, you’ll want fabric scissors that stay sharp through multiple layers, and a rotary cutter can be a welcome ally when working with thick materials, offering straight cuts and clean edges. A cutting mat helps you navigate multi-layer cutting without dulling your blades. Pins or clips keep layers aligned as you sew; you’ll want enough pins to secure every seam without fumbling with shifting layers mid-stitch. An iron, while optional, is helpful for crisp seams and neat pressed edges that translate into a professional finish. A measuring tool—whether a good ruler, a measuring tape, or a template—ensures accuracy, which you’ll feel in the tote’s symmetry when the pieces come together. In many ways, the tools you select shape your workflow as much as the fabric you pick. The right tools reduce frustration and elevate quality, especially for beginners who are building confidence with each seam. The beauty of this approach is that you can begin with a simple setup, then layer in more specialized tools as you gain experience and as your projects demand.\n\nFor those who love the idea of upcycling, there is a particularly flexible and sustainable route: old jeans can become sturdy, stylish denim totes with minimal additional material. Upcycling is not only environmentally friendly; it is also a practical way to source tough, durable fabric at little or no cost. Jeans provide a natural texture and a heavy, forgiving fabric that stands up to wear. The process often requires just basic tools and perhaps a little extra stabilizer to ensure the denim panels retain their shape. If you’re curious about how to repurpose worn jeans into a functional tote bag step by step, you’ll find a thorough demonstration online that walks through the cutting, reinforcing, and stitching needed to transform denim into a practical tote. This approach aligns with a broader ethos of making where material scarcity is turned into opportunity rather than waste. And because this project benefits from both stability and flexibility, denim’s inherent weight and resilience can be a natural fit for a flat-bottom design, as long as you approach it with the same attention to seam allowance, bottom reinforcement, and handle attachment that you would use with brand-new fabric.\n\nThe bottom insert deserves a word of emphasis here. The flat-bottom feature is what allows the tote to stand upright and remain balanced, even when fully loaded. The insert, whether integrated as a sewn box bottom or created as a separate reinforced panel, anchors the structure. Its interaction with the outer and lining fabrics must be considered from the outset. You want the bottom insert’s edges to align with the main panels so that the stitch lines form a continuous loop rather than a jagged boundary. This is where careful planning, accurate cutting, and precise sewing all converge. If you trace a box-shaped template onto clean fabric, you’re giving yourself a guide that helps you maintain symmetry. The more precise your cuts, the easier it is to attach the bottom insert evenly and sew around its perimeter cleanly. With a reliable insert in place, your flat-bottom tote earns a form that can resist crushing and still look sharp on a store shelf or in a classroom. It’s the difference between a bag that behaves like a soft sack and one that holds its shape under pressure.\n\nAs the project moves from concept to creation, keep sight of the lifecycle of materials. Durability and longevity matter, but so does responsibility. Reusing old fabrics is not only practical; it’s a chance to reduce waste and to reimagine what “new” can mean. If you’re using fresh fabric, you’re investing in a clean, safe material that’s designed to take repeated sewing and use without distorting. Either path, the goal remains the same: a tote that stands upright, carries weight without buckling, and wears well over time. The tools and materials you choose should feel like the scaffolding of a structure you will rely on daily—an invisible partnership between your hands, the fabric, and the design you’ve chosen. When you understand and respect the role of each component, you can approach the rest of the tote-making process with confidence, knowing that your choices will repay you with a bag that is not only useful but a little personal, a little durable, and a lot of fun to use.\n\nFor readers who want to explore further the relationship between fabric choices and tote performance, the concept of fabric selection for durable totes is discussed in longer guides and galleries. If you’d like to see a practical example tied to real-world design, consider visiting Fabric tote bags for women for broader context on how various fabrics behave in tote constructions and how designers balance aesthetics with sturdiness. This resource offers a broader lens on fabric behavior, complementing the hands-on focus of this chapter by situating material decisions within the larger landscape of everyday carry goods.\n\nAs you prepare to move into the next stage of constructing your flat-bottom tote, you’ll carry with you a clearer sense of the material and tool choices that shape its life. The bottom becomes more than a feature; it becomes a statement about how you intend the bag to perform, how long you expect it to endure, and how much you value the craft of making. The interplay between fabric weight, stabilization, thread strength, and handle anchoring will become evident in the first seam, the first row of stitches learning to grip the timeline of daily use. With the materials selected thoughtfully and the tools arranged with care, you’ll discover that making a tote with a flat bottom is as much about understanding the physics of a loaded bag as it is about enjoying the quiet, steady rhythm of stitching. In the next section, we’ll explore how those choices translate into the actual assembly steps, from cutting to finishing, and how this logic of stability and structure remains consistent across variations in size, style, and fabric while offering a reliable framework that supports creativity rather than constrains it.\n\nExternal resource: For a practical look at upcycling old jeans into a functional tote bag step by step, see the external guide here: https://www.youtube.com/watch?v=example
Stitching Identity into Your Flat-Bottom Tote: Personalization Techniques for a Standout Bag
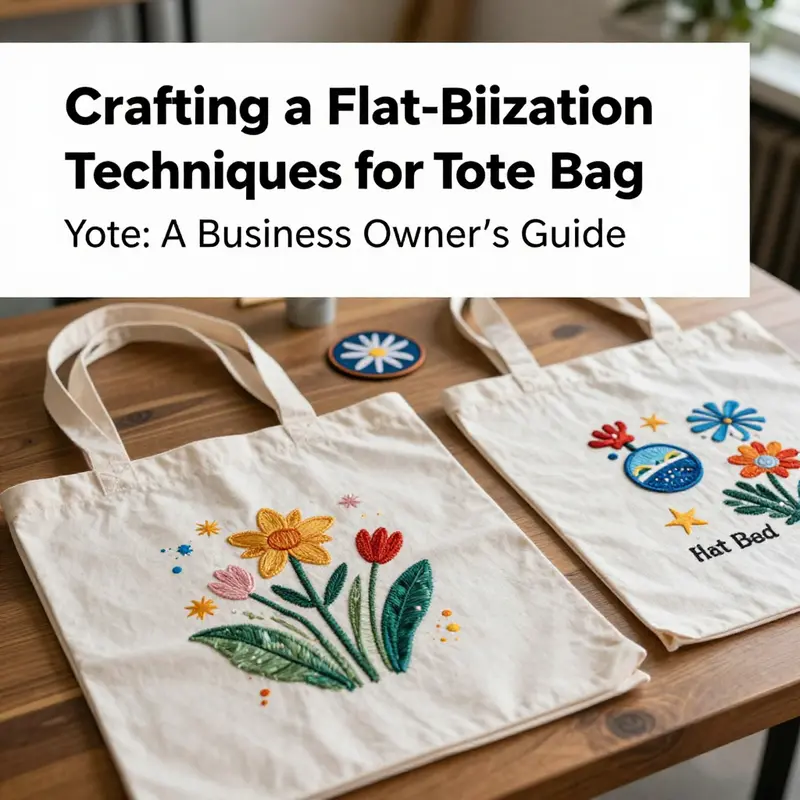
Personalization is more than decoration; it is a conversation between maker and wearer, a way to translate practical function into personal meaning. When you finish a flat-bottom tote, the last layer you add is not only the final aesthetic touch, but a chance to tell a story—yours. The flat bottom, with its box-like structure, invites this kind of storytelling. It stands upright, distributes weight evenly, and gives you a stable canvas for color, texture, and detail. Personalizing a tote bag made with a flat bottom does not demand rare skills or expensive gear; it invites intention and patience, an attitude of play that respects the bag’s robust construction while expanding its personality. In this chapter, the focus is on thoughtful, durable personalization that aligns with how the bag is built and used. It draws on the same careful planning you apply to cutting, reinforcing, and stitching, and it treats every design choice as a practical decision about wear, care, and daily usefulness. From choosing a complementary or contrasting fabric to adding paint, embroidery, patches, or strategic topstitching, personalization becomes a dialogue between form and function, between aesthetics and practicality. The guiding principle is balance: the enhancements should elevate the bag without compromising its flat-bottom stability, its carrying comfort, or its ability to stand upright when set down. Consider the tote not merely as a vessel for contents but as a moving surface where you can express taste, mood, or identity. The path to personalization follows a gentle arc: select your base materials with care, plan your design around the bag’s dimensions, and then apply techniques that suit your skill level and the bag’s intended use.
Final thoughts
Creating a flat-bottom tote bag not only strengthens your business’s commitment to quality and functionality but also enhances brand visibility through personalized, unique products. By providing customers with practical items they can use daily, you foster loyalty and promote sustainable practices. This guide outlines the craftsmanship involved in making a personalized tote bag, emphasizing how such an approach helps distinguish your business in the competitive market.