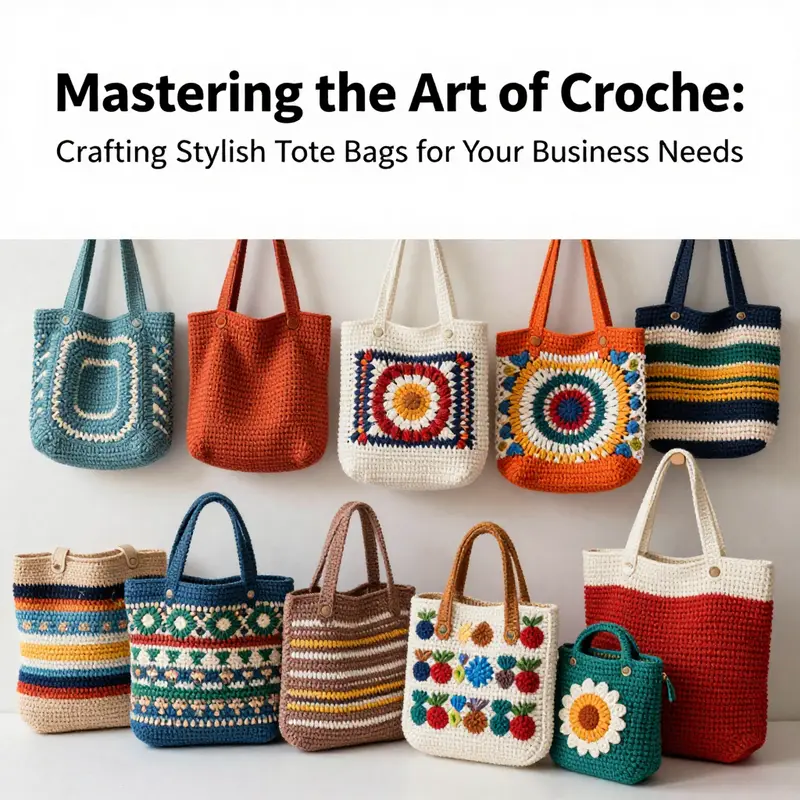
Crochet tote bags offer an excellent balance of style and utility, making them an invaluable asset for any business owner looking to combine functionality with creativity. As consumers increasingly gravitate towards eco-friendly and unique options, understanding how to create your own crochet tote bags can enhance your product offerings. This guide will navigate through selecting the right materials—yarn and hooks—to craft a sturdy structure that supports everyday use, ensuring your bags stand out in the market. Additionally, we’ll explore the importance of incorporating functional features that enhance usability, making your crochet tote bags not just visually appealing but also highly practical.
Stitching the Backbone: How Yarn, Hooks, and Gauge Shape Durable Crochet Tote Bags
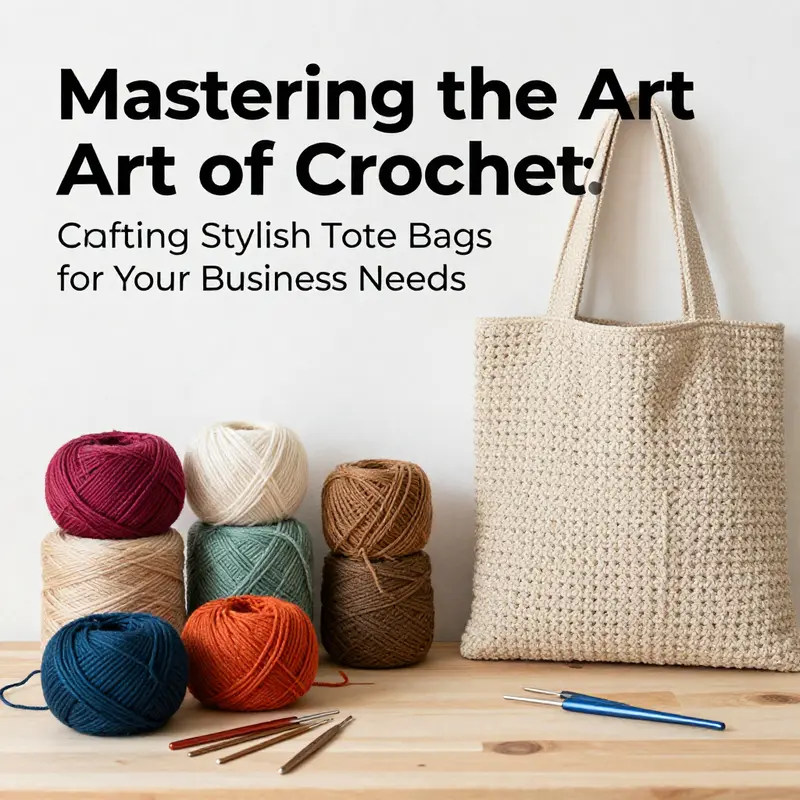
Choosing the right yarn and hook for crocheting tote bags is not merely a matter of preference or aesthetics. It is a practical decision that determines how well the bag will carry a load, how long it will hold its shape, and how easy it will be to care for after weeks of daily use. In this chapter, we weave together the strands of material strength, stitch density, and structural planning to illuminate how these elements work in concert. The goal is not to chase the softest fabric on the shelf, but to craft a tote that feels sturdy in the hand, resilient against wear, and balanced in its weight distribution. The path begins with yarn selection, moves through the relationship between fiber and hook, and extends to the careful planning of bottom reinforcement, body fabric, and handles. Reading this, you will understand why a tote made with the right combination of yarn and hook behaves differently under pressure than one stitched from a lighter, more pliable option, and you will see how gauge and tension translate into real-world performance when you fill its corners with books, snacks, or a laptop. The principles are universal across designs, yet the choices can be tailored to the tote you envision for spring strolls, library days, or weekend getaways.
When it comes to the yarn itself, durability and structure should take precedence over sheer softness. A tote must resist sagging and maintain a tidy silhouette even as weight accumulates. In practice, this means leaning toward yarns with built-in stiffness and good memory. Cotton yarns, especially cotton blends, provide a natural breathability and a crisp finish that reads well in a bag meant for everyday errands. They tend to hold their shape better than ultra-soft yarns that stretch noticeably over time. Cotton blends, particularly those that mix cotton with a touch of polyester or another sturdy fiber, offer improved tensile strength and resilience against wear while preserving a comfortable hand. These blends strike a useful balance: enough body to support contents without becoming rigid to the point of discomfort when you carry the tote for a full day. Acrylic blends can also be a viable choice, particularly when you want moisture resistance and fade resistance. They provide steadiness under use and tend to be easier to machine wash, though they can read as less breathable than cotton and may feel less substantial in very dense fabrics. Jute-based yarns, with their rugged, earthy vibe, can deliver excellent grip and a tactile sense of durability, but they demand tight, careful work. They can feel coarse and may fray if not tightly worked. The common thread across these options is this: avoid fluffy or very thin yarns for totes that will regularly bear weight. Their softness invites distortion and sag, and the fabric may not spring back after a heavy load.
Gauge is the invisible architect of your tote. It governs not only the size of the finished piece but also how well it will hold up under load. The general principle is to select a hook size that lets you achieve a dense, even fabric without gaps or excessive stretch. For worsted or aran weights, you will typically aim for a medium amount of heft in the fabric. A practical rule of thumb is to check your gauge: around twelve stitches should measure four inches and about eight rows should measure four inches when worked in your chosen stitch. This gauge information guides your decision on both the hook size and the number of stitches per row, which in turn affects the bag’s capacity and durability. If you are drawn to openwork or decorative patterns, you may use a larger hook to achieve a lighter, airier surface. But for a tote meant to carry books, groceries, or a gym bag, the open weave must be balanced with lining or a solid, dense fabric. The goal is a fabric that feels firm in the hand, with a slight spring that helps the bag resist collapsing under weight.
Hook size matters as much as fiber. The hook you choose should align with the fiber’s density and the stitch you plan to employ. Generally, a mid-range hook size—roughly in the five to six millimeter spectrum for heavier yarns—produces a fabric that holds together without sagging or becoming overly stiff. The exact size you settle on depends on your stitch choice and your tension. If you crochet tightly, you may be able to use a slightly smaller hook while preserving a sturdy fabric. If your stitches come out loose, a larger hook will draw in the fabric and improve integrity. The interaction between yarn and hook also informs your resulting density. A dense, tight fabric built with a heavier yarn and a smaller hook will resist deformation better than a looser fabric made with the same hook and a lighter yarn. In practice, begin with the recommended hook size on the yarn label as a baseline, then swatch and compare how your fabric behaves under tension. Swatching is not only a test of gauge; it is a forecast of durability. A swatch that holds its shape after gentle pressure is a good sign that you are on track for a tote that will endure daily use.
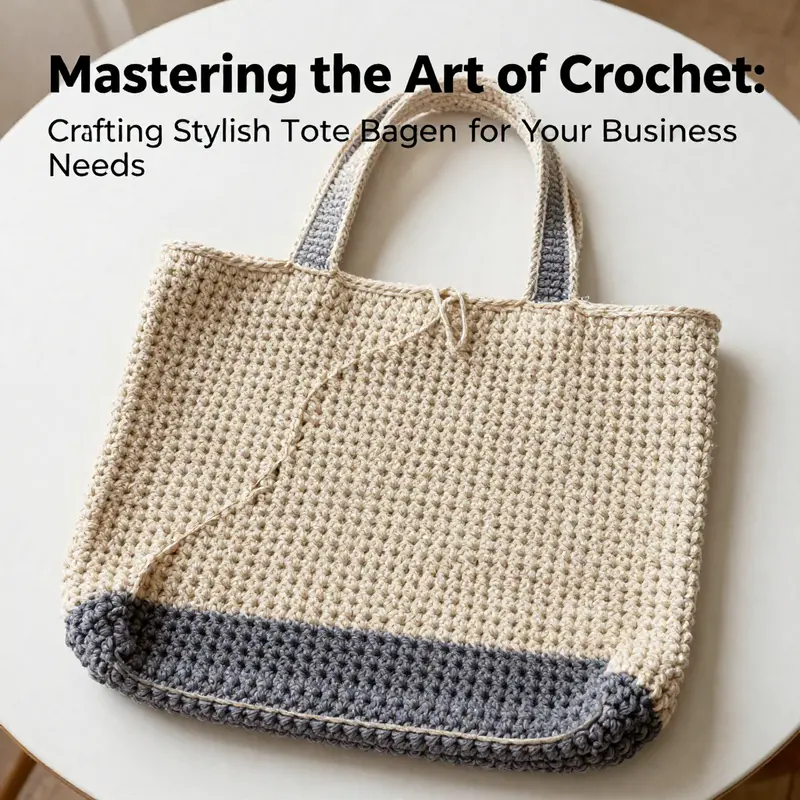
Beyond raw strength, the overall design of a tote matters deeply. A reliable tote presents three conceptual zones: a reinforced bottom that anchors weight, a body panel that forms the bag’s silhouette, and handles that survive repeated insertion, lifting, and setting down of contents. The bottom is where many crochet projects falter. Without a solid base, the bag can sag and develop wobbly corners that compromise stability and raise the risk of items slipping out. A practical strategy is to double the yarn when crocheting the bottom. By working two strands together, you create a stiffer base that resists bending or puckering as weight accumulates. This base also benefits from a tight stitch pattern. A classic approach starts with a chain that creates a stable starting edge, followed by single crochet around and a gradual, even increase to widen the base. The key here is to work flat, not in the round, after the initial foundation row. By maintaining forward motion in the same direction for several rounds, you build a bottom that won’t curl—a common issue with circular bases that are too small or insufficiently supported. As the base grows, continue to check your gauge and adjust your tension to keep the bottom level and square, which translates to a tote that sits neatly when set on a table.
With the bottom secured, the body of the bag follows. Here the choice of stitch pattern becomes a balance between texture, weight distribution, and visual appeal. A tight, dense fabric—crafted with single crochet or a blend of single and double crochet—offers the most robust structure for everyday use. The single crochet stitch, in particular, yields a compact fabric that resists stretching and resists sagging under moderate to heavy loads. It also makes the bag feel substantial in the hand, a quality many crocheters seek for a tote designed to carry books, groceries, or a water bottle. If you prefer a touch more airiness without sacrificing strength, a lemon peel or similar texture can provide a pleasing surface while still maintaining overall stability. These textures emerge from alternating stitches in a predictable rhythm, giving the fabric a shallow relief that helps distribute weight and keep the bag’s silhouette crisp. The technique should be chosen not just for aesthetics but for durability; a pattern that adds texture without creating stair-step gaps will help prevent weight from concentrating in one area and causing sagging.
Handles deserve careful attention because they bear the most visible stress as you lift and carry. A handle that is too thin or too short quickly becomes a point of failure, especially when the tote is loaded. The simplest robust approach is to crochet thick straps by chaining a length sufficient for your wearing style and then working several rows of sturdy stitches such as double crochet or single crochet to build a firm strap. For most users, a length of thirteen to seventeen inches provides the versatility to carry over the shoulder or by the crook of the arm. The construction should secure each end to the top edge of the bag with strong slip stitches or by working back into the edge with small stitches that anchor deeply into the fabric. If you anticipate heavier loads, reinforce the attachment points by adding extra stitches at the corners where the handles join the body. This extra reinforcement can be subtle but crucial in preventing the corners from tearing or pulling away under load. The interplay between handle length, thickness, and attachment design defines how comfortable and durable the tote feels during real-world use. A well-planned handle not only carries weight but also contributes to the bag’s overall comfort and balance when worn on the shoulder or carried by hand.
The structural choices outlined above naturally lead into a broader conversation about features that increase usability without compromising strength. The addition of interior pockets, exterior pockets, or subtle reinforcement at key stress points can dramatically improve function. Inner pockets, whether simple fabric linings or crocheted panels, help keep items organized and prevent bags from bulging unevenly. Exterior pockets, especially in openwork, provide quick access to keys or phones while preserving the tote’s clean exterior. Fringes or trims, when used judiciously, can echo a bag’s personal style without negatively affecting its integrity. Yet such features must be planned with the fabric’s behavior in mind. Openwork and decorative elements, while appealing, typically reduce the bag’s structural density. If you lean toward open designs, consider lining the bag or reinforcing the interior with a fabric panel or a tightly crocheted backing to preserve weight-bearing performance.
Finishing touches round out the project. When all parts are complete, secure every loose end with careful weaving. A tidy finish is more than cosmetic; it helps prevent unraveling where the stitches meet the yarn end. Blocking the bag is a traditional step that reshapes and relaxes the fibers after blocking, lay the bag flat or pin it to a chosen silhouette and allow it to dry. This step is essential for preserving the bag’s flat bottom, even sides, and crisp top edge, especially after the bottom reinforcement has set the base in a firm position. Care instructions follow the natural properties of the chosen fiber. For most cotton and acrylic blends, hand washing in cold water with mild detergent and laying flat to dry is sufficient. Avoid machine washing or drying, which can distort shape and shrink fibers, especially in natural cottons or blends not designed to undergo high heat. A well-cared-for tote retains its shape and color longer, making it a reliable daily companion rather than a fleeting accessory.
Throughout this discussion, we have circled back to the idea that the best tote for daily life begins with thoughtful material choices. The right fiber and the right hook, chosen in harmony with a gauge that ensures a dense, durable fabric, lay the groundwork for a bag whose bottom stays flat, whose sides hold their line, and whose handles invite confident lifting. It is a practical art form that translates craft into utility. If you are envisioning a tote that will carry a laptop or heavier items, you may explore a reference that focuses on larger, more practical options designed for that purpose. For readers considering the broader family of totes, a useful example in the tote-bag world is the laptop-tote-bags-women resource, which provides insights into proportion and structure applicable to a crochet version written in yarn. You can explore that example here: laptop tote bags for women.
As you progress, remember that the craft of crochet tote making is a dialogue among fiber, form, and function. Each choice you make in the yarn, the hook, the stitch pattern, and the attachment method feeds into the bag’s ability to carry life’s daily payload. The most durable totes are not the ones that look the sturdiest on the shelf but the ones that respond with steady resilience when loaded. The bottom anchors the weight, the body supports it, and the handles carry it with ease. This balance—between the bag’s core structure and the pockets of detail that personalize it—defines a tote that is not only beautiful but dependable. It is a product of careful planning, mindful tension, and respect for the tools at hand. When you approach your next crochet tote with these ideas in mind, you are doing more than choosing a yarn or hook. You are setting the stage for a daily workhorse of a bag, one that can accompany you to the library, the market, or the studio with the grace of a well-made instrument. For those curious about how these principles map onto heavier-duty designs, there is a broader dialogue in the crochet community about the interaction between crochet technique and material performance, including comparisons between crochet and other bag-building approaches. If you want to read more on durability comparisons in this area, you can consult external insights such as the discussion at https://www.crafty.com/crochet-tote-vs-canvas-shopper-heavy-groceries, which examines how different construction approaches hold up under real-world strain.
Solid Foundations, Open Yet Durable: Crafting the Bottom, Body, and Handles for a Crochet Tote That Holds Its Ground
When you set out to crochet a tote, the imagination often starts with the look—the color, the texture, the way a bag catches the light as you carry it along a sunny street. But a tote that sings visually can still fail under load if its structure isn’t planned with care. The heart of a successful crochet tote lies in three interconnected elements: a reinforced bottom that won’t sag, a body that rises to meet daily needs without warping, and handles that carry weight without giving way. Designing these parts in concert, rather than as separate afterthoughts, yields a bag that combines form and function with surprising ease. The beauty of this approach is that it rewards patience and precision as much as creativity. It invites you to tune each element to your exact needs, whether you’re carrying groceries, books, or beach towels, and to do so in a way that respects the material you’ve chosen and the pattern you’re following. As you think through bottom, body, and handles, you’re not just planning a bag—you’re drafting the backbone of every trip you’ll take with it, the way a sturdy frame supports a much-loved photograph or a favorite coat carries a daily load without losing shape.
A key part of this planning is acknowledging the different demands of weight, wear, and edge stability. The bottom bears the first contact with whatever you’ve loaded into the tote, and the weight concentrates there. If the base isn’t firm, the sides tend to bow, the stitches can loosen, and the entire bag looks tired far sooner than you’d expect. For this reason, the bottom is often constructed with a double strand of yarn, a technique that doubles the density of the fabric where it matters most. Using two strands at once creates a stiffer surface that resists compression and sagging, especially when the tote is carrying heavier items. The mode of construction matters here as well: working the bottom in flat rounds rather than in a continuous round helps prevent curling, which is a common problem when rows are joined in a circular pattern without sufficient stiffness. The goal is a flat, even surface that can distribute weight evenly across the entire base.
To begin, imagine the base as a circle that grows steadily in a controlled, predictable way. A practical starting point is a chain that forms a stable foundation—twenty-five chains, for example—and then working single crochet stitches around. The growth of the base is achieved by increasing a few stitches at regular intervals each round. In many patterns, you’ll see a progression such as 52, then 58, then 64, then 70, then 76, and finally 82 stitches per round. This measured increase prevents the base from buckling and helps it lay flat. It also allows you to tailor the base size to your preferences, aiming for roughly twelve to thirteen inches across, a dimension that suits typical tote proportions and yields a balanced bag when the body is added. The double-strand technique remains essential here throughout the base, particularly when the yarn you’ve chosen is already on the bulkier side. If you’re using a thicker yarn, you may intentionally work with an even larger hook to keep the surface tight and dense, which further reduces the risk of deformation when you actually load the bag. The base, then, becomes less a decorative element and more a reliable platform that anchors the entire project.
Once the base has achieved its desired diameter, the next principle is consistency in tension and fabric density as you transition to the body. You can continue to work in rounds if you plan to keep the body circular, or you can switch to a flat panel that then seams up to form the sides. If you choose to work the body in the round, you’ll want to maintain the same dense fabric texture you used for the bottom, so the sides don’t surrender to the weight by stretching and sagging. If you decide to work in flat panels first, you’ll eventually sew or crochet them together along the sides. Either approach can yield a durable tote, but the decision often rests on how you want the bag to sit when it’s empty and how you want the interior to look once finished. The body pattern you select matters, too. A simple single crochet gives a tight, sturdy surface ideal for everyday use, while double crochet—slightly looser—still offers durability and lends a roomier look to the sides. A decorative option like a lemon peel stitch—an alternating sequence of stitches that creates texture—gives the surface a subtle resilience and a modest amount of stretch resistance without sacrificing strength.
As the body rises from that reinforced bottom, consider how to preserve shape while allowing for flexibility. Many patterns advise working the body with the back loops only during some rows. This back-loop-only technique tightens the fabric’s grip on itself, reducing the natural pull that can make the sides sag over time. It also creates a slightly more rigid surface that helps the tote maintain its silhouette even when loaded. Height is a matter of balance: a tote that’s too short feels stunted, while one that’s too tall becomes difficult to manage. A practical target is around twelve and a half inches from the top of the base to the anticipated top edge where handles will anchor. Ending on a reverse or wrong-side row ensures a clean edge where the handles can meet the body, facilitating a neat seam and a comfortable handhold. The exact height you choose will also reflect your intended use. For a beach bag that invites sun and sand, a taller silhouette might be appealing, while a shopping tote designed for groceries might favor a slightly shorter form with a broader opening to ease access and cleaning.
Even the method of attaching the handles deserves thoughtful planning. Handles are often the most stressed components of a tote, catching the bulk of weight and enduring repeated use. A standard approach is to crochet each handle separately, then attach the ends to the top edge of the body with slip stitches or a back-loop technique that offers extra grip. A typical handle length ranges from thirteen to seventeen inches, depending on the wearer’s height and how the bag will be carried—rode on the shoulder, cradled in the hand, or slung over the forearm. The handle itself is frequently fashioned by chaining thirteen to seventeen stitches and then working ten to twelve rows in a firm stitch, such as single or double crochet, to form a sturdy strap. The ends can be anchored to the top edge with careful joining stitches that create a secure loop, ensuring the attachment points don’t creep or loosen over time.
Smart construction also involves reinforcing the corners where the handles attach and the points where the body meets the bottom. Heavy loads tend to pull at those seams first, so adding extra rows of stitches in these zones or sewing in a small, discreet reinforcement patch can dramatically improve longevity. Some designers even weave in an extra layer of yarn around the top edge where the handles connect, essentially creating a reinforced tunnel that distributes stress and reduces the risk of tearing. If you’re aiming for a more integrated look, you can crochet the handles directly onto the top edge as you near completion of the body. This technique minimizes the number of separate components that must be joined later and can offer a continuous, secure connection that resists unraveling. The trade-off is that it requires more careful planning in your row counts so you don’t run out of stitches or create awkward gaps where the handles join.
Beyond the core three elements, the tote’s durability also benefits from thoughtful material choices and construction details. The yarn itself matters as much as the stitch pattern. A sturdy, medium-to-bulky weight yarn made from a cotton-blend or a durable acrylic blend tends to hold its shape better than a soft, fluffy fiber that can loosen with use. Cotton and cotton blends provide a rigid, weight-bearing fabric that resists sagging, while acrylic blends offer resilience and a forgiving elasticity that maintains structure. For eco-minded makers, organic cotton or even natural fibers like jute can be excellent choices, though they may require different needle or hook considerations and slightly adjusted pattern tension to achieve the same stability. Whatever you choose, aim for a yarn that’s tight twisted and smooth to reduce snagging at the seams and to minimize pilling over time. A consistent gauge is essential; typically you’ll aim for about twelve stitches to four inches and eight rows to four inches as a baseline, checking this with a swatch before you dive into the full tote.
The bottom, body, and handles are not just mechanical parts; they are tactile experiences that define how the bag feels, how it wears, and how long it lasts. A well-planned bottom creates a trustworthy anchor; a well-executed body yields a bag that stands up to daily use; and well-attached handles ensure comfortable carrying without compromising the shape. When these elements are designed together, the resulting tote is more than a simple container. It becomes a reliable companion on errands, at markets, and on weekend adventures. And if you introduce small, practical features such as interior pockets or exterior mesh panels, you amplify usability without sacrificing the bag’s structural integrity. Interior pockets can be crocheted or fabric-backed inserts that hold keys, phones, or small notebooks, while exterior pockets provide quick access for items you want to keep within reach. Such features are optional but highly functional and can be adapted to suit your style and needs.
As you weave through these decisions, a single guiding principle keeps you from overcomplicating the process: treat the tote like a layered system rather than a single flat piece. The bottom provides a foundation; the body forms the primary storage area; the handles supply the load-bearing interface with the world. Any modification to one element should be harmonized with the others. If you widen the bottom to accommodate heavier fare, you may have to adjust the body height or stitch density to preserve balance. If you decide to lengthen the handles for shoulder carrying, you might need a slightly deeper body to avoid tipping when the bag is full. With this mindset, you’re designing not just a bag but a reliable daily tool that remains aesthetically pleasing while performing under real-world conditions.
To visualize these ideas in practice, many crafters find it helpful to review step-by-step illustrations that show how the bottom, body, and handles come together in a single project. A practical, step-by-step visual guide can be found here: crochet tote bag step-by-step guide. That resource walks through the precise sequences for reinforcing the bottom with a double strand, placing the body panels, and weaving in the handles with secure attachments. While this chapter speaks to the philosophy of a durable tote, the linked guide provides a concrete, visual reference you can consult as you work. It’s a complement to the principles described here, not a replacement for your own judgment and adaptation to the yarn you’ve chosen and the exact dimensions you’re aiming for. If you’re new to crocheting, starting with a guided pattern can ground your understanding of tension, stitch selection, and seam integrity before you embark on a more personalized project.
In the broader landscape of tote design, the question of durability versus aesthetics often arises. The answers lie in the subtle details that accumulate over time. The bottom’s density resists compression, the body’s fabric density prevents distortion, and the handles anchor the bag under load. Even with a modular design, where you might adjust the height or width to fit a particular purpose, the three-part structure acts as a steady framework you can rely on again and again. The more you practice balancing these elements, the more you’ll begin to see patterns emerge that suit your style and your needs. You may find yourself creating a family of totes—a grocery-friendly version, a bookish tote for library runs, a compact everyday bag for quick errands—each built on the same core principles, each framed by a reinforced bottom, a stable body, and durable handles that bear weight with grace. In this way, planning the structure becomes less about rigid rules and more about a considered approach to the craft: one that respects material realities, adapts to use cases, and invites ongoing experimentation with texture, stitch density, and seam finishing.
For those who want to push the envelope further, a few experimental adjustments can yield notable gains in durability without compromising the tote’s character. One option is to incorporate a second, interior layer along the bottom and lower sides—perhaps a fabric liner or a second crocheted panel that acts as a shield against wear and tear. This inner reinforcement can dramatically reduce the chances of tears at stress points and helps the base maintain its shape when carrying heavier loads. Another approach is to add a small, reinforced corner patch at each bottom edge, stitching in a circular or square patch that distributes weight more evenly and prevents the base from deforming where it meets the sides. If you anticipate frequent heavy use, consider thicker yarn or a slightly tighter gauge for the body panels, while keeping the bottom reinforced so the overall balance remains intact. Conversely, for a lighter, more portable tote, you can maintain the same three-part structure but choose a lighter yarn and a less aggressive base size, accepting a bit more flexibility in exchange for a soft, drapier silhouette between uses. The beauty of this framework is that it accommodates a wide range of materials, patterns, and purposes, all while preserving the core reliability that makes a tote truly dependable.
Throughout the journey from concept to finished bag, the act of planning the structure becomes a reflection of your craft philosophy. It asks you to weigh durability against ease of use, to consider the daily rhythms of the bag’s future life, and to align your choices with the realities of the fiber you’ve chosen and the hook you prefer. This level of intentional design doesn’t merely improve a tote’s performance; it enriches the crochet experience itself, turning a simple accessory into a thoughtfully engineered object. As you move through the steps of reinforcing the bottom, shaping the body, and fastening the handles, you’re not simply following a pattern—you are shaping a dependable companion for everyday errands, a tote that looks and behaves as well as you imagined.
For readers who want a practical blueprint as a reference, the core ideas can be distilled into a few guiding points. Start with a solid base by working two strands of yarn and creating a flat base in rounds, beginning with a chain like twenty-five and gradually increasing to form a circle that sits firmly on its surface. Keep the body dense and stable, choosing between sc, dc, or textured stitches that add resilience without sacrificing the bag’s shape. End the body at a height that feels proportionate to the base, making sure your top edge is clean where the handles will attach. When you crochet the handles, give them thickness and anchorage by securing them through multiple stitches and reinforcing the corners to spread weight evenly. If you want to explore additional details, interior pockets and reinforced seams offer practical benefits without compromising the core structure. These elements, together, create a tote that is not only visually appealing but also capable of standing up to the rhythm of daily life. And when you’re ready to expand your learning or to visualize the steps in action, a step-by-step resource can serve as a reliable companion and guide your hands along the most critical parts of the process.
In this way, planning the structure of a crochet tote is more than an exercise in technique; it is an invitation to design with purpose. The bottom becomes a steadfast anchor, the body forms a living chamber for the items you carry, and the handles become the interface between you and your belongings. By thoughtfully balancing these parts, you create a bag that not only carries the things you need but also carries the story of your hands at work, stitch by deliberate stitch. If you feel inspired to experiment, begin with a small test project focusing on the bottom and a short handle, then scale up to a full tote. You’ll gain a tactile sense of how thickness, tension, and edge finishing influence the bag’s behavior under load, and you’ll develop a rhythm that makes the building of future totes faster and more reliable. The end result is a sturdy, stylish tote—one born of careful planning and patient execution, ready to accompany you from farmers’ markets to libraries, from weekday errands to weekend explorations.
External resource for deeper design considerations: https://www.crochet.org.uk/tote-bag-designs
Strength with Style: Weaving Practical Features into Crochet Tote Bags
Crochet tote bags invite creativity, but their true charm lies in how well they perform in daily life. A tote that looks lovely yet collapses under a handful of groceries isn’t fulfilling its promise. The chapter that follows blends craft with function, showing how deliberate engineering of the base, the body, and the attachments can turn a pretty crochet piece into a durable everyday companion. It isn’t about chasing novelty for novelty’s sake; it’s about shaping a bag that respects the weight of the day while still honoring handmade detail. The ideas here flow from the same mindset that guides professional bagmaking, translated into crochet-friendly techniques that stay faithful to the medium’s warmth, texture, and accessibility. The aim is a bag that carries your world—whether you’re headed to the farmers market, the library, or a quick commute—without sag or wobble, with pockets that keep your items organized, and with handles that feel solid in your hand and secure at the edge where the bag meets the road.
A reinforced base is the most critical piece of the puzzle. Crochet fabric naturally lacks the rigid backbone of canvas or structured synthetics, so a strong foundation pays dividends as soon as you start filling the tote. The simplest path is to double the yarn for the bottom. By working the base with two strands held together, you immediately introduce stiffness that resists deformation when the bag carries books, groceries, or even a laptop. The method is not about bulk alone; it’s about choosing a stitch pattern and a working direction that encourage a flat, stable plane rather than a rounded or curling edge. Start with a chain of about 25 and work single crochet around, then increase evenly in a controlled rhythm—perhaps three sc in a few stitches every couple of rounds. The goal is a bottom roughly 12 to 13 inches wide, a size that pairs well with standard totes yet remains manageable in the hand. A crucial detail often overlooked is working flat, not in the round. After you complete the first row, do not turn the work. Continue in the same direction for several rounds. This practice yields a bottom that lays flat and resists the curling tendency common in rounded bases, providing a more rigid anchor for the rest of the bag.
With the base secure, the body of the bag presents its own set of choices. The pattern you select for the body can influence both texture and durability, and there’s elegance in choosing stitches that offer a tight, dense fabric. Single crochet delivers a compact, sturdy surface that stands up to daily use, while double crochet can provide a slightly looser but still durable fabric. For those who want a touch of decorative texture without sacrificing strength, the lemon peel stitch—an alternating sequence of sc and dc—offers a balanced look and a resilient weave. Whichever route you choose, maintain a consistent tension and a steady rhythm as you grow the body. You might work in the round for a seamless exterior or opt for a flat panel approach that you later seam along the sides. Either method benefits from a careful approach to color and yarn choice. Avoid variegated yarns that pool in ways you can’t predict, and select a cotton blend or a sturdy acrylic blend that holds up to weight without stretching unduly. The goal is a fabric that feels snug in the hand yet breathes with the content inside.
The handles deserve particular attention because they are the primary lifeline between your bag and its wearer. Handles must support weight without giving way or cutting into your shoulders. A typical length of 13 to 17 inches works well for most people, with variations depending on your height and how you plan to wear the tote. To craft a practical strap, chain 13 to 17 stitches and work 10 to 12 rows of a thick stitch—double crochet or single crochet—to form a robust strap. The method you use to attach the handles matters as much as the length. Slip stitches or back-loop-only single crochet at the attachment points can help secure the handle with a grippier edge. If the bag is likely to carry heavier loads, consider reinforcing the corners where the handles meet the body. Extra stitches or a small patch of crocheted reinforcement, sewn or sewn-in, distributes stress more evenly and reduces the chance of tearing at a fragile junction. The upper edge of the bag can also be reinforced with a simple spine of extra rows or a contrasting knot detail that doubles as a weight-bearing band. The outcome is a tote that feels grounded when you lift it and remains comfortable at the moment of transition from bag to arm.
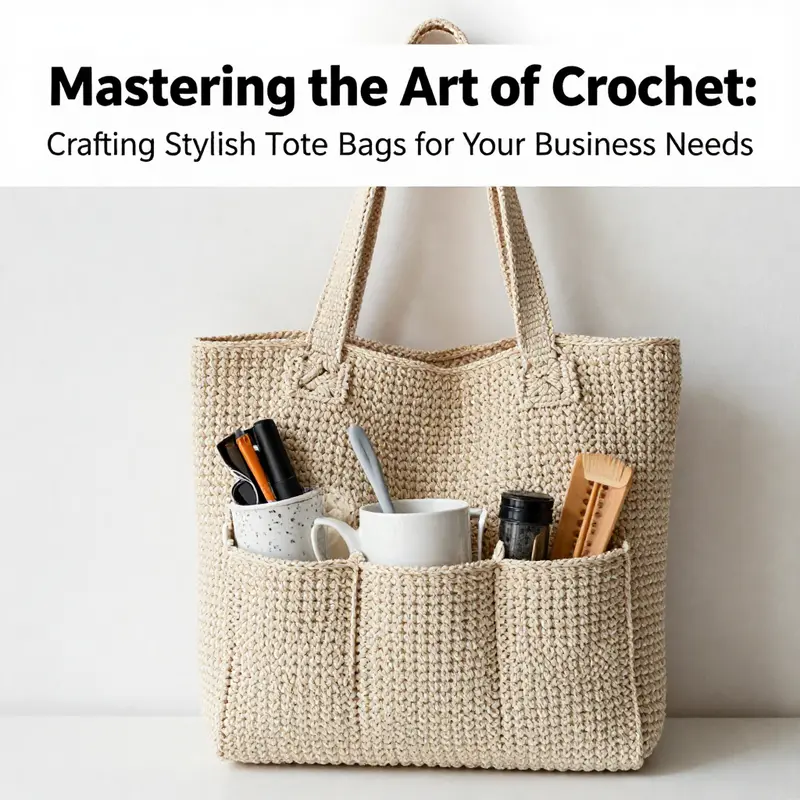
The chapter of function doesn’t end with the bare structure. Features like internal pockets, exterior pockets, and a protective lining can dramatically boost usability without compromising the handmade aesthetic. Inside pockets are a boon for everyone who juggles keys, phones, or cosmetics. The simplest method is to crochet small panels that act as pockets during the body-building stage, or you can sew a fabric or crocheted lining pocket directly into the interior. A contrasting yarn pocket stitched into the body not only adds visual interest but also serves as a quick visual cue for where items live. If you prefer a more secure closure for valuables, a small zipper pouch or a buttoned flap can be crocheted or attached as a separate piece. Exterior pockets, such as a mesh or openwork slip pocket, provide visibility and access for smaller items like keys, transit cards, or a note you want to keep handy. This pocketing approach has to be designed for balance, ensuring pockets don’t distort the bag’s silhouette or catch on everything you pass by. The interior and exterior pockets harmonize with the base and body; they are not afterthoughts but integral components that preserve shape and order.
A subtle but meaningful enhancement is the inclusion of a water-resistant lining. Even a simple insert made from a wipe-clean fabric can protect the contents from spills or light rain. The lining can be removable, which makes washing easier and extends the life of the crochet exterior. When you design the lining, think in terms of accessibility and protection—large, secure compartments for books or a laptop, a mesh section for quick-drying items, and a slim strap or tie to keep the lining in place as you assemble the bag. The lining does not merely shield; it also helps the bag hold its shape and contributes to a neater, more streamlined exterior. In many designs, the lining forms a gentle inner frame, supporting every corner and ensuring that the bag’s edges stay crisp even when loaded. This is where the internal logic of the bag’s architecture comes together: the reinforced base supports weight, the body fabric resists sag, the handles anchor weight, the pockets provide order, and the lining guarantees protection and structure.
Hidden or reinforced handle attachment points are another practical tweak that elevates durability. Rather than relying solely on the stitch at the top edge, consider integrating a stronger joining method. A leather strap or braided cotton rope can be used as an external handhold, or you can sew in webbing or a slim metal ring to distribute weight more evenly across the top. If you’re comfortable with it, add a reinforcing bar at the top edge—think of a slim wooden dowel or a small metal ring—that runs across the bag where the handles attach. This feature spreads the load and reduces the risk of tearing where the handles join the body. It is a detail that can be incorporated with minimal extra effort but yields long-term benefits in function and feel. The choice between hidden reinforcement (a stitched doubler inside the top edge) and visible reinforcement (a decorative bar) depends on your aesthetic goals and how you anticipate using the bag. Either option should be consistent with the bag’s overall weight expectations and the materials you’ve chosen for the exterior.
The design architecture is not a static blueprint but a conversation between material choices and the daily realities of use. A tote you crochet for a weekend market session will benefit from different tweaks than a bag built for heavy daily commutes or for transporting a laptop and books. The mathematics of this design is not just about numbers but about anticipating stress: where do you expect the bag to bend, where will the weight concentrate, how will the stitches behave under pressure? By thinking through these questions, you ensure that every feature — bottom reinforcement, body texture, handle security, pockets, and lining — works in concert rather than competing for attention. The result is a bag that wears well, resists sag, and remains faithful to the handmade voice that attracted you to crochet in the first place.
If you want to explore a concrete path to implementing pockets and reinforcements, you can consult resources that explore pockets and reinforcement in crochet bags. For broader techniques and inspiration, the practical guidance offered by a dedicated resource on adding pockets and reinforcements to crochet bags can be a helpful reference point for experimenting with new layouts or stitches. For hands-on examples and step-by-step methods, you might browse reliable tutorials that detail how to integrate internal compartments and reinforce attachment points while maintaining the integrity of the crochet fabric. These strategies align with the core idea that a tote bag should be both a canvas for craft and a reliable daily tool, capable of carrying the items that define your day without compromising its shape or beauty.
In weaving all these aspects together, there is room for personal style. The choice of stitch patterns, the color story, the texture of the yarn, and the placement of pockets all offer opportunities to express taste while preserving practicality. A balanced approach—where aesthetics do not overwhelm function and function never masks artistry—results in a tote that feels as good to use as it looks. The interplay of a solid base, a sturdy body, reinforced handles, thoughtful pockets, a protective lining, and careful finishing yields a bag that remains faithful to its form from the moment you lift it to your shoulder until you return it to its resting place after a busy day. In practice, this means that your crochet tote can become a trusted daily companion rather than a charming curiosity. The design choices you make in the early stages—what yarn to use, how to reinforce the bottom, where to place pockets, how to attach handles—will echo through every use, shaping how you pack, what you reach for first, and how long the bag stays beautiful.
As you plan your own tote, consider the life you intend for it: the groceries it will cradle, the books it will support, the laptop it will shelter, the beach towel you’ll tuck inside on a sunny day. The features you add should align with that life. When you think about bottom structure, you should imagine stability under weight. When you imagine pockets, you should envision organization that makes your day smoother. And when you imagine lining, you should see protection against splashes and spills that would otherwise threaten the contents. This is the heart of the project: transforming a simple crochet rectangle into a robust, dependable carrier that still breathes with handmade texture and personal flair. It requires patience, deliberate planning, and a willingness to adapt as your bag grows and your needs evolve. The payoff is a tote that feels crafted for you, not just stitched by you—a practical artifact that marries function, form, and craft in a single, enduring piece.
For further practical exploration of these enhancements, you can look to established hands-on resources that document how to incorporate pockets and reinforcement while maintaining the integrity of crochet fabric. The guidance offered in those tutorials centers on real-world applications—pockets integrated into the body, reinforced handles that distribute weight, and weather-ready linings that protect what you carry. Taken together, these ideas form a cohesive framework for designing crochet totes that are not only beautiful but also genuinely useful in daily life. The end product is a tote bag that invites you to reach for it again and again, confident in its balance, its organization, and its quiet resilience. And while the craft remains portable and approachable, the finished piece carries a sense of purpose: a handmade bag that travels with you, season after season, as you collect memories and keep essentials safely close at hand.
If you’re curious to see a concrete path for pockets and reinforced attachment points, consider exploring related tutorials that address these elements in depth. Such resources can offer fresh perspectives on how to maximize durability without sacrificing the delicate texture that characterizes crochet. When you read and experiment, you’ll refine your own approach to integrating functional details into crochet tote design, finding a balance that reflects both practicality and personal style. The result is a bag that truly earns its place in your everyday life, as a reliable vessel for the day’s essentials while serving as a canvas for your unique handcraft story.
For readers who want to explore related ideas and expand their repertoire, a trusted external resource on adding pockets and reinforcements to crochet bags provides a thorough, well-illustrated exploration of the techniques discussed here. It offers practical tips, variant stitches, and examples that help you adapt these concepts to your own projects. External reference: https://www.thesprucecrafts.com/add-pockets-to-crochet-bag-4158267.
If you’re ready to translate these principles into a practical project, you can also find a wealth of inspiration and specific layouts in hands-on tutorials that walk through the process of creating a tote with interior pockets, reinforced bases, and secure handle attachments. Each project will present a unique combination of materials and techniques, enabling you to tailor your tote to your personal needs and tastes while preserving the core philosophy of durable, beautifully crafted crochet. And as you experiment, you’ll develop a sense of how much reinforcement you need for your typical load, how to position pockets for accessibility, and how to attach handles in a way that feels natural when you wear the bag. The craft rewards curiosity, patience, and thoughtful planning, and the result—your own unique crochet tote with practical features—will stand as a testament to what careful design and handwork can accomplish when you blend artistry with everyday use.
As you close the loop on this chapter and prepare to transition to the next, consider how the practical features described here align with your own goals for crochet totes. If you’re aiming for a bag that can travel from bookstore to café to classroom with ease, the reinforced base and sturdy handles will be your foundation. If organization matters most, the pockets and lining will guide your design choices and your stitching cadence. If the bag’s look matters as much as its function, then texture, color, and proportion will be the stage on which these functional elements perform. In short, you have a framework that invites experimentation, a roadmap for turning a simple crochet tote into a reliable daily tool, and a design philosophy that respects both the hand-done charm and the practical demands of modern life. The result is not just a bag you crocheted; it is a bag that was thoughtfully built to be used, loved, and carried through the days ahead, season after season, with the quiet confidence of a handmade object that works as hard as it looks.
Final thoughts
In conclusion, embracing the art of crocheting tote bags offers business owners a unique way to connect with both creative and practical consumer demands. By carefully choosing the right materials, planning an enduring structure, and adding functional features, your crochet tote bags can become standout products in your offerings. With sustainability and individuality in mind, crafting these bags is not only fulfilling but also presents an opportunity for your business to thrive in the current market landscape. Dive into this crochet journey and watch your creative business flourish.