Adding a zipper to your tote bag is more than just a stylistic change—it’s a practical solution for enhancing security and organization for your business needs. By incorporating zippers, you can create a product that appeals to customers seeking a functional yet fashionable carryall. Whether you are producing tote bags for retail or personal use, understanding the step-by-step process to add a zipper can elevate the quality of your offerings, making them more competitive in the market. This article explores each aspect of zipper installation: from selecting the right one to preparing your tote bag and securing the zipper in place. Finally, we will detail how to test and make adjustments to ensure a smooth operation, thereby enhancing customer satisfaction and extending the lifespan of your tote bags.
Choosing the Right Zipper for Your Tote Bag: Security, Durability, and Everyday Convenience
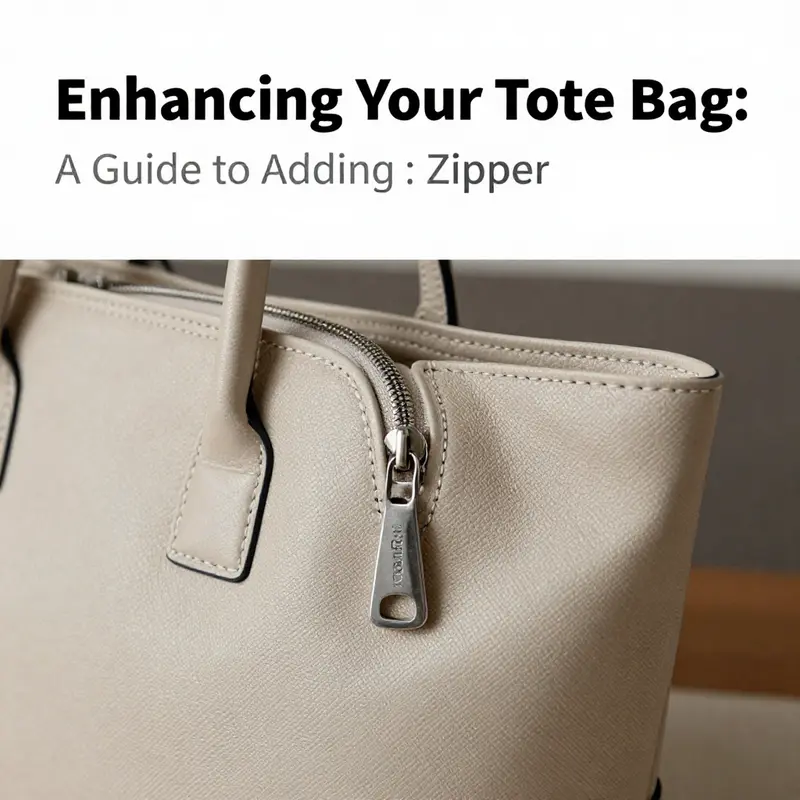
A tote bag is more than a simple container for everyday items. It is a portable system for how you move through a crowded city, a workplace, or a weekend market. The zipper you choose does more than close the bag; it determines how securely you carry your belongings, how easily you access them, and how the bag behaves under load. In this chapter, we explore how to select the zipper that best fits your tote’s fabric, weight, and daily routines. The goal is to strike a balance between security, durability, and ease of use, so the zipper becomes a reliable workhorse rather than a decorative line that often jams or tears when you need it most. When the top opening is properly fitted with the right zipper, the tote feels more organized, more protective, and more adaptable to the varied days most people face, from a rainy commute to a weekend bus ride with heavy notebooks and a laptop tucked inside.
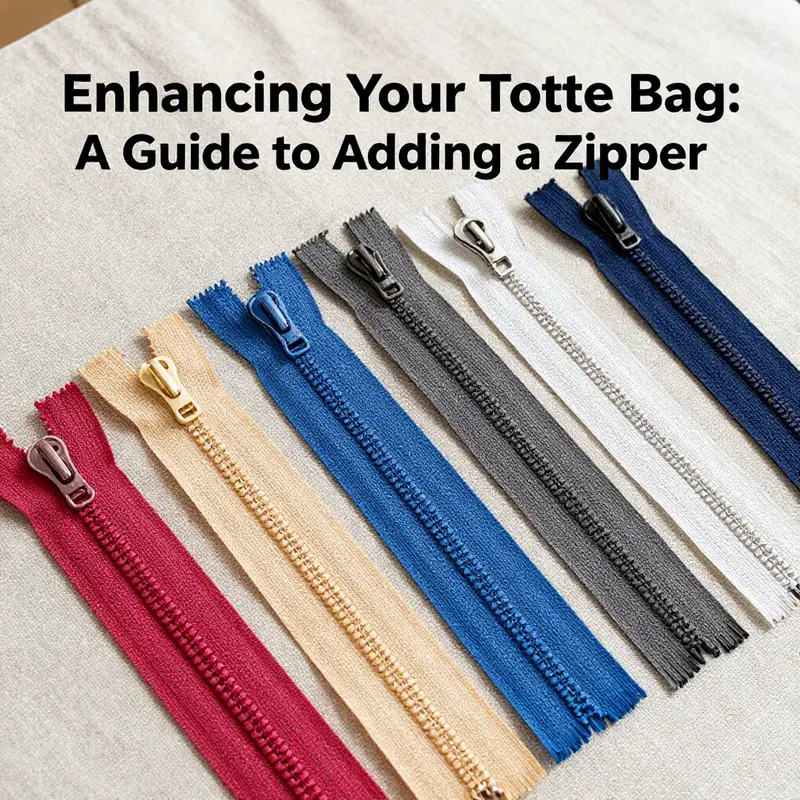
The first consideration is function. A tote’s top edge is the gateway to its contents. You want a closure that stays put during movement, resists snagging on clothing or chair corners, and glides smoothly when you want quick access. A well-chosen zipper accomplishes all of this without drawing extra attention to itself. For many totes made from canvas, denim, or heavy-weight fabrics, a heavy-duty coil zipper or a short metal zipper offers the right blend of strength and weight. The length of the zipper, often between seven and ten inches for standard tote openings, should align with the bag’s width and the amount of range you need when opening and closing. A zipper that is too short may prevent the bag from closing fully when it’s stuffed; one that is too long can bunch and catch, especially when the bag is slung over a shoulder.
Beyond length, the zipper’s construction matters. A smooth-gliding slider is essential for daily use, particularly if you carry items like keys, a phone, or a small notebook that you access frequently. The choice between a plastic-coated or metal zipper can influence feel and durability. A sturdy metal zipper presents a robust, tactile pull that many users prefer for a tote that carries heavier loads. A durable nylon coil zipper, while lighter, can offer excellent resilience and resistance to snagging when the bag bumps against the inside of a car or a desk drawer. The trade-off is typically between heft and smoothness. If you regularly pack heavier items, such as a compact laptop, two books, and a water bottle, leaning toward a heavy-duty coil or a metal option with reinforced tape will serve you better over time. In any case, the zipper tape should be thick enough to anchor securely to the fabric without curling or shifting as you sew. Measuring the fabric weight and the zipper tape thickness beforehand prevents misalignment and puckering at the seam.
Another dimension is the user experience. A zipper is part of the daily rhythm of the bag. If your commute involves crowded trains or buses, you’ll benefit from either a full-length closure or a design that hides the zipper behind an extra layer, such as a magnetic snap or a flap. This approach protects the contents from quick theft and also makes for fast access when you need to grab a subway card or a mask. A fully enclosed zipper—one that runs within a fabric channel or a zipper guard—offers maximum protection against the elements and against pickpockets, but it can feel less convenient if you often need to reach for something in a hurry. Conversely, a low-profile zipper combined with a magnetic snap or a small secondary latch can deliver quick access while maintaining a measure of security. The choice depends on your environment and routine: a busy urban route, a campus corridor with many pass-throughs, or a weekend market with fluctuating crowds.
Durability is intimately tied to how you construct and reinforce the zipper. It’s tempting to focus on the zipper itself, but the surrounding fabric and stitching determine how long the closure will function under load. The ends of the zipper deserve special attention. Zippers experience the highest strain where the fabric ends and the zipper tape begins. Without reinforcement, the zipper can begin to tear or the ends can separate from the fabric after repeated use. A practical approach is to reinforce the end areas with extra stitching and a touch of interfacing or fusible webbing. This creates a small but meaningful buffer that prevents the fabric from stretching and the zipper teeth from pulling away. When you finish the seam, consider a short series of backstitches at the start and end of each zipper side to lock the thread into place. These small details extend the life of the bag in ways that users notice. Barrel stitching at the ends—an extra layer of stitching that anchors the zipper tape to the fabric—also helps distribute stress more evenly when the bag is loaded with heavier items.
The practical implications of a thoughtful zipper choice show up in everyday use. If you carry a notebook, a charger, a small lunch, and a water bottle, the zipper must tolerate a mixed load without slipping on the teeth or warping the opening. The alignment of the zipper teeth is critical. Misalignment leads to catching and resistance, which discourages consistent use and invites users to abandon the closure altogether. When the bag is laid flat, the zipper line should sit evenly along the top edge, with the teeth meeting as the zipper is closed. Pressing the seam after sewing helps you verify straightness and smooth alignment. If you discover any puckering after you finish, you can gently ease the fabric away from the zipper while applying a light press to set the seam. This simple adjustment often makes the difference between a bag that closes cleanly and one that fights you every time you reach for your keys.
If you’re new to installing a zipper, an essential tactic is to test your setup before committing to full sewing. Pin the zipper in place to hold it along the top edge, then practice a few passes with your machine or hand stitch to verify the seam line and the zipper alignment. The goal is to sew a neat edge that keeps the zipper tape evenly attached to the fabric. After you sew both sides, close the zipper to test the interaction of teeth and slider. A smooth glide without catching or jamming is a good sign that your measurements were correct and your fabric was stabilized properly during sewing. If you notice any misalignment, you can undo the stitches at the beginning and end of the seam and re-sew with careful guidance and a steady hand.
One of the most useful adjustments you can make relates to ergonomics and speed. For people who need to reach into their bag quickly while standing in line or rushing between meetings, a low-profile closure can be more efficient than a fully enclosed system. A design that places a magnetic snap behind the zipper offers the best of both worlds: fast access when you need it, and a sealed top once you close the bag. In practice, this means you position the zipper so that the magnet sits just out of direct reach, allowing the zipper to close securely while the magnet provides a soft, unobtrusive seal. This approach is common in urban bag designs where both speed and security are valued. It is also adaptable for tote bags used in travel or commuting, where weather, crowds, and varied loads demand reliability in diverse conditions.
Of course, you should consider weather resilience. If your bag is likely to encounter rain or damp environments, look for finishes on the zipper that resist corrosion and reduce water entry. A zipper with a durable coating and weather-sealed tape helps keep the interior dry and protects the contents from moisture. Even if you don’t live in a rainy climate, this layer of protection contributes to longevity, preventing the zipper from stiffening or gumming up with humidity over time. When possible, you can also add a simple exterior rain flap or a fabric cover that shields the zipper from direct exposure during unexpected showers. These small precautions, while not always visible, make a practical difference over years of daily use.
To determine which zipper is best for your lifestyle, think through three guiding questions. First, how important is security in your daily routine? If the bag sits in crowded places or travels through busy transit systems, a fully enclosed or covered zipper with an additional closure element offers the strongest protection. Second, how much weight do you typically carry? If your tote tends to hold heavier items, prioritize a zipper with sturdy tape, a robust slider, and reinforced ends. Third, how much ease of use do you want on a day-to-day basis? If you value quick access, a design that combines a low-profile zipper with a hidden magnetic closure can deliver the speed you need without compromising security much. By answering these questions, you can narrow the field to a zipper type and length that harmonizes with your bag’s fabric and your daily rhythm.
If you want to explore practical variations and see visual examples, you can browse tote bags with zippers to observe how designers balance style with function. This resource offers a range of configurations that illustrate the core ideas discussed here: tote-bags-with-zippers. The page provides several approaches to zipper placement, tape width, and end reinforcement, which can help you envision the effect of different choices on your own project. When you visit, you’ll notice how some bags use a hidden closure system that preserves a clean exterior while others emphasize a robust, exposed zipper for utility and character. Both approaches work well, depending on the bag’s fabric, intended use, and the wearer’s preferences. The key is to select a zipper that complements the bag’s weight class and anticipated daily demands rather than chasing a trend that might fail under real-world conditions.
In sum, choosing the right zipper is about aligning material properties with human use. The zipper you pick should glide quietly, resist wear, and support the bag’s overall design objectives. It should be sturdy enough to carry essential items without fear of the slider escaping from the end or the tape tearing away from the fabric. It should also be adaptable to your environment, whether you are commuting through crowded streets, teaching a class, or traveling with a laptop and lunch. When you approach zipper selection with these criteria in mind, you move from a simple upgrade to a thoughtfully engineered enhancement that improves security, organization, and everyday ease. The right zipper becomes a quiet partner in your daily routine, enabling you to carry what matters most with confidence.
As a final practical note, remember that the zipper is only as good as its installation. Reinforce the ends, align the teeth, and test the operation across a range of loads before you consider the project complete. If you’re new to sewing, you may choose to rely on a pre-made zipper insert kit or to enlist a skilled tailor for your first tote project. The result will be a bag that opens and closes with the same calm assurance you feel when you slide your keys into your pocket after a long day. For further ideas and examples of zipper integration in totes, see the resource linked above. And if you’re curious about how different closure strategies can affect daily use in varied environments, keep the door open to experiments with magnetic closures, hidden zippers, and traditional exposed teeth. The best zipper for your tote is the one that makes your daily routine smoother, safer, and more enjoyable, season after season. External reference: a design example from a modern urban bag that uses a hidden closure behind a magnetic snap demonstrates how accessibility and security can coexist in a compact form. See the full discussion here: https://www.everlane.com/products/the-form-bag
From Marking to Mastery: Preparing Your Tote Bag for a Flawless Zipper Installation

A zipper upgrade begins long before the first stitch. The quiet, deliberate stage of preparation sets the tone for a secure, durable, and neatly finished tote. When you take the time to map out the top opening, select the right hardware, and shape the bag’s edges for a clean seam, you create a runway for the zipper to glide into place with confidence. Preparation is not a tedious prelude; it is the crucial work that transforms an open tote into a refined carryall with a zipper that actually functions when you need it. In this chapter, we walk through the steps that turn your tote into a zipper ready project, keeping the focus on accuracy, durability, and a clean final appearance. The goal is not merely to sew a zipper onto fabric but to align every piece so the installation feels natural, almost inevitable, once you begin the sewing that anchors the mechanism to the bag.
First comes the zipper itself. The choice of zipper is not cosmetic; it dictates how smoothly the bag will open and close, how resistant it will be to wear, and how forgiving the finish can be if the bag handles frequent use. For most tote bags, a coil or metal zipper offers a sturdy option that can endure daily activity. Coil zippers, with their flexible nylon teeth, tend to yield well to fabric thickness without adding bulk. Metal zippers bring a robust, tactile feel that can suit heavier materials like canvas or denim. The length of the zipper matters as much as the type. A typical tote top opening benefits from a zipper that runs across the full width but leaves room for seam allowances and finishes. In practice, a 7 to 10 inch zipper is a versatile range for many tote bag styles. If your bag is particularly wide or if you prefer a slightly longer look, you may opt for a zipper close to the full width while leaving space for a reinforced top edge. The takeaway is to measure the bag’s opening and choose a zipper that matches that length with a little extra for secure ends. The right zipper is the quiet foundation of a clean finish, and it deserves careful attention rather than last minute guessing.
With the zipper chosen, gather the tools and materials that will carry you through the preparation with precision. A sewing machine is ideal for these steps, but a sturdy hand sewing approach can work if you plan to finish by hand. A universal needle in the size range of 80/12 or 90/14, depending on fabric thickness, helps the needle bite through the layers without weaving or skipping. Matching thread, ideally a strong, durable weight that blends with the bag fabric, keeps the seam robust and less prone to fraying. Scissors or a sharp rotary cutter, pins, and a fabric marker or chalk are essential for clean lines. A seam ripper is a prudent companion for those early test fits when you discover that the marks or the zipper location need a minor adjustment. The ritual of laying out tools in a ready-to-run workspace reduces the chance of missteps mid sewing and gives you a clear sense of progress as you move from plan to practice.
The next phase is to lay out the tote pieces with care. Start by placing the main body pieces—the front and back—so the right sides face each other. This is a deceptively simple step, yet it matters a great deal for the final look. When the fabric is aligned and flat, the edges must meet and the markings you apply will translate cleanly onto the finished opening. This is also the moment to consider the bag’s overall geometry. If the tote has a gusset or a rounded top edge, you may want to consider how the zipper will cap those curves and where the zipper tape will sit along the edge. A stable, flat arrangement reduces the odds of puckering along the zipper line and ensures that once the zipper is installed, there is no pull or twist that would distort the opening over time. Taking a few extra minutes to check alignment now can save hours of fuss later.
Marking the zipper placement is a critical detail that should not be rushed. A fabric marker or chalk is ideal because it marks clearly but can be brushed away as you proceed. A common guideline is to position the zipper about one and a half inches from the top edge and to center it across the width of the bag. This distance provides a clean finish with a comfortable opening, and it leaves enough room at each end for secure stitching. Centering the line across the bag’s width helps ensure symmetry, which in turn contributes to a balanced silhouette when the zipper is closed. If your tote includes a pocket or additional features at the top, plan those elements with the zipper in mind so that there is a coherent flow rather than competing lines that draw the eye away from a tidy finish. As you mark, double check measurements from both sides to confirm that the placement mirrors on the opposite edge. The seam allowances you later introduce will rely on this alignment to maintain a professional look across the entire top.
If your project includes a pocket or a small touch of organization along the top edge, you will want to account for that in your preparation. For pocketed designs, draw a rectangle that marks where the zipper will attach to the pocket piece. A simple guideline is to draw a rectangle one inch tall and place it about one and a half inches from the top of the pocket piece. This drawing translates into a practical guide during sewing, allowing you to place the zipper precisely where you intend to create a concealed or decorative entry. Such attention to the smaller details helps ensure that the pocket and the zipper feel like intentional parts of the same structure rather than an afterthought. It also gives you a visual cue during cutting and stitching that prevents misalignment, which can lead to a bag that looks uneven or has a zipper that sits too high or too low relative to the pocket line.
With the placement marked, the next step is to cut or trim the zipper tape to the necessary length. This is not a step to be rushed, because a zipper that is too long or too short will complicate the subsequent installation. You want a length that matches the opening snugly, leaving a precise amount of extra fabric for seam allowances without introducing slack that could make the zipper sit unevenly. Carefully measure the distance between the two marked points along the top edge and cut the zipper tape accordingly. If you are unsure, err on the side of a slightly longer zipper and manage the excess with a topstitch or by tucking the extra length into the seam, rather than forcing a zipper that is too short. A precise length ensures that the zipper teeth meet smoothly when closed and that the ends align with the bag’s edges, creating a clean, uninterrupted line when the zipper is fastened.
Before you begin the actual attachment, take a moment to prepare the seam allowances around the top edge. Pressing the seam allowance flat with a hot iron creates a crisp edge that makes alignment easier and increases the accuracy of the subsequent stitches. A flat seam edge is not merely cosmetic; it helps prevent the zipper from catching on misaligned threads or fabric. If your fabric is prone to fraying, consider reinforcing the top edge with interfacing or fusible webbing. A light layer of interfacing adds stability where the zipper will live, and it helps resist stretching that could otherwise cause the zipper to misalign as you begin to use the bag. The objective is to create a stable plane along the opening, so your zipper can lay in place with minimal resistance and maximum durability.
As you map the top edge and prepare the zipper for installation, imagine how the parts will come together during the sewing phase. You want to anticipate how the zipper will sit when closed, how the teeth will align, and how the fabric will behave under tension as you test the smoothness of operation. This reflection is not a distraction but a practical rehearsal that informs your decisions about how much pressing, how much stabilizing, and how much extra length to permit for the zipper ends. If you find any misalignment in your marks, adjust early. It is easier to re-mark and re-press than to correct a misaligned zipper after several passes with the machine. The goal is to create a starting point that feels almost inevitable once you begin the actual stitching, a moment where the zipper slides along the top edge without snagging, pulling, or wavering.
A practical note on reinforcement can help in real-world sewing rooms. If you do not have interfacing handy, you can reinforce the top edge by applying a strip of fusible webbing along the opening before you lay the zipper. This extra layer helps control fraying and provides a stable surface for stitching. The choice between interfacing and fusible webbing depends on your fabric and your machine’s capabilities, but either option contributes significantly to the durability of the finished product. You should also consider thread choice—using a robust thread that matches or closely complements the bag fabric reduces visible wear at the seam line and enhances the seam’s longevity. As you prepare, remember that the sewing process is not a test of speed but a test of accuracy. The more deliberate you are in marking, cutting, and pressing, the less you will struggle with the actual attachment later.
The preparation phase naturally leads into the actual attachment of the zipper, which is the next chapter in this journey. Yet this phase is essential because it determines whether you will encounter puckering, misalignment, or a zipper that feels loose in the opening. The careful marking of placement, the thoughtful selection of materials, and the clean, pressed edges collectively create a stable platform for the zipper to perform. It is the difference between a tote that merely carries items and a tote that carries those items with security and elegance. As you continue, let the preparation work you have done become the backbone of a seamless installation, a point at which technique meets thoughtful design.
For readers seeking inspiration on design options and real-world examples, consider exploring tote designs that feature zipper elements. A curated collection of totes with zippers offers a spectrum of styles, from minimalist to richly detailed, and can spark ideas for your own project. You can explore relevant designs by visiting the linked collection that highlights tote bags with zippers, which presents a range of configurations and finishes that may inform your choice of zipper type, length, and placement. This resource complements the practical steps outlined here and helps you visualize how your prepared bag will behave once the zipper is sewn into place. tote bags with zippers.
Finally, a quick note on learning and verification. If you are a visual learner, watching a short, well-structured video tutorial can reinforce the steps described here. A concise demonstration of the zipper installation process, including how to line up the top edge, how to measure the opening, and how to press the seam allowances for a crisp finish, can be especially helpful. When you examine a video, look for clear views of the top edge preparation, the exact placement marks, and the way fabric reacts to pressing. A practical tip is to pause at each stage to check your own fabric against the demonstration, ensuring that your tote’s dimensions align with the instructions. By combining careful marking, stable edges, and a considered approach to zipper length and reinforcement, you set yourself up for a successful install that will endure daily use.
As you move toward the actual sewing, you will carry forward the sense of readiness cultivated during preparation. The moments of marking and pressing are not distractions; they are the technical foundation that will help your machine glide with confidence and your fabric resist distortion. When you finally attach the zipper, you will do so on a surface that has already been aligned and stabilized. That confidence translates into cleaner stitches, better alignment of zipper teeth, and a seam line that sits flat against the opening. The payoff is a tote that not only looks polished but also performs reliably when you need it most. And if you ever feel unsure, remember that you can return to these preparation steps, re-check the marks, and re-press the seam allowances before continuing. The calm, methodical approach you cultivate now will pay dividends the moment you start sewing and every time you zip and unzip the finished bag.
External resource for visual guidance can be helpful when you want to see a quick, practical reference. A short tutorial provides a step by step look at securing the zipper ends and ensuring the slider remains on track, which complements the preparation steps outlined here. Accessing that guidance can help you verify the end points of the zipper line and how a well-prepared edge behaves during the initial stitching. The objective remains to keep the workflow streamlined, precise, and forgiving so that your final installation feels sturdy rather than rushed.
From an Open Tote to a Secure Carryall: A Thorough, Seamless Zipper Upgrade for Your Tote Bag
Upgrading a tote bag with a zipper is more than a simple alteration; it transforms the way you carry, secure, and access your belongings. A zipper adds a level of protection against rain, dust, and casual rummaging, while also helping you keep contents organized during daily life, commutes, or weekend getaways. The idea may feel daunting if you picture a bag that must be torn apart to incorporate a zipper, but with careful preparation and a patient, methodical approach, the result is a clean, sturdy finish that respects the bag’s original shape and purpose. The following narrative weaves together reliable techniques into one cohesive process, offering a flow that begins with choosing the right zipper and ends with a smoothly operating closure that stands up to real-world use. Along the way, you will discover practical refinements and subtle considerations that separate a rushed alteration from a durable upgrade.
Begin with the understanding that the choice of zipper sets the tone for the entire project. A heavy-duty zipper, whether metal or a robust nylon coil, is a wise anchor when you are adding a zipper to a tote bag built from canvas, sturdy cottons, or similarly thick fabrics. The goal is to match the zipper’s thickness and the bag’s fabric weight. In most tote projects, a 7–10 inch zipper offers a balanced proportion for the top opening, ensuring the zipper teeth meet neatly when closed and do not overwhelm the bag’s silhouette. If the bag is particularly slim or if the top opening is narrow, a shorter length may be perfectly adequate. Conversely, a very large tote or one crafted from a particularly stiff fabric might benefit from a slightly longer zipper. In any case, the objective is to avoid a zipper that looks minuscule against a broad opening or one that crowds the fabric and restricts movement. A thoughtful selection reduces the risk of puckering and strain on the seam when the bag is full.
With the zipper chosen, shift to careful preparation. Lay the tote flat on a clean, stable surface. You want an unobstructed workspace where top edges can be measured and marked with precision. Marking helps ensure symmetry and balance along the opening. If you are upgrading an existing open-top tote, reinforce the area around the opening. A layer of interfacing or fusible webbing on the bag’s top edge provides a sturdier foundation for stitching. This reinforcement is especially valuable if the bag’s fabric has started to soften or wrinkle with use. While the mechanical steps of sewing are straightforward, these preparatory touches can keep the seam from sagging or distorting after repeated use.
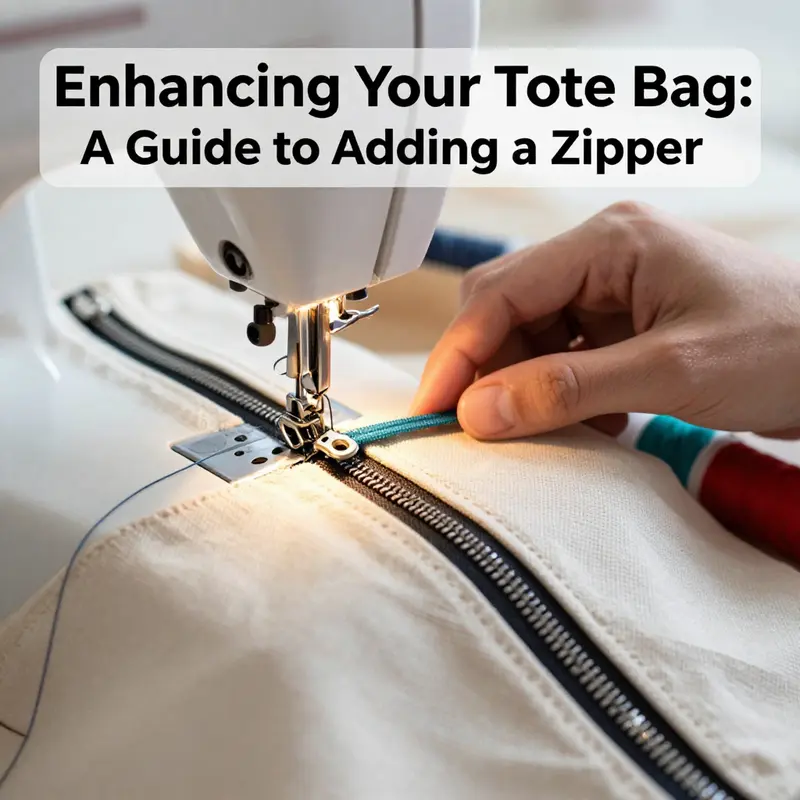
Having prepared the materials and the bag, you move into the core act of attaching the zipper. A modern sewing machine with a universal needle—size 80/12 or 90/14 depending on fabric thickness—will rivet the process with clean, even stitches. The technique described here follows a method in which the zipper is attached to both sides of the bag opening, creating a continuous, lined seam that preserves the bag’s interior and exterior finishes. Start by pinning one side of the zipper tape to the bag’s top edge, right sides together. The alignment should be precise, with the zipper’s teeth centered to meet smoothly when closed. Sew along the edge of the zipper tape with a straight stitch, making sure to backstitch at both ends for strength. After finishing the first side, repeat the same operation on the opposite edge, again aligning the zipper teeth so they meet cleanly when the zipper is closed. This approach provides a robust anchor for the zipper and helps ensure that both sides of the bag lie flat once the zipper is in place.
A key detail emerges here: securing the ends of the zipper to prevent slippage and maintain function. Attach zipper stoppers at each end of the zipper pull. These small clips keep the slider from sliding off and help preserve the zipper’s life by preventing excess movement that could detach teeth from the tape. If you want a more durable finish, you can reinforce the ends by hand-stitching through the fabric and zipper tape as an extra layer of security. The practical value of this step becomes evident after repeated use, when a well-fastened end makes the difference between a bag that opens reliably and one that catches on fabric or fabric weights.
Before you proceed to finalize the assembly, take a moment to test the operation. Open and close the zipper several times, watching for smooth movement and listening for any catching or binding. If you notice puckering along the seam lines or if the zipper processes unevenly, stop and adjust. A tiny adjustment—pinning more securely, re-sewing with a slightly smaller stitch length, or aligning the teeth more precisely—can correct a fault that would otherwise become stubborn over time. When the zipper behaves nicely, press the seam flat to settle the fabric and zipper into an aligned plane. This is not a cosmetic nicety; a flat seam reduces bulk at the top edge and helps the zipper glide with less resistance in daily use.
What if the bag’s construction favors a slightly different route? The chapter’s perspective remains flexible: the same intent—security, accessibility, and clean aesthetics—can be achieved via an alternative approach that some crafters prefer. For example, some designers attach the zipper to the lining and outer fabric separately, then join the two pieces with the zippers aligned along the top edge. This method creates a double-layered, reinforced top where the zipper becomes a controlled interface between the inner lining and the outer fabric, rather than a single seam running the entire top edge. The result is a tote that closes securely while maintaining a crisp, structured opening that stands up to daily challenges. In either approach, the essential ideas hold: align carefully, sew with a steady pace, and verify operation through repeated testing.
There is a natural moment of transition from the mechanical act of sewing to the tactile experience of handling the upgraded bag. After connecting the zipper to both the lining and the outer fabric, the two halves—the lining and the exterior—are placed right sides together, with the wrong sides facing. Pin the entire perimeter around the opening, ensuring the zippers are perfectly aligned and that the two fabric layers meet evenly. This stage emphasizes a balanced circular seam that forms the outer shell and the inner lining as a single, cohesive unit. The standard seam allowance—typically around a quarter of an inch—provides enough room to accommodate the zipper’s bulk without inviting sagging or misalignment. Sew around the entire perimeter, but leave a controlled turning opening. The size of that opening is a practical choice, often around four to six inches, which allows you to turn the bag right side out after stitching. This opening becomes the passage through which the bag’s interior is revealed and the final finish is applied.
Turning the project right side out is a moment of reveal and refinement. Clip the seam allowances at the corners to reduce bulk and help the bag meet sharp, crisp point geometry when turned. Use a blunt tool, such as a chopstick, to gently push the corners to a neat point and coax the bag into its intended shape. Once the bag is fully turned, press it flat with a hot iron, making sure to avoid scorching the fabric or distorting the zipper. The press isn’t just about aesthetics; it helps the seams set and the zipper lie flush against the top edge, preventing burrs or fabric from curling inward when the bag is opened or closed. The final step is to close the turning opening. Hand-stitch this seam with a ladder stitch or a blind hem stitch to render the seam nearly invisible from the outside. When this last stitch is complete, attach the zipper pull to test the function again. You want the feel of a well-tuned mechanism, where the slider moves smoothly and the teeth engage evenly along the entire length.
As you consider finishing touches, remember that the goal is not merely to add a zipper but to preserve the bag’s character and durability. Use high-quality thread, and be mindful of the bag’s capacity. A zipper should not become a bottleneck if the bag is repeatedly filled beyond its intended use. Some subtle adjustments can extend the life of the modification: avoid overloading the bag, choose a zipper length that aligns with the bag’s opening without creating tension, and consider reinforcing the top edge with a lightweight interfacing if you sense any tendency toward sagging after long-term use. The interconnectedness of these choices becomes clear when you imagine the bag being carried through a busy day: the zipper needs to perform reliably, the fabric must hold its shape, and the seams should resist everyday stress.
For readers who prefer a guided, visual path, there are accessible tutorials that illustrate the process with close-up demonstrations and practical tips. If you are seeking a visually oriented walkthrough to supplement these steps, a detailed video tutorial captures the flow from prep to final test. The resource emphasizes a similar sequence—preparing materials, attaching the zipper to both lining and exterior, joining the pieces, and finishing with turning and closing—in a format that reinforces the tactile sense of the operation. While videos are helpful for visual learners, this written guide aims to distill the essential decisions and common pitfalls into a coherent narrative you can follow at your own pace. If you want to explore more completing options or kit-based approaches, you can browse the collection labeled in the tag today as tote-bags-with-zippers.
As you reflect on the upgrade’s impact, you can sense that a zipper is not merely a functional detail but a design decision that respects the bag’s original spirit while elevating its practicality. The right zipper harmonizes with the fabric’s texture, the bag’s silhouette, and the daily routines of its future owner. With the seam allowances settled, the zippers aligned, and the turning opening stitched closed, the tote emerges as a more confident, organized carrier that can accompany you to work, the market, or a weekend excursion. The modification remains practical and accessible, designed for makers at various skill levels. The gentle rhythm of the sewing machine becomes a quiet testament to thoughtful craft, a reminder that small, well-executed improvements can extend a bag’s life and usefulness for years to come.
Pro Tip: If you’re not confident sewing by hand or machine, or if you’re working with delicate fabrics or heavier canvas that feels unwieldy, consider pre-made zipper inserts or DIY kits specially designed for tote bags. These kits often provide a zipper with a ready-to-sew backing, a positioned top edge, and clearer instructions that reduce the margin for error. They can be a practical alternative if you’re seeking a more predictable outcome without compromising on the bag’s aesthetic.
External resource to deepen the learning experience: For a detailed, visual walkthrough of the process, you can consult a comprehensive video guide that demonstrates the technique in real time. How to Install a Zipper on a Tote Bag.
If you’re looking for ongoing inspiration and related ideas, several related posts and collections offer deeper dives into tote construction and customization. For instance, exploring a selection of styles that balance practicality with design can help you anticipate how a zipper upgrade might alter the bag’s look and function in the long run. And for readers who enjoy expanding beyond one project, there are wide-ranging tutorials that address zippers in other fabrics and contexts, offering transferable skills you can apply to a diverse set of sewing projects. For those who want to connect their upgrade with broader bag choices, you can browse related content that showcases how different tote configurations benefit from sturdy closures and thoughtful detailing. If you want to explore further, consider visiting the collection labeled tote-bags-with-zippers to see how other makers have integrated this feature into a variety of tote shapes and materials.
In summary, attaching a zipper to a tote bag is not an isolated trick but a thoughtful enhancement that blends security, organization, and longevity. The approach described here centers on careful preparation, precise alignment, and reinforcing the top edge to support repeated use. The process, though detailed, yields a result that feels deliberate and durable. Whether you operate in a busy urban environment, or you simply want a reliable everyday bag, a well-executed zipper upgrade can transform an ordinary tote into a daily companion you trust to carry your essentials with calm, secure ease.
The Smooth Zip: Testing, Troubleshooting, and Tuning Your Tote Bag’s New Zipper
When you decide to add a zipper to a tote bag, the real work begins after the stitch is set and the zipper tape tucked into place. The zipper is not merely a fastener; it is a small, precise mechanism that governs security, access, and everyday usability. The final flourish—testing and fine-tuning—ensures that the modification delivers consistent results over time. A thoughtful approach to testing makes the difference between a bag that feels solid for a week and a tote that remains reliable for months of daily use. The aim is simple: a zipper that glides smoothly, seats evenly, and holds its integrity under routine load. This is the moment to treat your project with the same care you gave during the installation. The challenge lies in moving from a correctly installed zipper to a reliably performing one, and that transition rests on careful, repeated testing and a few prudent adjustments.
Begin with a basic functional test. Before you scrutinize alignment or tackle any tricky repairs, walk the zipper through its paces. Open and close it, not once but in a quiet, deliberate cycle—ten, then twenty times if you want to be thorough. The goal is to confirm that the slider moves with minimal resistance and that there is no catching, sticking, or unusual resistance along the path. If the bag feels stiff at the start, it can be a sign of fabric tension near the ends of the seam, not a fatal flaw in the zipper itself. Gently work the fabric away from the track as you ride the slider to avoid introducing new tension that could bias future results. A quiet glide is a good sign; a stubborn snag is a hint to slow down and investigate further. This initial test sets the tone for what comes next and helps you recognize subtle clues that might otherwise be overlooked in a rushed, after-the-fact inspection.
Next, inspect the alignment along the entire length of the zipper. A properly aligned zipper should show interlocked teeth from end to end when it is closed, with the teeth meshing evenly and without gaps or skew. A misalignment can appear as a slight tilt of the tape, skewed teeth, or a small gap that seems to widen at one side of the track. If you notice such irregularities, don’t force the slider. Instead, slow the closure and guide the teeth together with your fingers, taking care to keep the fabric flat and the tape straight. Even a barely perceptible misalignment can become a stubborn snag in daily use, especially when the bag is carried or loaded. In some cases, small fabric shifts during the sewing process can create tension that travels to the zipper seam. A careful recheck with the zip closed, then reopened, can reveal whether the problem is tension or teeth that actually need a minor realignment.
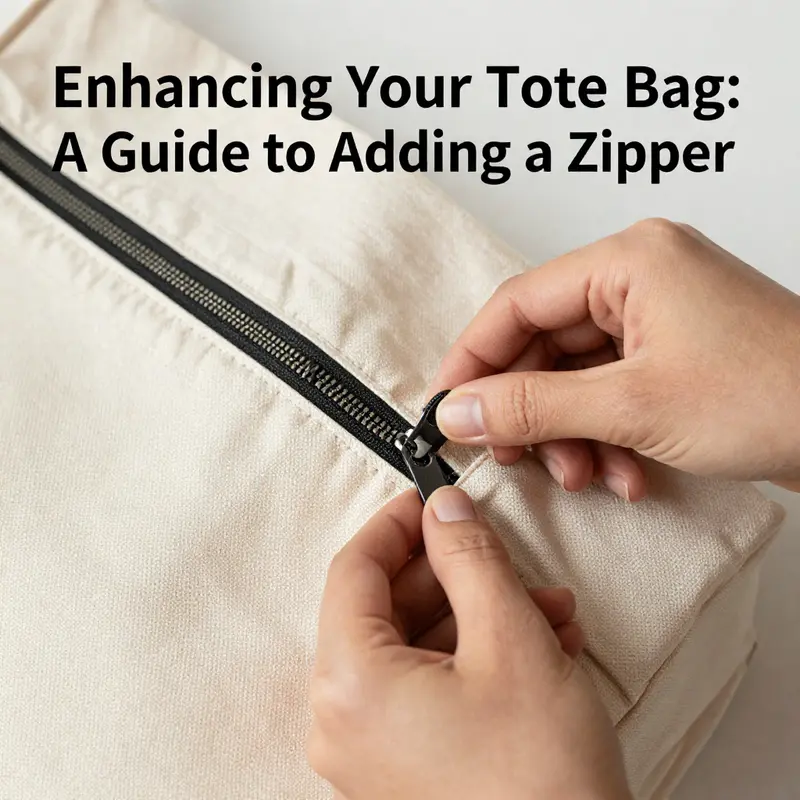
The pull tab itself deserves attention. A smoothly operating pull tab should move freely along the track, with no wobble or looseness that would indicate a detached head or a worn mounting. If the head wiggles, or if the tab sits high or low relative to the surrounding fabric, that can signal a loose attachment or an end-stop issue. A common, reversible fix is to gently tighten the metal loop or securing point with careful pressure, using small pliers if necessary. If the pull tab is cracked or missing, it may be time to replace it with a new one. Replacement should be straightforward—remove the old tab with a small tool and fit a new head that matches the width of the zipper chain. In both cases, test the result by cycling the zipper again to ensure the new tab tracks cleanly and remains securely attached through repeated use.
Lubrication and clean maintenance play a quiet but pivotal role in the long-term behavior of a newly installed zipper. A zipper’s track collects dust, lint, and tiny fabric fibers that can slow the slider. Clean the track with a soft cloth or a gentle cotton swab to remove debris from the inside edges of the channel. If dust proves stubborn, a light, gentle wash with soapy water can help, followed by thorough drying to prevent moisture from weakening the fabric or encouraging rust on metal components. After cleaning, apply a lubricant designed for fabric zippers or a light wax. The idea is to coat the teeth lightly on both sides of the track so the slider can glide with ease in future cycles. It is not necessary to saturate the mechanism; a thin film is enough to lower friction and reduce resistance during routine use. Re-test by cycling the zipper several times to confirm that the lubricant has settled into place and that the glide remains smooth. Maintaining a clean, lightly lubricated track pays dividends in daily performance and helps extend the life of the installation.
As you observe performance, consider the interactions between the zipper and the surrounding fabric. Zippers do not exist in isolation; they are part of a fabric system that includes seam allowances, reinforcement, and the bag’s opening geometry. If the bag is frequently opened wide to retrieve larger items, the fabric edges at the ends of the zipper can stretch and put stress on the teeth. If the opening is too tight or the fabric is gathered at the seam, the zipper may feel resistant or even bind. In such cases, a subtle adjustment to the fabric near the ends can relieve pressure. Loosening a stitch line, redistributing a small amount of fabric, or reinforcing with a light touch of interfacing can provide the necessary slack without compromising the bag’s clean lines. These adjustments should be minimal and measured, performed with the zipper open to avoid pinching the teeth during the process. The goal is to maintain an even seam line and consistent tension near the zipper; a balanced setup reduces the chance that the teeth will misbehave as you open and close the bag across a typical daily routine.
Preventive maintenance emerges as a companion practice to testing. Clean the zipper periodically with a damp cloth to keep dust and fibers at bay. Store the bag with the zipper left slightly open to relieve tension that accumulates during long periods of storage or heavy use. Avoid overstuffing the bag, especially in the area around the zipper, as excessive weight can push against the teeth and endstops, encouraging misalignment or fatigue. A light, regular application of lubricant every few months—more often if the bag is used daily in dusty environments—helps maintain a consistent glide and reduces the chance of resistance developing over time. If you approach maintenance as part of the regular care routine, your tote bag becomes a more reliable companion and your initial install a lasting upgrade rather than a temporary improvement.
In the event testing reveals a more persistent issue, it is prudent to isolate the cause before breathing new life into the mechanics. A zipper that continues to misbehave after cleaning and adjustment may require more substantial intervention. If the chain is visibly damaged, if teeth are missing, or if the pull tab has sustained irreparable wear, replacement of the entire zipper becomes the most prudent course. A skilled tailor or repair technician can perform this task efficiently, replacing the zipper with one that matches the bag’s fabric and opening width. This is not a failure of your effort but a natural part of the lifecycle of a well-used piece of equipment. The goal remains clear: ensure the modified tote maintains its security, balance, and aesthetic appeal while standing up to daily wear. It is also worth noting that, for broader inspiration, many crafters explore zipper inserts or pre-made solutions designed to fit tote openings, which can simplify future updates or repairs. If you wish to see how zipper-equipped totes are commonly discussed and showcased in real-world contexts, you can explore resources focusing on tote bags with zippers. For broader design considerations, you might also peruse related examples that show how different tote styles integrate hardware and closures in a way that preserves both form and function.
Throughout this process, a steady, patient approach pays dividends. The instinct to rush—especially when a bag must be ready for a trip or a workday—can lead to hurried missteps that show up later as misalignment or stiffness. Step back, test, and re-test. The moment you observe a smooth glide, even seam tension, and a secure end-stop, you know you’ve achieved a durable result. This isn’t merely about making a zipper work once; it’s about cultivating a reliable mechanism that stands up to daily use and the occasional overload that life can deliver. The outcome is more than a functional closure. It is a quiet confidence that the tote will keep its contents secure and accessible when you need them, without demanding constant care or frequent repair. As you proceed, remember that the journey from installation to dependable performance is iterative by design, reflecting the broader craft of making things last.
If you want to see practical examples of how others approach this issue and to gain a sense of the varied design strategies in play, consider a broader guide on tote bag designs that incorporate zippers. It can provide useful context about how different bags handle the opening geometry and how a zipper integrates with the bag’s overall silhouette. See the discussion about tote bag designs with zippers for more ideas and inspiration. This internal reference can complement the hands-on testing you perform on your own project and help you anticipate how minor changes in fabric type or seam allowances might influence glide and alignment over time.
Finally, when the testing phase yields a result you’re happy with, document what you did and what you observed. A short note about end-stops, glide feel, and any minor fabric adjustments can be a valuable reference for future repairs or upgrades. Shooting for a consistent testing routine—open, close, inspect, lubricate, and re-test—will help you maintain the performance you’ve achieved and prepare you to handle any future modifications with confidence.
Internal resource note: for readers exploring practical, real-world guidance on zipper integration across tote styles, you can explore broader discussions about tote bags with zippers as a reference point. This can help you compare how different construction choices influence zipper behavior and long-term durability. See the guide on tote bags with zippers for a concise overview of how zipper hardware interacts with various tote fabrics and openings. This internal link provides a broader perspective without distracting from the hands-on focus of testing and tuning your own project.
External reference: for a practical, user-focused overview of common zipper issues and quick fixes, consult a general repair guide that covers steps to fix a sticky zipper and related concerns. Such resources can offer additional tips on how to approach subtle issues you might encounter during maintenance, ensuring you have a well-rounded toolkit for keeping your tote’s zipper performing smoothly over time.
Final thoughts
Incorporating zippers into your tote bag design can significantly elevate the product’s usability and aesthetic appeal. By following the described steps—from selecting the right zipper to testing its functionality—you can ensure that your tote bags not only meet customer expectations but also stand out in a competitive market. Investing time in perfecting this feature will likely lead to increased customer satisfaction and loyalty. As your business evolves, consider this enhancement as part of your quality assurance process to continually offer superior products.